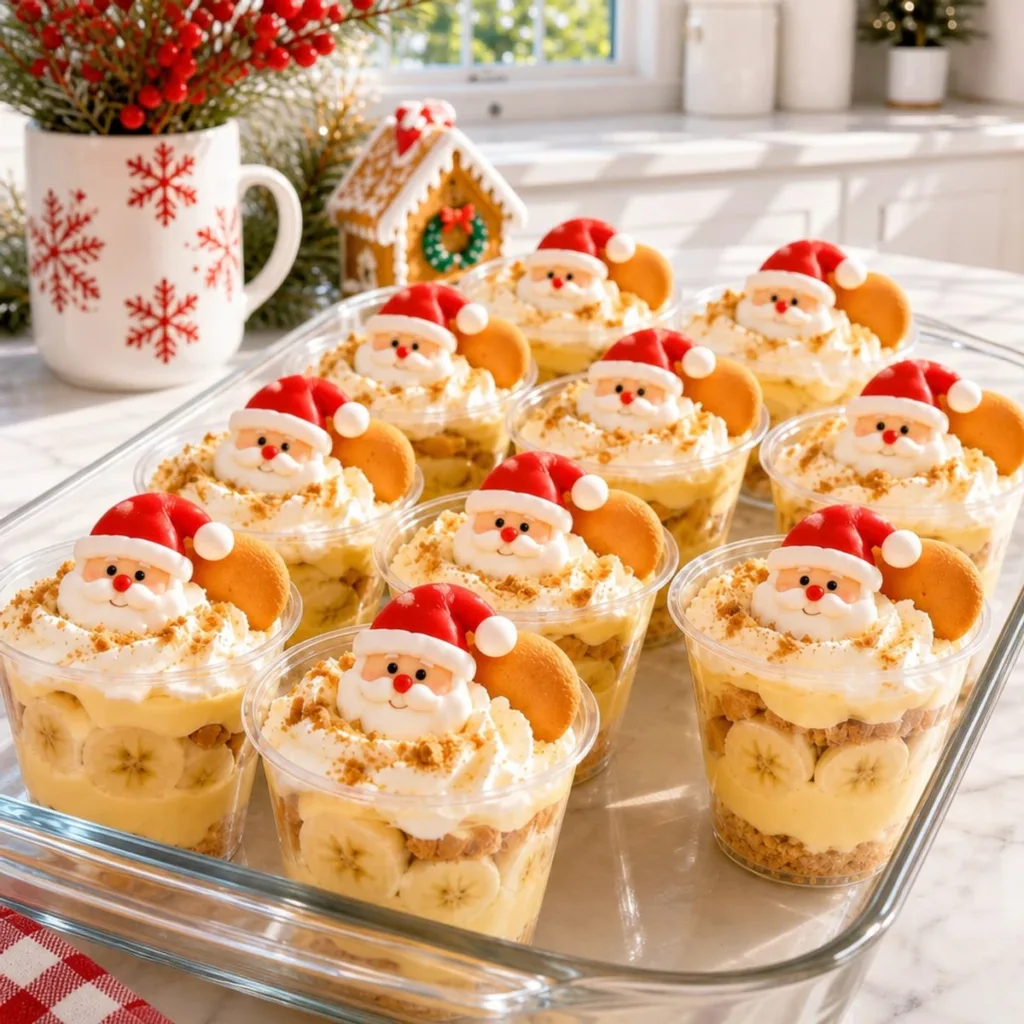
As the holidays approach, our kitchen transforms into a warm, inviting space filled with laughter and the delightful scent of sweet treats. This year, I’m excited to share my Santa Banana Pudding Cups—a festive twist on a classic dessert that’s sure to become a family favorite. With layers of creamy vanilla pudding, ripe banana slices, and crunchy vanilla wafers, these cups are not only a visual delight but also a crowd-pleaser that can be whipped up in under 30 minutes. They’re perfect for holiday gatherings, offering a fun and whimsical touch that will charm guests of all ages. Plus, you can prepare them ahead of time, allowing you to spend more time enjoying the festivities with loved ones. Let’s dive into creating these cheerful cups that bring a touch of holiday magic to the table!
Ingredient breakdown
Understanding the ingredients in your Santa Banana Pudding Cups is key to crafting this delightful dessert. Each component plays a crucial role in creating that creamy, dreamy layer of goodness with a festive flair. Let’s break down what you'll need:
For the Pudding Base
- Instant vanilla pudding mix – This forms the foundation of our dessert, offering a quick and easy way to achieve a creamy texture.
- Cold whole milk – A key ingredient that combines with the pudding mix for a rich flavor; feel free to substitute with almond or oat milk for a dairy-free option.
- Sweetened condensed milk – This adds extra sweetness and creaminess, making the pudding decadently smooth. If you're looking for a lighter alternative, try using evaporated milk mixed with a bit of sugar.
- Vanilla extract – A splash of pure vanilla enhances the overall flavor profile, elevating your Santa Banana Pudding Cups to new heights.
For the Whipped Cream
- Heavy whipping cream – This ensures a luscious, fluffy topping; you can replace it with coconut cream for a non-dairy version.
- Powdered sugar – Just a touch sweetens the whipped cream without being overpowering, contributing to the lightness of the overall dessert.
For the Layering
- Ripe but firm bananas – Sliced for that fresh sweetness, they provide a delightful contrast to the creamy pudding. Choose firm bananas for the best texture, as overripe ones may become mushy.
- Crushed vanilla wafer cookies – These crunchy bits create layers of texture; for a fun twist, consider using chocolate wafers or graham crackers.
- Whole vanilla wafer cookies – A charming decoration that adds to the visual appeal—these will stand upright in your cups for that festive look.
For the Festive Touch
- Edible Santa face decorations – These little delights bring cheer and whimsy, making your dessert a holiday highlight. If you can’t find them, consider using mini marshmallows or chocolate stars instead.
- Extra crushed vanilla wafers – Sprinkle these on top of the whipped cream for added crunch; they tie in beautifully with the layered theme.
Now that you have the scoop on the ingredients, it’s time to gather everything and create your Santa Banana Pudding Cups — a delightful, festive treat that will surely bring smiles this holiday season!
Step-by-Step Instructions for Santa Banana Pudding Cups
Step 1: Prepare the Pudding Mixture
In a large mixing bowl, add the two packages of instant vanilla pudding mix. Pour in three cups of cold whole milk, and whisk vigorously for about 2 minutes until the mixture is smooth and has thickened. The pudding should have a creamy consistency that holds its shape slightly.
Step 2: Combine the Creamy Ingredients
Next, add one can of sweetened condensed milk and one teaspoon of vanilla extract to the pudding mixture. Whisk these ingredients together until they are completely combined and creamy, ensuring no lumps remain. The mixture will be rich and sweet, perfect for your Santa Banana Pudding Cups.
Step 3: Chill the Pudding Base
Cover the bowl with plastic wrap and refrigerate the pudding mixture for about 10 minutes. This chilling process will help the pudding set properly, allowing for better layering in your dessert cups. You'll notice it becomes even thicker as it cools.
Step 4: Whip the Cream
While the pudding chills, pour two cups of cold heavy whipping cream into a separate chilled mixing bowl. Add three tablespoons of powdered sugar and use an electric mixer to beat the cream on medium-high speed until stiff peaks form, which should take about 3-5 minutes. The whipped cream should look fluffy and hold its shape.
Step 5: Fold the Whipped Cream
Once your whipped cream is ready, set aside one cup for decorating. Gently fold the remaining whipped cream into the chilled pudding mixture using a spatula. The goal is to maintain the light, airy texture of the whipped cream while fully incorporating it into the pudding for those deliciously fluffy Santa Banana Pudding Cups.
Step 6: Slice the Bananas
Peel and slice four ripe but firm bananas into even rounds. Aim for slices about a quarter-inch thick to ensure they layer well and maintain their shape. Fresh banana slices will add a delightful contrast to the creamy pudding layers.
Step 7: First Layer in the Cups
Arrange 12 clear dessert cups in a large rectangular glass baking dish for stability. Start by adding two tablespoons of crushed vanilla wafer cookies to the bottom of each cup. These will provide a crunchy base that complements the creamy layers above.
Step 8: Add the Pudding and Bananas
Spoon a generous layer of the creamy vanilla pudding over the cookie crumbs, filling each cup about one-third full. Next, arrange several banana slices around the inside walls of each cup. This creates a beautiful visual effect and infuses each bite with fresh banana flavor.
Step 9: Layer Again
Sprinkle another layer of crushed vanilla wafers on top of the banana slices. Then, spoon more vanilla pudding over the wafers to fill up each cup nearly to the top. Make sure to leave some space for the whipped cream layer later on; the cups should be artfully layered.
Step 10: Finish with Whipped Cream
Top each cup with a generous swirl of the reserved whipped cream, making sure it's beautifully fluffy on top. This will be the crowning touch for your Santa Banana Pudding Cups, giving them that festive, creamy finish.
Step 11: Garnish and Add Decorations
Sprinkle some extra crushed vanilla wafers over the whipped cream for added crunch. Place a whole vanilla wafer upright in each cup, then add an edible Santa face decoration on top, making each cup look festive and inviting.
Step 12: Chill and Serve
Carefully cover the dessert cups without disturbing the toppings and refrigerate for at least 2 hours until chilled and set. Once ready, serve the Santa Banana Pudding Cups chilled for that perfect creamy texture, and keep in mind they taste best when enjoyed within 24 hours!
Make-ahead notes
These Santa Banana Pudding Cups are a fantastic option for busy home cooks looking to save time during the holiday rush! You can prepare the creamy vanilla pudding base up to 24 hours in advance, simply refrigerate it after whisking in the sweetened condensed milk and vanilla extract. Slice the bananas no more than 2 hours before serving to prevent browning, and store them in an airtight container with a touch of lemon juice for freshness. Assemble the cups and garnish with whipped cream and festive decorations just before presentation to keep everything looking perfect. This way, your Santa Banana Pudding Cups will be just as delightful as if they were made fresh!
Practical tips
- Banana Selection: Choose ripe but firm bananas for your Santa Banana Pudding Cups; overripe bananas can turn mushy, affecting texture and taste.
- Layering Technique: Layer gently to maintain the distinct flavors and textures of pudding, wafers, and bananas. Avoid over-mixing when folding in whipped cream.
- Chill Time: Allow sufficient chilling time to let the pudding set properly; follow the 2-hour refrigeration to ensure optimal creaminess.
- Whipped Cream Peaks: Ensure the heavy whipping cream forms stiff peaks for a fluffy topping—over-beating can lead to a butter-like consistency.
- Decorating Fun: Get creative with the edible Santa face decorations; you can personalize each cup for a fun and festive presentation!
These practical tips will help you craft perfect Santa Banana Pudding Cups that are sure to impress your holiday guests!
Storing and reheating
Fridge: Store covered Santa Banana Pudding Cups in the refrigerator for up to 24 hours to maintain the freshness of the bananas and creamy texture.
Freezer: While these cups are best enjoyed fresh, you can freeze them for up to 1 month. However, be aware that bananas may become mushy upon thawing.
Reheating: If you've frozen the cups, thaw in the fridge overnight before serving. Avoid microwaving as it may alter the texture of the pudding and whipped cream.
Serving Tip: For the best flavor and texture, always serve the Santa Banana Pudding Cups chilled. Enjoy each delightful layer!
Variations and Swaps
Feel free to customize your Santa Banana Pudding Cups—let your creativity shine through these delightful twists!
Dairy-Free: Substitute the heavy whipping cream with coconut cream for a lush, dairy-free topping that retains all the flavor.
Chocolate Twist: Replace some vanilla wafers with crushed chocolate cookies for a rich, chocolatey layer that will make chocolate lovers swoon. This variation will bring a whole new flavor profile to your holiday treat!
Nutty Goodness: Add a sprinkle of chopped nuts, like pecans or walnuts, between the layers for an extra crunch and a warm, nutty flavor. Trust me, the added texture elevates each bite!
Fruit Fusion: Mix in other fruits like strawberries or raspberries between the banana layers for added color and freshness. Your guests will love the surprise bursts of flavor!
Caramel Drizzle: Drizzle caramel sauce in the layers for an indulgent sweetness that complements the creamy pudding and bananas beautifully. It’s a wonderful way to elevate your cups with a touch of decadence!
Flavored Extracts: Swap the vanilla extract for almond or maple extract to give your pudding a unique twist. Each flavor brings a new depth, making it a delightful surprise!
Spiced Variation: Dust a bit of cinnamon or nutmeg over the layers for a warm, spicy kick that brings the festive spirit to life. It complements the bananas perfectly and adds a lovely aroma!
Reduced Sugar: Use sugar-free pudding mix and sweeteners to create a lighter version without sacrificing flavor—perfect for health-conscious guests.
Let these variations inspire you to craft your own unique take on Santa Banana Pudding Cups, adding personal touches that your guests will adore! For more delightful pairings, consider serving it alongside some cozy spiced apple cider or delicious gingerbread cookies. Enjoy the holiday magic!
Santa Banana Pudding Cups Recipe FAQs
How do I select ripe bananas for the recipe?
Absolutely! Look for bananas that are ripe but still firm; they should have a slight yellow color without any dark spots. Overripe bananas can become mushy, which isn’t ideal for layering in your Santa Banana Pudding Cups.
What is the best way to store the Santa Banana Pudding Cups?
Very! Keep the cups covered and refrigerated. They are best enjoyed within 24 hours to maintain the freshness of the bananas and the creamy texture of the pudding. If you're preparing them in advance, store them straight in the refrigerator until serving.
Can I freeze the Santa Banana Pudding Cups?
Yes, you can freeze them! However, keep in mind that while they can safely be frozen for up to 1 month, the bananas may turn mushy once thawed. If you want to try freezing, I recommend not assembling the banana layers until you’re ready to serve after thawing. First, freeze the dessert without bananas, then layer in the fresh bananas after thawing.
What should I do if my whipped cream isn't forming stiff peaks?
Great question! Ensure your mixing bowl and beaters are cold—this helps the cream whip better. If whipped cream isn't thickening, continue to beat at medium-high speed for another minute or two. Just be cautious not to over-whip, as this can turn it into butter!
How can I adjust the recipe for dietary restrictions?
Absolutely! If you need a dairy-free option, use almond milk or coconut cream in place of whole milk and heavy whipping cream. For a gluten-free version, ensure the vanilla wafers are gluten-free. This way, everyone can enjoy your Santa Banana Pudding Cups!
Are there any special tips for assembling the cups?
Definitely! Layer your ingredients gently to keep the layers distinct. Use a small spoon to avoid mixing the layers. Additionally, reserve some crushed wafers to sprinkle on top for extra crunch, and allow for at least 2 hours of chilling before serving so everything sets beautifully.
These FAQs will help answer your questions as you whip up your delightful Santa Banana Pudding Cups!
Print
Delicious Santa Banana Pudding Cups for Holiday Cheer
- Total Time: 2 hours 15 minutes
- Yield: 12 cups
Description
Enjoy festive Santa Banana Pudding Cups with layers of creamy pudding, bananas, and wafers for a delightful holiday treat.
Ingredients
Pudding Base
- 2 packages Instant vanilla pudding mix
- 3 cups Cold whole milk (can substitute with almond or oat milk)
- 1 can Sweetened condensed milk (can substitute with evaporated milk and sugar)
- 1 teaspoon Vanilla extract
Whipped Cream
- 2 cups Heavy whipping cream (can substitute with coconut cream)
- 3 tablespoons Powdered sugar
Layering
- 4 medium Ripe but firm bananas (sliced)
- 12 tablespoons Crushed vanilla wafer cookies
- 12 whole Vanilla wafer cookies (for decoration)
Festive Touch
- 12 pieces Edible Santa face decorations (or mini marshmallows/chocolate stars)
- extra Crushed vanilla wafers (for topping)
Instructions
Step-by-Step Instructions
- Prepare the Pudding Mixture by whisking instant vanilla pudding mix with cold whole milk until smooth.
- Combine the Creamy Ingredients by adding sweetened condensed milk and vanilla extract, whisking until creamy.
- Chill the Pudding Base for about 10 minutes covered with plastic wrap.
- Whip the Cream by mixing heavy whipping cream and powdered sugar until stiff peaks form.
- Fold the Whipped Cream into the chilled pudding mixture carefully.
- Slice the Bananas into quarter-inch thick rounds.
- First Layer in the Cups by adding crushed vanilla wafers to the bottom of each dessert cup.
- Add the Pudding and Bananas layering pudding and banana slices in each cup.
- Layer Again with more crushed wafers and pudding, leaving space for whipped cream.
- Finish with Whipped Cream by topping each cup with reserved whipped cream.
- Garnish and Add Decorations with extra crushed wafers and Santa face decorations.
- Chill and Serve by refrigerating for at least 2 hours before serving.
Notes
Best enjoyed within 24 hours for optimal freshness. Customize decorations for individual flair.
- Prep Time: 15 minutes
- Category: Dessert
- Cuisine: American