
Every now and then, I find myself yearning for a dessert that feels like a warm hug but doesn’t carry the guilt that often tags along with indulgent sweets. Enter the Japanese Yogurt Cheesecake—a delightful blend of creamy Greek yogurt and smooth cream cheese that brings both lightness and satisfaction to the table. This recipe is perfect for those of us who enjoy creating homemade treats but want something that’s both easy to prepare and impressively elegant. With its airy texture and subtle hints of lemon and vanilla, it's a crowd-pleaser that can transform any ordinary gathering into something special. Plus, it’s freezer-friendly, allowing you to whip up joy in advance. Trust me, this cheesecake will redefine your dessert game, inviting you to savor each fluffy bite while leaving the fast food cravings behind. Dive in and discover just how simple it is to create a slice of heaven in your own kitchen!
Ingredient notes
When whipping up your Japanese Yogurt Cheesecake, each ingredient plays a vital role in creating that fluffy, airy texture and delightful flavor. Below, you'll find insights into the key components, making your preparation even smoother.
For the Creamy Base
• Greek yogurt – The star of the show, providing tang and creaminess; opt for full-fat for optimal texture.
• Cream cheese – Softened cream cheese adds richness; make sure it’s at room temperature for easy blending.
• Whole milk – Choose whole milk for added creaminess; you can substitute with a plant-based milk, though it may alter the final texture.
For the Structure
• Eggs – Separated eggs contribute to both the stability and fluffiness of the cheesecake; ensure they’re at room temperature for better whipping.
• Cake flour – Using cake flour ensures a light and tender crumb; all-purpose flour can be a substitute, though the texture will be slightly denser.
• Cornstarch – Helps stabilize the cheesecake while keeping it light; don’t skip this ingredient for the best results.
For Flavor Enhancement
• Granulated sugar – Balances the tartness of the yogurt, so feel free to adjust to taste if you prefer it sweeter.
• Vanilla extract – A must for a rich flavor profile; opt for pure vanilla extract for maximum impact.
• Fresh lemon juice – Adds brightness and cuts the richness; bottled lemon juice can be used in a pinch, but fresh is best!
For the Final Touches
• Powdered sugar – For a delicate dusting on top; this adds a lovely visual appeal without overpowering the flavor.
• Cream of tartar – Stabilizes the whipped egg whites, which means no deflation—essential for that light texture!
• Kosher salt – Just a pinch enhances all the flavors, so don’t skip it!
With these thoughtful ingredient notes, you’re all set to create a truly spectacular Japanese Yogurt Cheesecake that will make your taste buds dance!
Step-by-Step Instructions for Japanese Yogurt Cheesecake
Step 1: Preheat the Oven
Begin by preheating your oven to 300°F (150°C). This ensures a consistent baking temperature for your Japanese Yogurt Cheesecake. While the oven warms up, gather your baking equipment and prepare a 9 by 13-inch rectangular glass baking dish by lightly greasing it with unsalted butter.
Step 2: Prepare the Baking Dish
Once the dish is greased, line both the bottom and sides with parchment paper, allowing the parchment to extend above the rim. This step is crucial for easy removal and presentation of the cheesecake later. Set the prepared dish aside while you mix the batter.
Step 3: Mix the Cream Cheese and Yogurt
In a large mixing bowl, add the softened cream cheese. Beat it with a hand mixer until completely smooth, about 2-3 minutes. Next, incorporate the 2 cups of plain full-fat Greek yogurt and blend until the mixture is creamy and free of lumps, creating a rich base for your cheesecake.
Step 4: Add the Wet Ingredients
Pour in the melted unsalted butter and whole milk, followed by the vanilla extract and fresh lemon juice. Mix gently until all ingredients are well combined, which should take about another 2 minutes. You'll notice a luscious and smooth texture forming.
Step 5: Separate and Whisk the Eggs
Carefully separate the egg yolks from the egg whites. Add the egg yolks directly into the yogurt mixture and whisk until smooth. The batter should be well-combined and slightly thickened after this step. Place the egg whites in a clean, dry mixing bowl for whipping.
Step 6: Combine Dry Ingredients
Sift together the cake flour and cornstarch in a separate bowl. This step ensures there are no lumps in your dry ingredients. Gradually add the sifted mixture to the yogurt batter, mixing gently until the dry ingredients are fully incorporated, with no visible flour lumps left behind.
Step 7: Whip the Egg Whites
Using an electric mixer, beat the egg whites with cream of tartar until foamy. Gradually add the granulated sugar, continuing to beat until soft, glossy peaks form, which should take about 4-5 minutes. This fluffy meringue is essential for the airy texture of your cheesecake.
Step 8: Fold in the Egg Whites
Carefully fold one third of the whipped egg whites into the yogurt batter using a spatula. This technique lightens the batter, making it easier to combine. Gently fold in the remaining egg whites, using slow, deliberate motions to preserve the air bubbles necessary for a light Japanese Yogurt Cheesecake.
Step 9: Pour and Smooth the Batter
Pour the fluffy cheesecake batter into the prepared rectangular dish. Use a spatula to smooth the surface gently, ensuring an even top. Tap the dish lightly on the counter to release any large air pockets that could affect the texture during baking.
Step 10: Create a Water Bath
Place the glass dish inside a larger roasting pan. Carefully pour hot water into the roasting pan until it reaches halfway up the sides of the glass dish. This water bath maintains moisture in the oven, leading to a creamy texture.
Step 11: Bake the Cheesecake
Transfer the water bath to your preheated oven and bake the cheesecake for 60 to 75 minutes. You'll know it's done when the top is lightly golden and the center has a gentle wobble without appearing wet.
Step 12: Cool Gradually
Once baked, turn off the oven and leave the cheesecake inside for an additional 20 minutes. Crack the oven door slightly to allow gradual cooling; this helps prevent cracking. Carefully remove the cheesecake from the water bath and let it cool at room temperature.
Step 13: Refrigerate and Serve
After cooling completely, refrigerate the Japanese Yogurt Cheesecake for at least 4 hours, or until fully chilled. When ready to serve, gently remove the parchment paper to keep the cheesecake intact. Dust the top lightly with powdered sugar for an elegant finish, and keep it in the glass dish until serving.
Common mistakes to avoid
Overmixing the Batter: Avoid excessive mixing after adding the dry ingredients. Gentle folding helps maintain airiness, ensuring a light Japanese Yogurt Cheesecake.
Undercooking or Overcooking: Keep an eye on the baking time. A gentle wobble in the center signifies doneness; too much firmness might mean overbaking.
Skipping the Water Bath: Don’t skip the water bath step! It helps control the baking temperature, resulting in a creamy texture without cracks.
Not Room Temperature Ingredients: Ensure your cream cheese and eggs are at room temperature. This helps create a smooth batter with no lumps or graininess.
Inadequate Whipping: When whipping egg whites, be cautious not to under-whip them. Glossy, soft peaks are essential for a fluffy cheesecake; adjust whipping time if needed.
Perfect pairings
What to serve with Japanese Yogurt Cheesecake?
This light and fluffy dessert is about to elevate your dining experience, making it the centerpiece of a lovely meal.
- Fresh Berries: The burst of tartness from freshly picked strawberries, blueberries, or raspberries complements the cheesecake's creaminess beautifully.
- Green Tea: A warm cup of green tea offers a soothing contrast and enhances the cheesecake's delicate flavors.
- Matcha Ice Cream: This rich, earthy treat adds a delightful contrast in both flavor and temperature, enhancing each bite of the cheesecake.
- Whipped Cream: A dollop of light, sweet whipped cream adds an airy finish, balancing the tartness of the yogurt effortlessly.
- Almond Biscotti: The crunchiness provides a satisfying texture against the smooth cheesecake, perfect for dipping and enjoying together.
- Citrus Salad: A refreshing mix of oranges and grapefruit cleanses the palate and brightens the overall dessert experience.
- Chocolate Sauce: Drizzling a little chocolate sauce brings a decadent touch, perfect for those craving something sweet alongside.
- Espresso: A shot of rich espresso adds a bold bite, the perfect balance to the delicate sweetness of the cheesecake.
- Pistachio Crumble: A sprinkle of crushed pistachios not only adds a beautiful color but also a delightful crunch that pairs well with the soft texture of the cheesecake.
- Honey Drizzle: A light drizzle of honey amplifies the dessert’s sweetness without overpowering its inherent flavors, making every bite heavenly.
Make-ahead notes
Preparing a Japanese Yogurt Cheesecake in advance is a game-changer for busy home cooks! You can mix the cheesecake batter and store it in the refrigerator for up to 24 hours before baking, ensuring optimal freshness and flavor. Additionally, you can separate and store the whipped egg whites in an airtight container for up to 3 days, just be sure to keep them in a clean bowl to avoid deflation. When you’re ready to finish, simply fold in the prepared egg whites, pour the batter into the baking dish, and bake. This approach allows you to enjoy delightful, restaurant-quality results with minimal last-minute effort!
Storing and reheating
Room Temperature: After baking, let your Japanese Yogurt Cheesecake cool completely at room temperature for optimal texture; avoid leaving it out for more than 2 hours.
Fridge: Store leftovers in the refrigerator, covered with plastic wrap or a lid. It will stay fresh for up to 3 days, retaining its lovely flavor and texture.
Freezer: You can freeze the cheesecake for up to 2 months. Wrap it tightly in plastic wrap and then aluminum foil to prevent freezer burn, ensuring it remains delicious upon defrosting.
Reheating: While best served chilled, if you prefer it slightly warm, place individual slices in the microwave for 10-15 seconds—just enough to take the chill off!
Substitutions and variations
Feel free to experiment with these delightful twists to make the Japanese Yogurt Cheesecake truly your own!
- Dairy-Free: Substitute Greek yogurt and cream cheese with coconut yogurt and vegan cream cheese for a plant-based version.
- Gluten-Free: Use almond flour or gluten-free all-purpose flour instead of cake flour to cater to gluten sensitivities.
- Citrus Burst: Swap fresh lemon juice for orange or yuzu juice to give your cheesecake a refreshing, zesty kick.
- Flavor Twist: Add matcha powder directly to the batter for a unique green tea flavor that beautifully contrasts the lightness of the cheesecake.
- Extra Sweetness: Fold in a bit of honey or maple syrup with the sugar for a more natural sweetness that enhances the flavors.
- Chocolate Lovers: Incorporate cocoa powder into the batter or drizzle melted chocolate over the chilled cheesecake for a luscious touch.
- Nutty Crunch: Add chopped nuts, like almonds or walnuts, into the batter or as a topping for added texture and flavor.
- Fruit Infused: Mix in fresh fruit purees, like mango or raspberry, to create a deliciously fruity swirl throughout the cheesecake.
These variations are wonderful ways to adjust this recipe to your personal taste. You can also consider serving your cheesecake with fresh berries or a light drizzle of honey for an elegant finish. Enjoy creating your own spin on this delightful dessert!
FAQ
What type of Greek yogurt should I use?
I recommend using plain full-fat Greek yogurt for the best texture and flavor. The creaminess of full-fat yogurt contributes significantly to the lightness of your Japanese Yogurt Cheesecake. Low-fat or non-fat options can alter the texture, making it less decadent.
How should I store the cheesecake?
Once fully cooled, cover your Japanese Yogurt Cheesecake with plastic wrap or a lid and store it in the refrigerator. It will keep fresh for up to 3 days. If your cheesecake is well-wrapped, it will maintain its delightful flavors and fluffy texture during this time.
Can I freeze the cheesecake?
Absolutely! To freeze, wrap the cheesecake tightly in plastic wrap, then in aluminum foil, making sure it’s sealed against air. It can be frozen for up to 2 months. When you're ready to enjoy it, simply transfer it to the refrigerator to thaw overnight for the best results.
What should I do if my cheesecake cracks while baking?
To avoid cracks, use the water bath method. This helps regulate the temperature and keeps the cheesecake moist. If you still notice cracks, don’t worry—lightly dusting the top with powdered sugar will disguise them beautifully, adding an elegant touch!
Are there any dietary considerations?
Yes! If you have lactose intolerance, you may substitute Greek yogurt and cream cheese with lactose-free versions. Just be mindful that the cheesecake’s texture may vary slightly. For allergies, ensure that all ingredients are safe according to your needs, particularly with eggs and dairy.
How do I know when the cheesecake is done?
Look for a lightly golden top and a gentle wobble in the center of your Japanese Yogurt Cheesecake. It shouldn’t appear wet, and this gentle wobble indicates that it's just set. Remember, it will firm up more as it chills in the refrigerator!
Advertisement
These FAQs should guide you through making a perfect Japanese Yogurt Cheesecake while providing useful insights and recommendations!
Print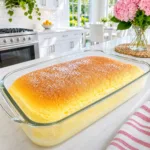
Light & Fluffy Japanese Yogurt Cheesecake Recipe
- Total Time: 5 hours 45 minutes
- Yield: 12 slices
Description
This Japanese Yogurt Cheesecake combines creamy Greek yogurt and smooth cream cheese, creating a light and fluffy dessert that’s a guilt-free indulgence.
Ingredients
For the Creamy Base
- 2 cups plain full-fat Greek yogurt (opt for full-fat for optimal texture)
- 8 oz cream cheese (softened)
- 1 cup whole milk (can substitute with plant-based milk)
For the Structure
- 4 large eggs (separated and at room temperature)
- 1 cup cake flour (can substitute with all-purpose flour)
- 2 tbsp cornstarch
For Flavor Enhancement
- 3/4 cup granulated sugar (adjust to taste)
- 1 tbsp vanilla extract (opt for pure)
- 2 tbsp fresh lemon juice (fresh is best)
For the Final Touches
- 1 tbsp powdered sugar (for dusting)
- 1/4 tsp cream of tartar
- 1 pinch kosher salt (to enhance flavors)
Instructions
Preparation
- Preheat your oven to 300°F (150°C) and prepare a 9 by 13-inch rectangular glass baking dish by greasing it with unsalted butter.
- Line the baking dish with parchment paper, allowing it to extend above the rim for easy removal.
- In a large mixing bowl, beat softened cream cheese until smooth, then incorporate Greek yogurt until creamy.
- Add melted unsalted butter, whole milk, vanilla extract, and lemon juice; mix until combined.
- Separate the eggs, mixing the yolks into the yogurt mixture while whipping the egg whites in a separate bowl.
- Sift together cake flour and cornstarch and fold into the yogurt batter.
- Beat egg whites with cream of tartar, gradually adding sugar until soft peaks form.
- Fold one third of the whipped egg whites into the batter, then gently fold in the remaining whites.
- Pour the batter into the prepared dish, smoothing the top.
- Place the dish in a larger roasting pan and fill with hot water halfway up the sides.
- Bake for 60-75 minutes until the top is golden and the center has a gentle wobble.
- Turn off the oven, leave the cheesecake inside for 20 minutes, then cool at room temperature.
- Refrigerate for at least 4 hours before serving, dusting with powdered sugar before serving.
Notes
Ensure all ingredients are at room temperature for the best results.
- Prep Time: 30 minutes
- Cook Time: 1 hour 15 minutes
- Category: Dessert
- Cuisine: Japanese