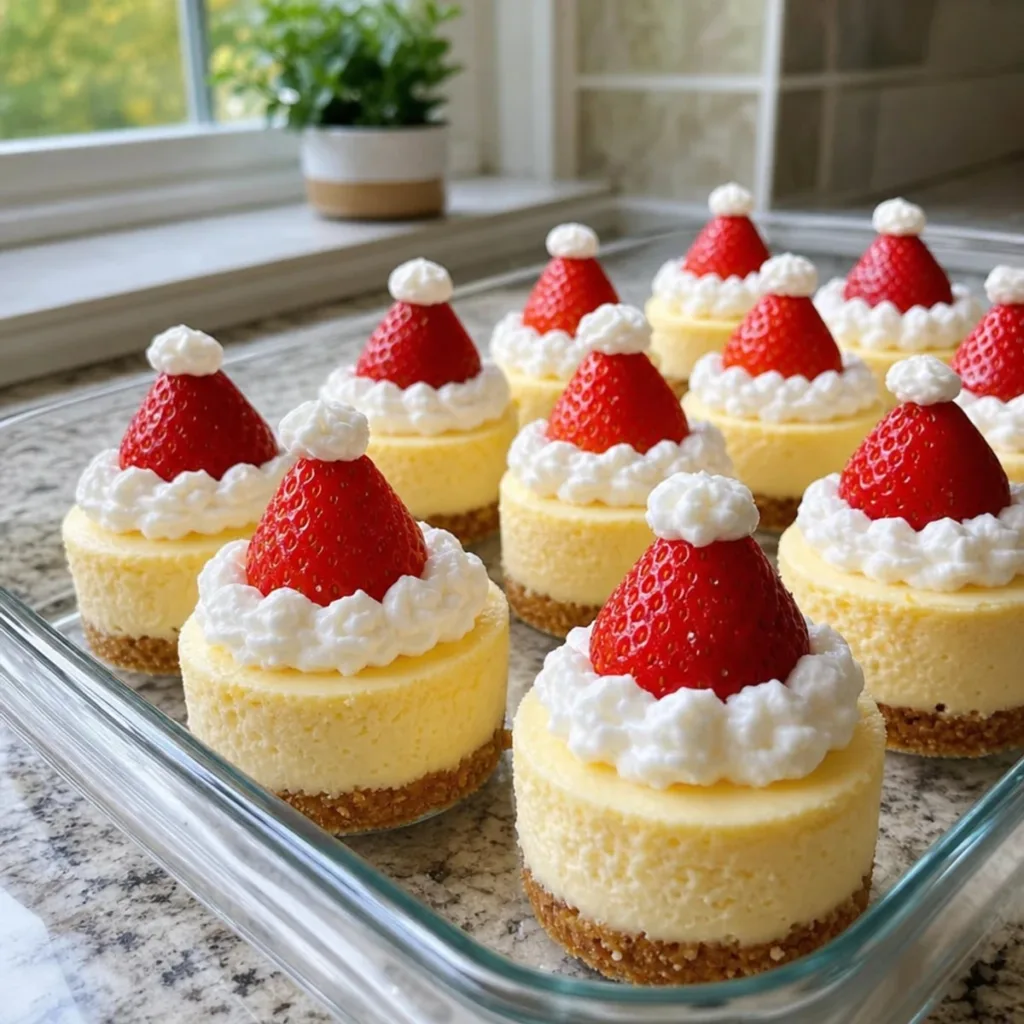
These Santa Hat Mini Cheesecakes are a festive delight, transforming traditional cheesecake into a whimsical holiday treat that everyone will adore. With their creamy texture resting atop a perfectly crumbly graham cracker crust, they look almost too cute to eat—almost! Ideal for holiday parties, potlucks, or simply to indulge in during a cozy night at home, these little bites pack a punch of flavor and cheer. Not only are they a stunning centerpiece, but they’re also surprisingly easy to make. You’ll love that they require minimal prep time and are guaranteed to impress your guests without the stress. Let’s dive into creating these adorable mini cheesecakes that will have everyone smiling this season!
What makes it special
Uniqueness abounds in these Santa Hat Mini Cheesecakes, as they transform a classic dessert into a playful holiday delight. The vibrant strawberries mimic Santa’s iconic hat, making them not only a treat for the taste buds but also a showstopper for the eyes. Simplicity is key; with just a handful of ingredients and straightforward steps, you can create an impressive dish without the stress.
Crowd-pleasing appeal is guaranteed! The creamy cheesecake paired with the crumbly graham cracker base creates a perfect balance of texture and flavor that everyone will love. Versatile too, you can easily make these mini cheesecakes ahead of time, freeing you up to enjoy time with family and friends during the festive season. Give them a try for your next holiday gathering—your guests will be raving about them!
Ingredient breakdown
Creating these Santa Hat Mini Cheesecakes is a breeze when you have all the right ingredients on hand! Here’s a quick look at what you’ll need:
For the Crust
• Graham cracker crumbs – 1 and 1/2 cups; provides that deliciously crunchy foundation.
• Unsalted butter – 5 tablespoons, melted; acts as a binding agent for the crust.
• Granulated sugar – 2 tablespoons; adds a touch of sweetness to complement the buttery flavor.
For the Cheesecake Filling
• Cream cheese – 16 ounces, softened to room temperature; ensures a creamy, smooth texture.
• Granulated sugar – 1/2 cup; balances the richness of the cream cheese.
• Large eggs – 2, at room temperature; help the cheesecake set beautifully.
• Sour cream – 1/4 cup; adds moisture and a slight tang for depth of flavor.
• Vanilla extract – 1 teaspoon; infuses a warm aroma and sweetness.
• All-purpose flour – 1 tablespoon; helps stabilize the cheesecake and create the perfect consistency.
• Salt – 1/4 teaspoon; enhances the flavors by cutting through the sweetness.
For the Topping
• Medium fresh strawberries – 12; these are the stars of the show, mimicking Santa's hat!
• Heavy whipping cream – 1 cup, chilled; perfect for whipping up a fluffy topping.
• Powdered sugar – 3 tablespoons; gives the whipped cream a lovely sweetness.
• Vanilla extract – 1/2 teaspoon; adds extra flavor to the whipped cream.
With this combination of ingredients, you’ll be well on your way to crafting your festive and delightful Santa Hat Mini Cheesecakes!
Making it, step by step
Step 1: Preheat and Prepare the Muffin Pan
Preheat your oven to 325°F (165°C). While the oven warms up, line a 12-cup muffin pan with paper cupcake liners to create a perfect base for your Santa Hat Mini Cheesecakes. Set aside your pan while you prepare the graham cracker crust.
Step 2: Make the Graham Cracker Crust
In a large mixing bowl, combine 1 and 1/2 cups of graham cracker crumbs, 5 tablespoons of melted unsalted butter, and 2 tablespoons of granulated sugar. Mix well until the texture resembles wet sand. Once mixed, divide this crumb mixture evenly among the 12 muffin liners, pressing it firmly into the bottom of each with the back of a spoon.
Step 3: Bake the Crusts
Place the muffin pan in the preheated oven and bake the crusts for 5 minutes. As they bake, you'll notice a light golden color forming. After 5 minutes, remove the pan from the oven and allow the crusts to cool slightly while you prepare the cheesecake filling.
Step 4: Prepare the Cheesecake Filling
In a clean mixing bowl, beat 16 ounces of softened cream cheese using an electric mixer on medium speed until smooth and creamy. Add in 1/2 cup of granulated sugar and mix until fully incorporated. You’ll want a velvety texture with no lumps; this sets the foundation for your Santa Hat Mini Cheesecakes.
Step 5: Add Eggs and Remaining Ingredients
Add 2 large eggs one at a time, mixing on low speed after each until just combined. Next, incorporate 1/4 cup of sour cream, 1 teaspoon of vanilla extract, 1 tablespoon of all-purpose flour, and 1/4 teaspoon of salt. Mix gently until smooth, scraping down the sides to avoid overmixing, which can cause air bubbles in your batter.
Step 6: Fill the Muffin Cups
Carefully divide the cheesecake batter evenly among the prepared muffin cups, filling nearly to the top while leaving a little room for rise. Gently tap the muffin pan against the counter to eliminate trapped air bubbles, which ensures a uniform texture in your Santa Hat Mini Cheesecakes.
Step 7: Bake the Cheesecakes
Place the muffin pan back into the oven and bake for 18 to 22 minutes. You'll know they're done when the edges are set but the centers still have a slight wobble. This ensures a creamy cheesecake texture.
Step 8: Cool in the Oven
Turn off the oven and leave the door slightly ajar. Allow the cheesecakes to rest inside for 10 minutes, which helps prevent cracking. You’ll notice the cheesecakes will firm up slightly during this time.
Step 9: Cool Completely
Remove the muffin pan from the oven and transfer the cheesecakes to a cooling rack. Allow them to cool completely at room temperature. Once cooled, transfer them to the refrigerator and chill for at least 3 hours to ensure they are fully firm and ready for decoration.
Step 10: Prepare the Strawberries
While waiting for the cheesecakes to chill, wash 12 medium strawberries under cold running water and pat them dry. Remove the green leafy tops while keeping the pointed ends intact, resembling Santa's hat tops—a delightful touch for the final presentation.
Step 11: Whip the Cream
In a cold mixing bowl, add 1 cup of chilled heavy whipping cream, 3 tablespoons of powdered sugar, and 1/2 teaspoon of vanilla extract. Beat the cream using an electric mixer until stiff peaks form, indicating a light and airy whipped cream perfect for topping your cheesecakes.
Step 12: Decorate the Cheesecakes
Once the cheesecakes are chilled, remove the paper liners and arrange them in a rectangular clear glass serving dish. Pipe a generous ring of whipped cream around the top of each cheesecake, then position one strawberry upside down in the center. Add a bit more whipped cream to create the fluffy trim and pom pom of Santa's hat. Refrigerate for 20 minutes to help everything hold its shape.
Step 13: Serve and Enjoy
Keep the finished Santa Hat Mini Cheesecakes chilled until you're ready to serve. These delightful treats are best enjoyed cold, and any leftovers should be covered and stored in the refrigerator for later enjoyment.
What to Serve With Santa Hat Mini Cheesecakes
Set the stage for a festive gathering with delightful pairings that will elevate these whimsical treats.
Rich Hot Chocolate: The creamy marshmallow flavor of hot chocolate complements the cheesecakes beautifully, making each bite feel like a warm hug.
Gingerbread Cookies: Their spiced sweetness harmonizes with the refreshing strawberry and creamy cheesecake, adding a nostalgic holiday feel to your dessert table.
Fresh Mint Leaves: A sprinkle of fresh mint enhances the festive look while adding a refreshing contrast to the sweet cheesecakes, making each bite feel light and bright.
Vanilla Ice Cream: The creamy and cool texture of vanilla ice cream works perfectly alongside the cheesecakes, creating a delightful temperature contrast.
Mixed Berries Medley: A colorful assortment of berries adds a burst of freshness and vibrant flavor that beautifully contrasts with the rich cheesecake.
Sparkling Cider: This bubbly beverage adds a festive touch, its light fizz balancing the delicious creaminess of the mini cheesecakes.
Chocolate Covered Pretzels: The salty crunch of pretzels adds a fun texture and a sweet-salty flavor, perfect for those craving a little contrast with their sweets.
Serve these delightful combinations to create a truly unforgettable dessert experience!
Make ahead
These Santa Hat Mini Cheesecakes are ideal for meal prep, allowing you to enjoy the festive season with ease! You can prepare the cheesecake base and crust up to 24 hours in advance, storing them covered in the refrigerator to maintain their creamy texture. Additionally, the finished cheesecakes can be made up to 3 days ahead—just decorate with whipped cream and strawberries before serving to keep everything fresh. To ensure quality, refrigerate them immediately after chilling and cover tightly so they don’t absorb any fridge odors. When ready to impress, simply pipe the whipped cream and top with the strawberries, and you’ll have delightful treats that taste just as delicious as if made fresh!
Easy variations
Feel free to explore these variations and make these Santa Hat Mini Cheesecakes uniquely yours!
Gluten-Free: Use gluten-free graham cracker crumbs for the crust to make them suitable for gluten-sensitive guests. You'll still enjoy that delightful crunch!
Dairy-Free: Substitute the cream cheese with a dairy-free cream cheese alternative and the heavy whipping cream with coconut cream for a vegan twist. The flavors will still shine through!
Chocolate Lovers: Add 1/3 cup of cocoa powder to the cheesecake batter for a rich chocolate version. Topped with strawberries, this is a double treat!
Extra Fruit: Mix in some finely chopped raspberries or blueberries into the cheesecake batter for added fruity notes that enhance the overall flavor profile.
Zesty Lemon: Incorporate 1 tablespoon of lemon juice and 1 teaspoon of lemon zest into the batter to add a refreshing citrus twist, brightening every bite.
Spiced Up: Sprinkle in a pinch of cinnamon or nutmeg to the cheesecake filling for a cozy, spiced flavor that complements the holiday vibe beautifully.
Caramel Drizzle: After decorating, drizzle some caramel sauce over the whipped cream for added sweetness and a sophisticated touch. It's like a festive crown!
Chill Time Variation: For a more substantial set, chill the cheesecakes overnight instead of 3 hours. This will create an even firmer texture that's a delight to cut into.
Want to elevate your experience further? Try serving these cheesecakes alongside a warm cup of rich hot chocolate or some fresh mint leaves for that festive touch!
Keeping leftovers fresh
Fridge: Store any leftover Santa Hat Mini Cheesecakes in an airtight container in the refrigerator for up to 3 days. This keeps them fresh and prevents them from absorbing any odors.
Freezer: To freeze, wrap each cheesecake tightly in plastic wrap and place them in a freezer-safe container. They can be stored for up to 2 months.
Thawing: When ready to enjoy, transfer the frozen cheesecakes to the fridge overnight to thaw slowly. This helps maintain their creamy texture.
Reheating: These mini cheesecakes are best served cold, so avoid reheating. Instead, let them come to room temperature for 20 minutes before serving for optimal flavor.
Santa Hat Mini Cheesecakes Recipe FAQs
How do I select ripe strawberries for my cheesecakes?
Absolutely! Choose firm strawberries with a vibrant red color and a fresh green top. Avoid any with dark spots or signs of mold, as these may be overripe and won’t hold their shape well for the Santa hats.
Can I make these cheesecakes ahead of time?
Very! You can prepare these Santa Hat Mini Cheesecakes up to two days in advance. Just store them in the refrigerator (covered) after they’ve chilled. This allows you to enjoy a stress-free holiday gathering!
How should I store leftovers?
Keep any leftovers in an airtight container in the fridge for up to 3 days. Make sure they are completely covered to prevent them from absorbing any odors or flavors from other foods.
Can I freeze Santa Hat Mini Cheesecakes? How?
Of course! To freeze, individually wrap each mini cheesecake tightly in plastic wrap and then place them in a freezer-safe container. They will stay fresh for up to 2 months. To thaw, simply place them in the fridge overnight before serving.
What should I do if my cheesecakes crack during baking?
Don’t fret! Cracks can happen for various reasons, usually from overmixing or fluctuating oven temperatures. To avoid this, mix the cheesecake batter gently until just combined, and always ensure your oven is preheated to 325°F (165°C).
What dietary considerations should I keep in mind?
Great question! If your guests have allergies, keep in mind that this recipe contains dairy, gluten (from the crust), and eggs. For a gluten-free option, swap the graham cracker crumbs for gluten-free crumbs and ensure all other ingredients are gluten-free.
Advertisement
Santa Hat Mini Cheesecakes That Steal the Show
- Total Time: 3 hours 55 minutes
- Yield: 12 cheesecakes
Description
These Santa Hat Mini Cheesecakes are a delightful holiday treat that everyone will adore.
Ingredients
For the Crust
- 1.5 cups graham cracker crumbs (provides that deliciously crunchy foundation)
- 5 tablespoons unsalted butter (melted, acts as a binding agent)
- 2 tablespoons granulated sugar (adds a touch of sweetness)
For the Cheesecake Filling
- 16 ounces cream cheese (softened to room temperature)
- 0.5 cups granulated sugar (balances the richness)
- 2 large eggs (at room temperature)
- 0.25 cups sour cream (adds moisture and tang)
- 1 teaspoon vanilla extract (infuses a warm aroma)
- 1 tablespoon all-purpose flour (helps stabilize the cheesecake)
- 0.25 teaspoon salt (enhances the flavors)
For the Topping
- 12 medium fresh strawberries (mimicking Santa’s hat)
- 1 cup heavy whipping cream (chilled for whipping)
- 3 tablespoons powdered sugar (adds sweetness to the whipped cream)
- 0.5 teaspoon vanilla extract (adds flavor to whipped cream)
Instructions
Making it, step by step
- Preheat your oven to 325°F (165°C) and line a 12-cup muffin pan with paper cupcake liners.
- Combine graham cracker crumbs, melted butter, and granulated sugar in a bowl. Mix until resembling wet sand. Divide among muffin liners.
- Bake the crusts for 5 minutes, then remove and let cool slightly.
- Beat softened cream cheese until smooth. Add granulated sugar and mix until velvety.
- Incorporate eggs, sour cream, vanilla extract, flour, and salt gently to avoid overmixing.
- Fill muffin cups with cheesecake batter and tap to eliminate air bubbles.
- Bake for 18 to 22 minutes until the edges are set with a slight wobble in the center.
- Turn off the oven and let cheesecakes rest inside for 10 minutes to prevent cracking.
- Transfer cheesecakes to a cooling rack and chill in the refrigerator for at least 3 hours.
- Wash and dry strawberries, removing tops while keeping pointed ends intact.
- Whip heavy cream with powdered sugar and vanilla extract until stiff peaks form.
- Remove cheesecakes from liners and pipe a ring of whipped cream on top. Place a strawberry upside down in the center.
- Refrigerate for 20 minutes to help hold shape.
- Serve chilled and enjoy your Santa Hat Mini Cheesecakes!
Notes
These mini cheesecakes are best enjoyed cold. Store any leftovers in the refrigerator.
- Prep Time: 30 minutes
- Cook Time: 25 minutes
- Category: Dessert
- Cuisine: American