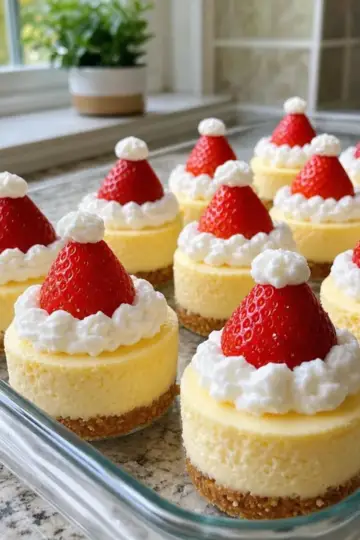

The holiday rush can leave us scrambling for desserts that delight without demanding hours in the kitchen. Enter the Strawberry Santa Cheesecake Cups! These delightful treats not only boast a festive flair but are also a breeze to whip up, making them the perfect solution for your next holiday gathering. With a buttery graham cracker crust and velvety cheesecake filling, these cups are both indulgent and visually captivating. Plus, they can be prepared in advance, allowing you to spend more time celebrating and less time stressing about dessert. Trust me, your friends and family will be begging for seconds! Let’s dive into this sweet holiday magic that’s sure to bring smiles all around.
Why you'll love this recipe
Easy Preparation: No baking required—just mix, layer, and chill!
Adorable Presentation: These cups are a festive delight that impress your guests.
Velvety Texture: The creamy cheesecake paired with the crumbly crust is pure magic.
Perfect for All Ages: Kids and adults alike will adore these sweet treats.
Customizable: Swap strawberries for your favorite fruits to suit any season or taste!
You’ll find that these Strawberry Santa Cheesecake Cups are not just a dessert but a joyful centerpiece for your holiday table.
What you'll need and why
Creating these delightful Strawberry Santa Cheesecake Cups is a breeze with the right ingredients. Each component plays a crucial role in crafting this festive dessert, ensuring it's both delicious and visually appealing. Let’s break down what you’ll need and the purpose each ingredient serves.
For the Crust
- Graham cracker crumbs – The backbone of our dessert, providing that sweet, crumbly base. If you're feeling adventurous, consider using chocolate graham crackers for a twist!
- Unsalted butter – This binds the crumbs together and adds richness; opt for unsalted so you can control the sweetness.
- Granulated sugar – A touch of sweetness enhances the crust's flavor; brown sugar is a great alternative for a deeper caramel hint.
For the Cheesecake Filling
- Cream cheese – The star of the show, giving the filling its creamy texture. Make sure it’s softened for easy mixing!
- Powdered sugar – This sweetens the mixture and helps achieve that desirable silkiness. Feel free to use a sugar substitute if needed.
- Pure vanilla extract – Adds a warm flavor that elevates the cheesecake; consider almond extract for a unique twist.
- Heavy whipping cream – Creates a luscious, airy texture when whipped and folded into the mixture. Use it cold for best results.
For the Strawberry Decoration
- Fresh strawberries – Their vibrant color and juicy sweetness make these cups visually stunning and delicious. Ensure they're ripe for fantastic flavor!
- Mini chocolate chips – Perfect for creating Santa's eyes; you can use raisins as a health-conscious option.
- Small red candy pieces – These serve as Santa noses; gummy candies can be a fun and chewy substitute if desired.
Each of these ingredients is vital to making your Strawberry Santa Cheesecake Cups a show-stopping dessert that everyone will adore. Ready to dive in? Let’s get to the fun part—making them!
Step-by-Step Instructions for Strawberry Santa Cheesecake Cups
Step 1: Prepare the Dessert Cups
Start by gathering 6 clear 8-ounce dessert cups. Set them aside and prepare your graham cracker crust. In a medium bowl, combine the graham cracker crumbs, melted unsalted butter, and granulated sugar, stirring until the crumbs look moist and crumbly.
Step 2: Form the Crust
Evenly divide the crust mixture among the 6 dessert cups, pressing it down gently using the back of a spoon to create a solid base. This crust should ideally be compacted and firm, providing a sturdy foundation for your Strawberry Santa Cheesecake Cups. Refrigerate the cups for 15 minutes while you prepare the filling.
Step 3: Make the Cheesecake Filling
Place 8 ounces of softened cream cheese into a large mixing bowl. Using an electric mixer, beat it on medium speed until the mixture is completely smooth and creamy, which should take about 2-3 minutes. You should see a glossy texture, indicating it's ready for the next steps.
Step 4: Combine the Ingredients
Add ½ cup of powdered sugar and 1 teaspoon of pure vanilla extract to the cream cheese. Continue mixing until the ingredients are just combined and the filling has a uniform appearance. The mixture should be sweet and fragrant, signaling that it's ready to be folded with whipped cream.
Step 5: Whip the Cream
In a separate chilled mixing bowl, pour in 1 cup of cold heavy whipping cream and add 2 tablespoons of powdered sugar. Beat the cream with an electric mixer on high speed until stiff peaks form, about 3-5 minutes. The cream should resemble fluffy clouds, perfect for folding into the cheesecake mixture.
Step 6: Fold the Whipped Cream
Gently fold about 1 cup of the whipped cream into the cheesecake mixture in a spatula motion. Continue folding until you achieve a light and airy consistency. Be patient, as this step is crucial to ensure your Strawberry Santa Cheesecake Cups are incredibly fluffy and not dense.
Step 7: Prepare the Strawberries
Wash and dry 1 pound of fresh strawberries, ensuring they are free from water. Set aside 6 large strawberries with green tops removed to serve as Santa hats. Slice the remaining strawberries thinly so they can be easily arranged around the walls of the dessert cups.
Step 8: Assemble the Cheesecake Cups
Remove the cups from the refrigerator. Spoon a layer of cheesecake filling over the graham cracker crust, followed by arranging the sliced strawberries around the inside of each cup. This should create a festive, colorful display, making the strawberries visible against the cheesecake layer.
Step 9: Add More Filling
Cover the strawberry slices with another layer of cheesecake filling, ensuring they are completely submerged. Smooth the top of each cup with the back of a spoon. The layers should appear distinct but harmonious, ready to be set for chilling.
Step 10: Chill the Cups
Cover the dessert cups loosely with plastic wrap and place them in the refrigerator for at least 1 hour. This chilling time allows the filling to firm up, making the cheesecake cups easier to decorate later and enhancing their overall texture.
Step 11: Decorate for Santa
Transfer the reserved whipped cream into a piping bag fitted with a star-shaped tip. Once chilled, remove the cups from the fridge, and pipe a generous swirl of whipped cream on top, forming Santa's beard. The creamy decoration should be fluffy and eye-catching.
Step 12: Final Touches
Finish by placing 2 mini chocolate chips for eyes and a small red candy piece for the nose on each whipped cream-covered face. On top, position one large upside-down strawberry to serve as the Santa hat. Add a dollop of whipped cream on the tip of the strawberry to enhance the festive look. Refrigerate for another 30 minutes to set the decorations before serving.
Tips for the best results
- Use Room Temperature Cream Cheese: Ensuring your cream cheese is softened will make it easier to blend, creating a smooth cheesecake filling that elevates your Strawberry Santa Cheesecake Cups.
- Chill Your Bowls: For whipped cream that's extra fluffy, chill your mixing bowl and beaters beforehand. Cold utensils help achieve perfect stiff peaks in no time!
- Slice Strawberries Finely: Thinly slicing your strawberries allows for better visibility and a prettier presentation against the cheesecake filling, making for stunning Strawberry Santa Cheesecake Cups.
- Don't Rush the Chilling: Patience is key! Allow adequate refrigeration time for the filling to set properly, ensuring that each cup holds its shape beautifully when served.
- Perfect Your Whipped Cream Design: Practice piping your whipped cream decorations if you're new to it. A little preparation can lead to a delightful Santa face that impresses your guests!
What to Serve with Strawberry Santa Cheesecake Cups
The magic of holiday gatherings becomes even sweeter when you pair delightful desserts with complementary sides and refreshments.
Festive Fruit Salad: A colorful mix of seasonal fruits adds a refreshing balance to the rich cheesecake cups, enhancing their sweetness with zest.
Spicy Gingerbread Cookies: The warm spices in gingerbread contrast beautifully with the creamy cheesecake, providing a cozy addition that your guests will adore.
Homemade Hot Chocolate: Rich and creamy, this drink pairs perfectly, bringing warmth and indulgence that perfectly complements the lightness of the cheesecake cups.
Cranberry Sauce: A tangy cranberry sauce offers a burst of flavor that cuts through the creaminess, making each bite of cheesecake even more enjoyable.
Peppermint Bark: Crunchy and minty, this festive treat adds a delightful chocolate touch alongside the smooth cheesecake, creating a well-rounded dessert experience.
Mini Pecan Tarts: Nutty and sweet, these small tarts provide a wonderful crunch that contrasts the creamy texture of the cheesecake cups, delighting your taste buds.
Eggnog Milkshake: A fun, festive twist on a classic drink, this creamy shake adds a holiday cheer and pairs perfectly with the cheerful presentation of your Strawberry Santa Cheesecake Cups.
These pairing ideas not only enhance the festive atmosphere but also elevate the delightful experience of your Strawberry Santa Cheesecake Cups!
Variations and swaps
Feel free to explore new flavors and textures for your Strawberry Santa Cheesecake Cups—your creativity will make them even more delightful!
Gluten-Free: Use gluten-free graham crackers or almond flour for the crust, ensuring everyone can enjoy these festive treats. A crunchy alternative is worth the switch!
Dairy-Free: Opt for vegan cream cheese and coconut whipped cream to create a dairy-free version that still satisfies the sweet tooth while keeping it light and fluffy.
Chocolate Lover’s Delight: Replace some or all strawberries with crushed chocolate cookies or chocolate ganache to add a rich twist to your cheesecake. Imagine those flavors melding together!
Fruit Explosion: Consider using other fruits like raspberries or blueberries for a berry medley; just be sure to slice them thinly to maintain the captivating presentation.
Nutty Crust: Add ground almonds or walnuts to your graham cracker crust for an earthy flavor and delightful crunch that complements the creaminess of the cheesecake.
Spicy Twist: Incorporate a pinch of cinnamon or nutmeg into the cheesecake filling to add a warm, spicy flavor that enhances the festive feel. Imagine the warmth filling your kitchen!
No-Bake Variation: Swap the cheesecake filling with a yogurt mixture for a lighter treat that still remains indulgent without all the bells and whistles.
Mini Versions: Create bite-sized versions using mini muffin tins, turning your delightful dessert into easy-to-eat treats that are perfect for parties. They’ll be the talk of the gathering!
Experimenting with these variations and substitutions will not only enhance your Strawberry Santa Cheesecake Cups but also create a memorable experience for you and your guests. For more festive inspirations, check out our homemade hot chocolate recipe or whip up some delicious mini pecan tarts. Happy cooking!
Storage and Freezing
Refrigerator: Store any leftover Strawberry Santa Cheesecake Cups in the fridge, covered with plastic wrap, for up to 2 days to maintain freshness and flavor.
Freezer: While these cups are best enjoyed fresh, you can freeze the cheesecake filling separately in an airtight container for up to 1 month. Just thaw before assembling.
Assembly Advice: Avoid freezing assembled cups, as the texture and appearance of the strawberries and whipped cream may suffer. Consider making filling in advance instead.
Reheating: No reheating required! Serve chilled straight from the fridge for the perfect creamy texture that everyone will love.
Make-ahead notes
Strawberry Santa Cheesecake Cups are a fantastic option for busy home cooks looking to save time! You can prepare the graham cracker crust and cheesecake filling up to 24 hours in advance. Just assemble the cups with the crust, cover with the filling, and refrigerate; this keeps the flavors fresh while allowing the filling to firm up beautifully. Slice the strawberries and add them right before adding the whipped cream decorations to prevent sogginess. Store any leftover cups in the refrigerator for up to 2 days; this way, you can enjoy a delicious dessert that remains just as delightful as day one. When ready to serve, simply top with whipped cream and the strawberry "Santa hats," and watch everyone’s eyes light up!
FAQ
What should I look for when selecting strawberries?
Absolutely! Choose strawberries that are bright red, firm, and fragrant. Avoid any with dark spots or a dull color, as those indicate overripeness. Ideally, you want them to be fresh and sweet for perfect taste.
How should I store the Strawberry Santa Cheesecake Cups?
Always cover your leftover cheesecake cups with plastic wrap and refrigerate them. They will stay fresh for up to 2 days. Just remember to keep them chilled to maintain that delightful creamy texture!
Can I freeze these cheesecake cups?
While it's best not to freeze the assembled Strawberry Santa Cheesecake Cups due to the textures of the strawberries and whipped cream, you can freeze the cheesecake filling separately. Just store it in an airtight container for up to 1 month, and thaw it in the fridge before assembling.
What if my whipped cream isn't stiff enough?
Don’t worry! If you find your whipped cream hasn't formed stiff peaks, check that your bowl and beaters are cold. If you've already whipped it too long and it’s grainy, you can try gently folding it back with a bit of fresh cream. Aim for fluffy white clouds for the best results!
Can I make these cheesecake cups dairy-free?
Absolutely! You can use dairy-free cream cheese and coconut cream instead of heavy whipping cream to make a delicious substitute. Just be sure to check labels for any hidden dairy ingredients if anyone has allergies.
How far in advance can I make these?
You can prepare these Strawberry Santa Cheesecake Cups up to a day in advance. Just ensure they’re properly chilled and stored to maintain that creamy deliciousness!
Advertisement
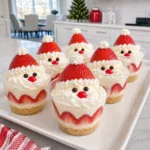
Strawberry Santa Cheesecake Cups for a Festive Treat
- Total Time: 2 hours
- Yield: 6 cups
Description
Delightful Strawberry Cheesecake Cups inspired by festive Santa themes, perfect for holiday gatherings.
Ingredients
For the Crust
- 1 cup Graham cracker crumbs (Can substitute with chocolate graham crackers)
- 4 tablespoons Unsalted butter (Melted)
- 2 tablespoons Granulated sugar (Brown sugar is an alternative)
For the Cheesecake Filling
- 8 ounces Cream cheese (Softened)
- 1/2 cup Powdered sugar (Can use sugar substitute)
- 1 teaspoon Pure vanilla extract (Almond extract as a twist)
- 1 cup Heavy whipping cream (Use cold)
For the Strawberry Decoration
- 1 pound Fresh strawberries (Ripe)
- 12 pieces Mini chocolate chips (For eyes)
- 6 pieces Small red candy pieces (For noses)
Instructions
Preparation Steps
- Gather 6 clear 8-ounce dessert cups.
- Combine graham cracker crumbs, melted unsalted butter, and granulated sugar in a medium bowl.
- Divide the crust mixture among the cups and press down gently.
- Refrigerate the crust for 15 minutes.
- Beat softened cream cheese until smooth.
- Mix in powdered sugar and vanilla extract until combined.
- Whip heavy cream with powdered sugar until stiff peaks form.
- Fold whipped cream into the cheesecake mixture.
- Wash strawberries, remove tops from 6 large ones for decoration.
- Spoon cheesecake filling into cups, add sliced strawberries.
- Cover with another layer of cheesecake filling.
- Chill cups for at least 1 hour.
- Pipe whipped cream on top to create Santa’s beard.
- Decorate with chocolate chips for eyes and red candy for noses.
- Position an upside-down strawberry as a Santa hat and add whipped cream on top.
- Refrigerate decorated cups for another 30 minutes before serving.
Notes
Use room temperature cream cheese for easier mixing. Make sure to chill bowls for whipped cream for better results.
- Prep Time: 30 minutes
- Category: Dessert