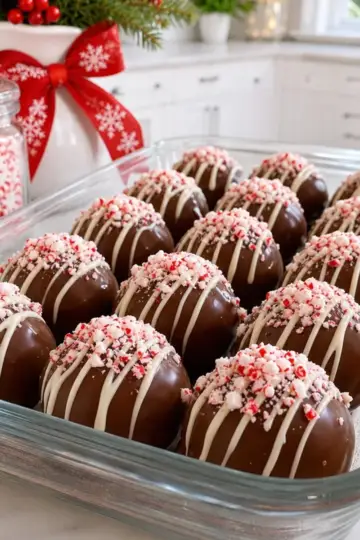

Amidst the shimmer of holiday lights, there’s something undeniably festive about the sight of Christmas Cherry Balls glistening on a tray, their smooth chocolate coating accented by cheerful sprinkles and vibrant cherries. These delightful treats, ideal for holiday gatherings, strike the perfect balance between rich creaminess and sweet crunch, making them a crowd-pleaser that’s impossible to resist. What I love most is how simple they are to whip up—ready in just under two hours—and how wonderfully they unleash a wave of nostalgia with each bite. Perfect for both seasoned home-chefs and those looking to bring a touch of sweetness to their festive spread, these cherry balls make entertaining a breeze. Let's dive into this joyful recipe and create some magical holiday memories together!
Why you'll love this recipe
- Simplicity: With just a handful of ingredients, these Christmas Cherry Balls are easy to make, even for novice bakers.
- Festive Appeal: The vibrant colors from the maraschino cherries and sprinkles make for a stunning holiday treat that brightens any gathering.
- Versatile: Customize your cherry balls with optional almond extract or your favorite nuts, perfect for tailoring them to your taste!
- Decadent Flavor: Each bite melts in your mouth, combining the rich creaminess of cream cheese and chocolate with the sweet burst of cherries.
- Make Ahead: Prepare them in advance and enjoy a stress-free holiday season, as they store beautifully in the fridge for up to five days.
Get ready to impress your guests and fill your home with the joyful spirit of the season!
Choosing your ingredients
Creating the perfect Christmas Cherry Balls starts with quality ingredients. Let’s make sure you have everything you need for these delightful treats!
- Crushed vanilla wafer cookies – A sweet and slightly crunchy base that holds everything together; look for fresh ones for the best flavor.
- Powdered sugar – This adds sweetness and helps create a smooth, creamy texture; make sure it's freshly sifted for a lump-free mix.
- Softened cream cheese – Essential for that deliciously rich and creamy filling; bringing it to room temperature ensures easy blending.
- Finely chopped maraschino cherries – Choose well-drained cherries to avoid excess moisture; pat them dry before adding to keep your mixture from getting soggy.
- Vanilla extract – Adds a warm, aromatic flavor that enhances the sweetness; pure vanilla is ideal for the best taste.
- Almond extract (optional) – A delightful touch that complements the cherries wonderfully; use sparingly for a subtle flavor boost.
- Semi-sweet chocolate chips – The main coating for your cherry balls; opt for high-quality chocolate for a rich finish.
- Coconut oil – Helps to smooth the chocolate when melting, giving it a glossy finish; if you avoid coconut flavor, feel free to substitute with vegetable oil.
- Whole maraschino cherries with stems – Used as a festive topping, they add a pop of color and make for a beautiful presentation; choose bright, vibrant ones for an extra holiday touch.
- Christmas sprinkles – Add whimsical charm to your treats; go for a variety of festive shapes and colors to truly capture the holiday spirit.
- Finely chopped nuts or cookie crumbs (optional) – They offer an extra layer of crunch and flavor if you like some texture in your sweets; feel free to use your favorites!
By carefully selecting these ingredients, you’re well on your way to crafting delightful Christmas Cherry Balls that will bring smiles and joy to your holiday gatherings.
Making it, step by step
Step 1: Prepare the Cherries
Begin by draining the finely chopped maraschino cherries thoroughly, ensuring no excess moisture remains. Pat them dry with paper towels to maintain a firm texture in your Christmas Cherry Balls. Properly prepared cherries will prevent the mixture from becoming soggy and will enhance the overall flavor.
Step 2: Mix the Base
In a large mixing bowl, combine 2 cups of crushed vanilla wafer cookies, 1 cup of powdered sugar, ½ cup of softened cream cheese, and the prepared chopped cherries. Add ½ teaspoon of vanilla extract and ¼ teaspoon of almond extract if desired. Stir together until the mixture forms a thick, slightly sticky dough, about 3-4 minutes of mixing.
Step 3: Roll the Balls
Once the dough is ready, use your hands to roll it into approximately 1-inch balls. Arrange the formed balls on a parchment-lined baking sheet, ensuring they are spaced out to allow for easy coating later. This step will yield about 20 to 24 delightful Christmas Cherry Balls, ready for chilling.
Step 4: Chill for Firmness
Place the baking sheet with the rolled balls into the refrigerator and chill for about 30–45 minutes. This step is essential for achieving a firmer texture, making it easier to dip the balls in chocolate later. They should feel solid to the touch before proceeding.
Step 5: Melt the Chocolate
In a microwave-safe bowl, combine 2 cups of semi-sweet chocolate chips and 1 tablespoon of coconut oil. Microwave the mixture in 20-second intervals, stirring in between, until it's smooth and glossy, which should take about 1-2 minutes. The chocolate should be fluid enough to easily coat the cherry balls.
Step 6: Dip the Balls
Remove the chilled cherry balls from the refrigerator and begin dipping each one into the melted chocolate. Use a fork to ensure they’re fully coated, then gently tap off any excess chocolate. Place each chocolate-covered ball back on the parchment-lined tray, creating a beautiful glossy finish.
Step 7: Add Toppings
While the chocolate is still wet, press a whole maraschino cherry gently on top of each dipped cherry ball. Then sprinkle with colorful Christmas sprinkles, allowing these festive toppings to adhere before the chocolate sets. This adds a delightful, decorative touch to your Christmas Cherry Balls.
Step 8: Chill Again
Return the tray to the refrigerator for another 20–30 minutes, allowing the chocolate coating to firm up completely. You’ll know they’re ready when the chocolate feels set and unwraps easily from the parchment paper.
Step 9: Arrange for Presentation
Once the chocolate coating is firm, arrange your finished Christmas Cherry Balls on a serving tray. Keeping them whole makes for a delectable presentation that’s sure to impress your guests during holiday gatherings. Enjoy the festive spirit these delightful treats bring!
Common mistakes to avoid
Wet Cherries: Ensure maraschino cherries are well-drained and patted dry. Excess moisture can lead to a soggy dough in your Christmas Cherry Balls.
Skipping Chilling: Don’t skip the chilling step! It’s crucial for firming up the balls, making them easier to coat in chocolate.
Overheating Chocolate: Melt chocolate in short intervals, stirring in between. Overheating can cause it to seize, ruining the glossy coating of your Christmas Cherry Balls.
Uneven Coating: Make sure to dip each ball thoroughly in chocolate and tap off excess. This helps achieve an even, shiny layer.
Ignoring Decorations: While chocolate is still wet, add your toppings immediately. This ensures the sprinkles and cherries stick well and look festive!
Planning ahead
These Christmas Cherry Balls are a busy cook's dream for meal prepping! You can prepare the cherry mixture and roll the balls up to 24 hours in advance, just refrigerate them to maintain their firmness. To keep the chocolate coating fresh, dip them in chocolate only the day you plan to serve, as they’ll hold their texture beautifully for up to 5 days in the refrigerator when stored in an airtight container. If you want to get fancy, feel free to add the festive toppings just before serving to keep them vibrant and appealing. This way, you can enjoy a stress-free holiday celebration with these delightful treats ready to impress!
Easy variations
Feel free to get creative with your Christmas Cherry Balls—each twist brings a sprinkle of joy to your holiday celebrations!
- Gluten-Free: Swap crushed vanilla wafers with gluten-free cookies for a delightful alternative that everyone can enjoy.
- Nut-Free: Omit the optional nuts or cookie crumbs to keep your treats safe for nut allergies, ensuring everyone can dig in without worry.
- Vegan: Use dairy-free cream cheese and dark chocolate chips to create a delicious plant-based version that still delivers rich flavor.
- Add Spice: Enhance the flavor by adding a pinch of cinnamon or nutmeg to the dough for a cozy, festive twist.
- Berry Bliss: Substitute finely chopped maraschino cherries with crushed raspberries or strawberries for a fruity update that's just as vibrant.
- Coconut Love: Incorporate shredded coconut into the mixture for a tropical flair that complements the cherry sweetness brilliantly.
- Candy Cane Crunch: Crush some peppermint candies and sprinkle them on top for an extra festive crunch and a minty kick—perfect for the holidays!
- Boozy Charm: Soak cherries in a splash of your favorite liqueur before adding to the mixture for a holiday-inspired, adult treat.
These options make your Christmas Cherry Balls truly unique while helping you capture the spirit of the season! Want to explore more sweet treats? Check out our festive cookie ideas or perhaps a savory holiday cheese platter to complement your festive gathering!
Serving suggestions
What to serve with Christmas Cherry Balls?
Elevate your festive gathering with delightful pairings that complement the sweetness of these cheerful treats.
- Festive Cheese Platter: A mixture of sharp and creamy cheeses balances the sweetness, providing a savory contrast that’s always a hit.
- Classic Hot Chocolate Bar: Rich, warming hot chocolate topped with whipped cream or marshmallows enhances the cozy vibe of your holiday celebrations.
- Buttery Sugar Cookies: Their tender, melt-in-your-mouth texture perfectly offsets the richness of the cherry balls, creating a delightful dessert duo.
- Peppermint Bark: The cool mint flavor brings a refreshing twist, harmonizing beautifully with the chocolatey goodness of the cherry balls.
- Mulled Wine: This warm, spiced drink adds a touch of elegance and warmth, inviting everyone to relax and enjoy the festive atmosphere together.
- Fruity Fruit Salad: A light, refreshing salad adds brightness and a burst of freshness, enhancing the overall enjoyment of the dessert spread.
- Chocolate Dipped Strawberries: Keep the chocolate theme going! The freshness of strawberries complements the sweetness of the cherry balls in a luscious way.
- Christmas Punch: A bubbly, fruity punch is perfect for celebrations, providing a fun, festive drink option that invites cheer to your table.
- Gingerbread Cookies: Spicy and sweet, these cookies offer a wonderful seasonal flavor that pairs wonderfully with every bite of cherry balls.
- Whipped Cream Delight: A dollop of freshly whipped cream on the side adds a light, airy touch, perfect for balancing richer desserts.
FAQ
Are the maraschino cherries I use important?
Absolutely! It's best to choose well-drained maraschino cherries for your Christmas Cherry Balls. If they're too wet, they can make the dough soggy. After chopping, pat them dry with paper towels, ensuring they hold their shape and flavor.
How should I store my Christmas Cherry Balls?
These treats can be kept in an airtight container in the refrigerator for up to 5 days. If you want to save some for later, they can also be frozen before being dipped in chocolate. Just roll them into balls, freeze them on a tray, and then transfer them to a freezer-safe bag or container for up to 3 months.
What if my chocolate seizes during melting?
If your chocolate becomes thick and grainy, it may have overheated. Start over by adding a teaspoon of coconut oil or vegetable oil to the bowl, and gently reheat in the microwave in 10-15 second intervals, stirring frequently, until smooth. This should rescue your chocolate coating!
Can I customize the flavors in my Christmas Cherry Balls?
Very! You can switch up the extracts to your liking. For example, try using orange extract instead of almond for a citrusy twist or even add a hint of peppermint extract for a festive flair. The more variety, the merrier!
How do I freeze the Christmas Cherry Balls properly?
To freeze them, roll the formed cherry balls and place them on a parchment-lined baking sheet. Freeze them for about 1-2 hours until solid, then transfer to a freezer-safe bag or container, separating layers with parchment paper to prevent sticking. Thaw them in the fridge before dipping them in chocolate.
Are there any dietary considerations for your Christmas Cherry Balls?
Yes, if you're making these for guests with allergies, be mindful of potential nut allergies when using the optional nuts or cookie crumbs. Additionally, check that the chocolate chips are dairy-free if you're catering to a vegan audience. Making small tweaks ensures everyone can enjoy these delightful treats!

Delicious No-Bake Cherry Treats for Holiday Cheer
- Total Time: 2 hours
- Yield: 24 pieces
Description
These Christmas Cherry Balls combine rich creaminess and sweet crunch, making them an irresistible holiday treat!
Ingredients
Base Ingredients
- 2 cups crushed vanilla wafer cookies (Fresh for best flavor.)
- 1 cup powdered sugar (Sifted for lump-free mix.)
- ½ cup softened cream cheese (Room temperature.)
- ½ cup finely chopped maraschino cherries (Well-drained and pat dry.)
- ½ teaspoon vanilla extract (Preferably pure.)
- ¼ teaspoon almond extract (Optional for subtle flavor.)
Coating and Toppings
- 2 cups semi-sweet chocolate chips (High-quality chocolate.)
- 1 tablespoon coconut oil (Substitute with vegetable oil if needed.)
- 10 pieces whole maraschino cherries with stems (For topping.)
- ½ cup Christmas sprinkles (Variety of shapes and colors.)
- ½ cup finely chopped nuts or cookie crumbs (Optional for extra crunch.)
Instructions
Steps to Prepare Christmas Cherry Balls
- Drain the finely chopped maraschino cherries thoroughly and pat them dry.
- In a large mixing bowl, combine crushed vanilla wafer cookies, powdered sugar, softened cream cheese, and chopped cherries. Add vanilla extract and almond extract if desired. Stir until a thick dough forms.
- Roll the mixture into approximately 1-inch balls and place them on a parchment-lined baking sheet.
- Chill the rolled balls in the refrigerator for 30-45 minutes.
- In a microwave-safe bowl, combine semi-sweet chocolate chips and coconut oil. Microwave in 20-second intervals, stirring until smooth.
- Dip each chilled cherry ball into the melted chocolate, tapping off excess and placing them back on the tray.
- While the chocolate is still wet, press a whole maraschino cherry on top and sprinkle with Christmas sprinkles.
- Return the tray to the refrigerator for another 20-30 minutes until the chocolate is set.
- Arrange the finished Christmas Cherry Balls on a serving tray to impress your guests.
Notes
Store in an airtight container in the fridge for up to 5 days or freeze before coating in chocolate for up to 3 months.
- Prep Time: 1 hour 30 minutes
- Category: Dessert
- Cuisine: American