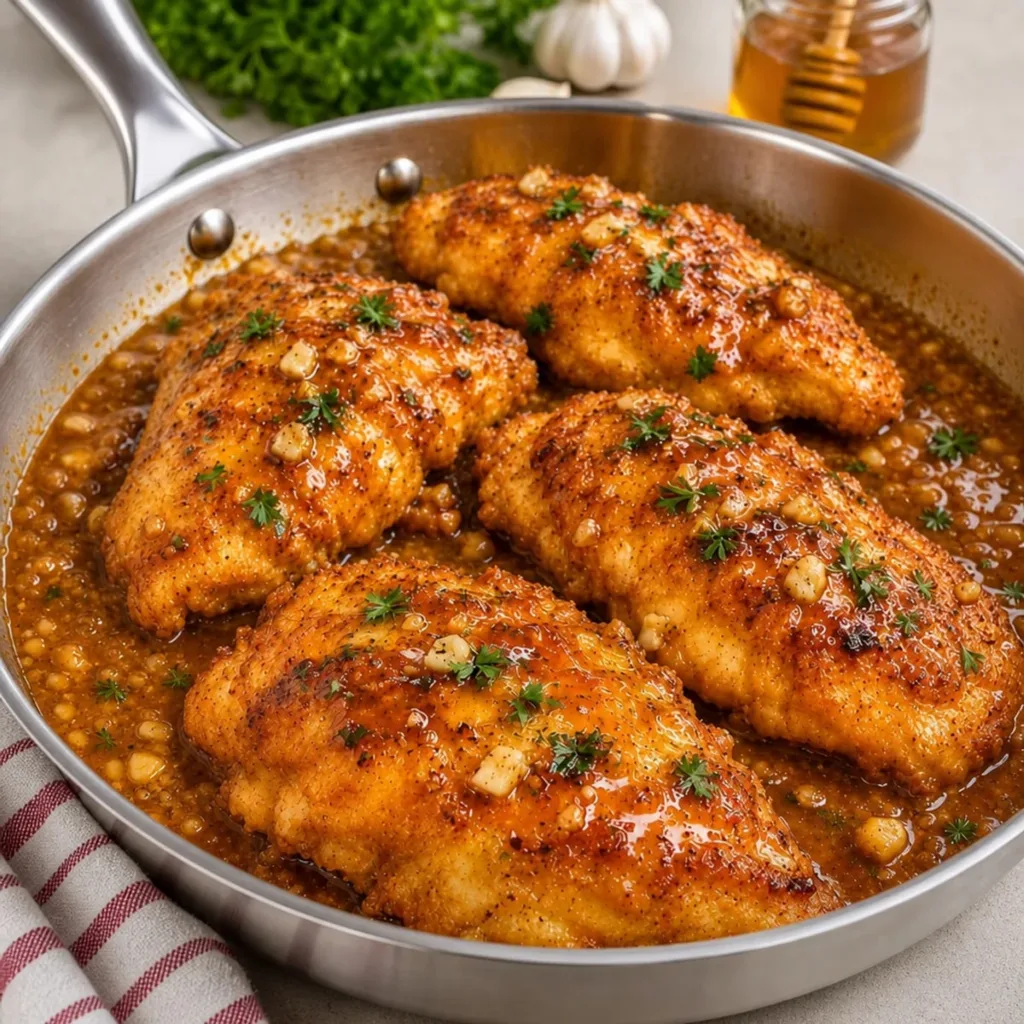
After a long day, there's something so comforting about gathering around the dinner table with a meal that feels both special and satisfying. Enter Crispy Honey Garlic Chicken—a delightful dish that perfectly marries crunchy, golden chicken with a luscious, sticky glaze. The prime ingredients showcase tender chicken breasts, bathed in a rich honey garlic sauce bursting with flavor, making it a crowd-pleaser for both family dinners and cozy gatherings with friends. Plus, it's a breeze to whip up in under an hour, making it an ideal choice for those evenings when you want homemade goodness without the fuss. Say goodbye to takeout and hello to a dish that not only looks fabulous but tastes extraordinary too!
Why this recipe works
Simplicity and Speed: This Crispy Honey Garlic Chicken recipe is incredibly easy to follow, making it perfect for home cooks of all levels. With just a few pantry staples and under an hour, you can create a dish that rivals your favorite restaurant takeout.
Glamorous Taste on a Budget: Imagine the rich flavor of garlic and honey combined in a glossy sauce, all draping over succulent, crispy chicken. The delightful blend of textures, from the crunchy coating to the silky glaze, is sure to impress your family and friends. Elevate your dinner game without breaking the bank—this dish is pure comfort food that keeps everyone coming back for more!
Ingredient breakdown
In our Crispy Honey Garlic Chicken, each ingredient plays a crucial role, contributing not just flavor, but also texture and balance to this delightful dish. Let’s dive into the key components to understand why they’re so important!
For the Chicken
- Boneless skinless chicken breasts – these provide lean protein that cooks quickly and evenly; you can substitute with chicken thighs for a juicier result.
- All-purpose flour – this gives a light yet crispy coating; gluten-free flour can be used for a similar crunch.
- Cornstarch – it helps create an extra-crispy texture; for a variation, use potato starch if you have it.
- Eggs – act as the binder for the coating, ensuring it adheres well to the chicken; flax eggs work as a vegan alternative.
For the Seasoning
- Garlic powder – adds a wonderful depth of flavor; fresh minced garlic can substitute for a more vibrant taste.
- Paprika – lends a subtle smokiness and color to the chicken; smoked paprika can enhance the flavor profile even further.
- Salt – essential for seasoning, bringing out the overall flavors; sea salt or kosher salt works beautifully.
- Freshly ground black pepper – adds a touch of heat to balance the sweetness of the sauce; white pepper can also be used if desired.
For the Sauce
- Honey – the star ingredient that gives the dish its signature sweetness; maple syrup is a delicious alternative for those who prefer a different flavor.
- Low sodium soy sauce – provides umami and saltiness; coconut aminos are a great gluten-free substitute.
- Unsalted butter – enriches the sauce, providing creaminess; you could use vegan butter for a dairy-free option.
- Rice vinegar – adds acidity to balance the sweetness; apple cider vinegar can be used in a pinch.
For Garnish
- Red pepper flakes (optional) – introduce a delightful hint of heat; cayenne pepper can be a spicier alternative.
- Fresh parsley – adds a vibrant pop of color and freshness; cilantro can be a flavorful substitute if you love its taste.
Each ingredient in this Crispy Honey Garlic Chicken not only enhances the dish but also makes it simple to adapt based on what you have in your kitchen.
Step-by-Step Instructions for Crispy Honey Garlic Chicken
Step 1: Prepare the Chicken
Begin by placing the 4 boneless skinless chicken breasts on a clean cutting board. Pat each chicken breast dry thoroughly with paper towels, ensuring they’re moisture-free to help the coating stick. Pound the thicker portions to an even thickness of about ¾ inch, which promotes even cooking and tender texture. Season both sides generously with salt and freshly ground black pepper.
Step 2: Make the Coating
In a shallow mixing bowl, combine ½ cup of all-purpose flour with ¼ cup of cornstarch, 1 teaspoon of garlic powder, 1 teaspoon of paprika, 1 teaspoon of salt, and ½ teaspoon of freshly ground black pepper. Whisk the mixture until fully blended. In another bowl, beat 2 large eggs until the yolks and whites are completely combined, creating a binding agent for the crunchy coating of your Crispy Honey Garlic Chicken.
Step 3: Coat the Chicken
Dip each seasoned chicken breast into the beaten eggs, allowing the excess to drip back into the bowl. Transfer the chicken into the seasoned flour mixture, pressing firmly to ensure a well-coated surface. Shake off any loose flour, then place the coated chicken on a clean plate. Allow the coating to rest for about 5 minutes to help it adhere better during frying.
Step 4: Fry the Chicken
Heat ¼ cup of vegetable oil in a large stainless steel skillet over medium heat until hot but not smoking. Carefully place the coated chicken breasts into the skillet, ensuring not to crowd them. Cook for 5 to 7 minutes until the underside is golden brown and crispy, then use kitchen tongs to turn each breast. Cook the second side for another 5 to 7 minutes, checking that each piece reaches an internal temperature of 165°F (74°C).
Step 5: Rest the Chicken
Once cooked, transfer the crispy chicken to a wire rack, allowing it to rest while you prepare the honey garlic sauce. This resting time helps maintain the crispiness of the coating, making your Crispy Honey Garlic Chicken even more delectable.
Step 6: Make the Sauce
Carefully pour the excess frying oil from the skillet into a heatproof container, then reduce the heat to medium-low. Add 2 tablespoons of unsalted butter to the skillet, allowing it to melt gently. Add 4 cloves of minced garlic and cook for 30 to 45 seconds until fragrant, filling your kitchen with that wonderful aroma.
Step 7: Combine Sauce Ingredients
Pour in ⅓ cup of honey and 3 tablespoons of low sodium soy sauce into the skillet. Stir in 1 tablespoon of rice vinegar and sprinkle with optional crushed red pepper flakes, if desired. Whisk the mixture gently until all ingredients are well combined, creating a glossy sauce that will elevate your Crispy Honey Garlic Chicken.
Step 8: Thicken the Sauce
In a small bowl, mix 1 teaspoon of cornstarch with 2 tablespoons of water until dissolved. Pour the cornstarch mixture into the simmering honey garlic sauce and cook for 2 to 3 minutes, stirring gently until the sauce thickens slightly and takes on a glossy appearance.
Step 9: Glaze the Chicken
Return the crispy chicken breasts to the skillet, spooning the warm honey garlic sauce generously over each piece. Carefully turn the chicken to coat both sides in the sticky glaze, letting it warm in the sauce for about 1 minute, ensuring each bite is flavorful and juicy.
Step 10: Garnish and Serve
Remove the skillet from heat and sprinkle chopped fresh parsley over the glazed chicken for a pop of color and freshness. Allow the chicken to rest for 2 minutes before serving, ensuring the coating stays crisp. Spoon any remaining honey garlic glaze over each serving for added flavor and enjoy your homemade Crispy Honey Garlic Chicken!
What to Serve with Crispy Honey Garlic Chicken
Imagine a cozy dinner where every bite of your crispy chicken is perfectly complemented by delightful sides that satisfy the senses.
- Steamed Jasmine Rice: Light and fluffy, it soaks up the luscious honey garlic sauce, creating a comforting experience with every bite.
- Roasted Seasonal Vegetables: Caramelized to perfection, they add a colorful, healthy crunch, balancing the sweetness of the chicken beautifully.
- Garlic Mashed Potatoes: Creamy and buttery, they offer a rich, velvety counterpart to the crispy texture of the chicken, elevating the meal to comfort food heaven.
- Asian Slaw: A zesty mix of cabbage and carrots, this fresh, crunchy side brightens the plate and adds a satisfying crunch, enhancing the flavors of the chicken.
- Cucumber Pickles: Quick-pickled cucumbers provide a refreshing, tangy contrast that cuts through the richness of the sauce, keeping your palate excited.
- Chilled Sake or White Wine: A crisp, chilled sake or a light pinot grigio enhances the dish with its refreshing notes, making each sip a perfect pairing.
- Sesame Noodles: These nutty, savory noodles are a delicious accompaniment, offering another layer of flavor that harmonizes beautifully with the main dish.
- Chocolate Mousse: For dessert, a silky chocolate mousse is a luscious way to end the meal, giving a sweet finish that contrasts well with the savory chicken.
- Lemon Sorbet: This light, refreshing dessert will cleanse the palate after your honey garlic dish, leaving everyone feeling satisfied yet light.
- Mango Lassi: A creamy mango yogurt drink enhances the meal with its delightful sweetness, complementing the spices in the chicken.
Storage and Freezing
Fridge: Store your Crispy Honey Garlic Chicken in an airtight container for up to 3 days to keep the chicken moist while preserving the flavors.
Freezer: For longer storage, freeze the fully cooked chicken in a sealed container or freezer-safe bag for up to 3 months. To reheat, let it thaw in the fridge overnight.
Reheating: Warm the chicken in a skillet over medium heat, adding a splash of water or sauce to maintain moisture, for about 5-7 minutes, until heated through.
Sauce Storage: If you have leftover honey garlic sauce, store it in the fridge for up to a week, or freeze it for up to 3 months for a quick flavor boost in future meals.
Planning ahead
Preparing your Crispy Honey Garlic Chicken in advance is a game changer for busy weeknights! You can coat the chicken breasts up to 24 hours ahead of time—just place them on a plate and cover them tightly in the fridge to maintain that delightful crunch. The honey garlic sauce can be made in advance, too—store it in an airtight container for up to 3 days. When you're ready to finish the dish, simply cook the breaded chicken as instructed and then glaze it with the warmed sauce, ensuring each bite remains as crispy as when first prepared. This way, you’ll have a homemade meal, ready to wow your family, without the last-minute chaos!
Practical tips
Dry the Chicken Well: Patting the chicken breasts dry is essential for achieving that perfect crispy coating; moisture can lead to sogginess.
Coating Rest Time: Allowing the coated chicken to rest for 5 minutes lets the flour adhere better, preventing it from falling off during frying.
Oil Temperature Check: Ensure the oil is hot but not smoking; too cool will result in greasy, soggy chicken, while too hot can burn the coating.
Internal Temperature: Always check that the chicken reaches an internal temperature of 165°F (74°C) for safety and perfect juiciness in your Crispy Honey Garlic Chicken.
Glaze Generously: Spoon the honey garlic sauce over the chicken right before serving; doing this locks in moisture and enhances flavor.
Garnish for Freshness: Don’t skip the fresh parsley—it's not just for looks! It brightens up the dish with flavor and color, making it even more irresistible.
Frequently asked questions
What kind of chicken should I use for Crispy Honey Garlic Chicken?
I recommend using boneless skinless chicken breasts for a lean and quick-cooking option. If you prefer a juicier alternative, chicken thighs work beautifully too! Just ensure they’re trimmed for even cooking.
How long can I store leftover Crispy Honey Garlic Chicken?
You can store your Crispy Honey Garlic Chicken in an airtight container in the fridge for up to 3 days. To keep the chicken moist and flavorful, be sure to cover it well!
Can I freeze Crispy Honey Garlic Chicken?
Absolutely! For longer storage, freeze the cooked chicken in a sealed container or freezer-safe bag for up to 3 months. Just allow it to thaw in the fridge overnight before reheating.
What’s the best way to reheat the chicken?
To reheat, warm the chicken in a skillet over medium heat for about 5-7 minutes, adding a splash of water or extra sauce to keep it moist. Alternatively, you can use an oven at 350°F (175°C) for about 10-15 minutes until warmed through.
What if my chicken coating doesn't stick?
If you find the coating doesn’t stick well, make sure you pat the chicken dry before coating and let it rest for 5 minutes after coating before frying. This helps the coating adhere better. Also, pressing the coating onto the chicken firmly will help!
Is there a gluten-free option for this recipe?
Absolutely! You can substitute the all-purpose flour with a gluten-free flour blend and use cornstarch or potato starch for the coating. Ensure that your soy sauce is also gluten-free (try coconut aminos) for a complete gluten-free meal.

Crispy Honey Garlic Chicken That Will Wow You!
- Total Time: 50 minutes
- Yield: 4 pieces
Description
Delicious crispy honey garlic chicken featuring tender chicken breasts with a sticky glaze.
Ingredients
For the Chicken
- 4 pieces boneless skinless chicken breasts (or thighs for juiciness)
- ½ cup all-purpose flour (gluten-free flour can be used)
- ¼ cup cornstarch (potato starch can be used)
- 2 large eggs (flax eggs as a vegan alternative)
For the Seasoning
- 1 teaspoon garlic powder (fresh minced garlic can be substituted)
- 1 teaspoon paprika (smoked paprika enhances flavor)
- 1 teaspoon salt (sea or kosher salt recommended)
- ½ teaspoon freshly ground black pepper (white pepper can be used)
For the Sauce
- ⅓ cup honey (maple syrup can be used)
- 3 tablespoons low sodium soy sauce (coconut aminos as a gluten-free substitute)
- 2 tablespoons unsalted butter (vegan butter as a dairy-free option)
- 1 tablespoon rice vinegar (apple cider vinegar can be substituted)
For Garnish
- 1 teaspoon red pepper flakes (optional, cayenne pepper for spiciness)
- 2 tablespoons fresh parsley (or cilantro for freshness)
Instructions
Step-by-Step Instructions
- Prepare the chicken by patting dry and seasoning with salt and pepper.
- Make the coating by combining flour, cornstarch, garlic powder, paprika, salt, and pepper in a bowl.
- Coat the chicken in flour mixture after dipping in egg.
- Heat vegetable oil and fry chicken until golden and cooked through.
- Rest the chicken on a wire rack.
- Make the sauce by melting butter, cooking garlic, then adding honey and soy sauce.
- Combine sauce ingredients and whisk until glossy.
- Thicken the sauce by adding cornstarch mixture and stirring until glossy.
- Glaze the chicken with the sauce before serving.
- Garnish with parsley and serve.
Notes
Ensure to check the internal temperature of the chicken reaches 165°F (74°C) for safety.
- Prep Time: 20 minutes
- Cook Time: 25 minutes
- Category: Dinner
- Cuisine: American