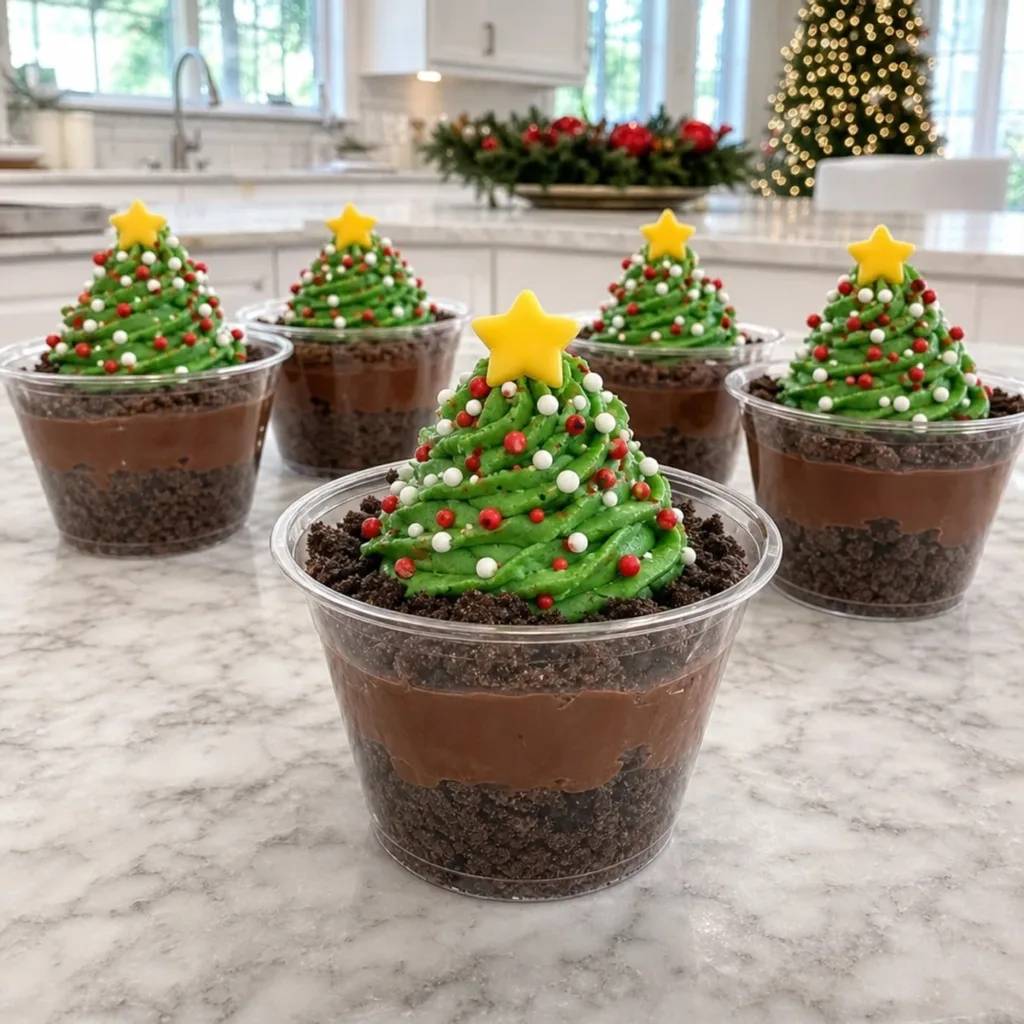
The holiday season always brings an air of magic, especially when our decorations start to dazzle and our kitchens fill with delightful scents. Enter the charming Christmas Tree Cake Dirt Cups—a whimsical dessert that artfully combines layers of rich chocolate pudding, crushed chocolate cookies, and a vibrant green buttercream frosting shaped into festive trees. These crowd-pleasers not only require minimal prep time but also add a playful touch to any holiday gathering, making them perfect for easy entertaining or cozy family evenings. Imagine serving up these delightful cups, each one topped with colorful sprinkles and a shining star candy, while everyone shares stories and laughter around the table.
Are you ready to create a sweet centerpiece for your holiday festivities?
Ingredient notes
These Christmas Tree Cake Dirt Cups are crafted with a blend of delightful ingredients that make them not only tasty but also visually stunning. Below, I’ve broken down the components to help you understand their role in this festive treat and suggest any handy substitutions.
For the Base
- Chocolate sandwich cookies – These create a delicious "dirt" layer that's both crunchy and sweet. You can substitute with any chocolate cookie you enjoy.
- Cold whole milk – Essential for the pudding mix; it ensures a creamy texture. Almond milk can be used as a dairy-free alternative.
For the Filling
- Instant chocolate pudding mix – This rich mix gives the dessert its chocolaty flavor and silky finish. You can also use vanilla pudding for a lighter taste.
- Cream cheese – Adds a velvety richness to the filling. Neufchâtel cheese is a great lower-fat substitute.
- Powdered sugar – Sweetens the cream cheese mixture; you can use sugar alternatives if desired.
- Vanilla extract – This enhances the overall flavor; use pure vanilla for the best taste.
For the Frosting
- Unsalted butter – Whipped to fluffy perfection, it’s the base of your festive green frosting. If you're looking for a dairy-free option, you could use vegan butter.
- Heavy whipping cream – Adds richness to the frosting; half-and-half can be a lighter substitute if you prefer.
- Green gel food coloring – Vital for achieving that festive tree color; feel free to use natural food coloring if you wish.
For the Decorations
- Red and white Christmas sprinkles – These add a pop of color and festive cheer. Use any holiday-themed sprinkles you love!
- Yellow star-shaped candy decorations – A charming finishing touch to your trees; you can use edible gold stars if you can't find star-shaped candies.
Every ingredient plays a crucial role in creating these whimsical Christmas Tree Cake Dirt Cups, making them a delectable addition to your holiday celebrations!
Step-by-Step Instructions for Christmas Tree Cake Dirt Cups
Step 1: Prepare the Cookie Crumbs
Place the chocolate sandwich cookies into a food processor and pulse until they become coarse crumbs, resembling dark chocolate dirt, for about 30 seconds. Transfer the crushed cookies into a medium mixing bowl, ensuring you keep aside 1 cup of cookie crumbs for the topping later.
Step 2: Make the Chocolate Pudding
Pour the cold whole milk into a large mixing bowl and add the instant chocolate pudding mix. Whisk continuously for about 2 minutes until the mixture thickens and becomes smooth. Once done, refrigerate the pudding for 5 minutes to help it set properly.
Step 3: Create the Cream Cheese Mixture
In another large mixing bowl, place the softened cream cheese, 1/4 cup of powdered sugar, and 1 teaspoon of vanilla extract. Using an electric mixer, beat on medium speed for 3 minutes until the cream cheese is completely smooth and creamy, creating a rich base for your filling.
Step 4: Combine the Pudding and Cream Cheese
Add the prepared chocolate pudding to the cream cheese mixture. Beat on low speed until everything is evenly combined, which should take about 1 minute. This will create a luscious filling that will beautifully blend with the cookie crumb base in the Christmas Tree Cake Dirt Cups.
Step 5: Fold in the Whipped Topping
Gently fold the thawed whipped topping into the chocolate mixture using a rubber spatula, being careful not to deflate the fluffy texture. Continue folding until the filling is light and airy, creating that irresistibly creamy texture perfect for layering in your dessert cups.
Step 6: Assemble the Cup Layers
Arrange 5 clear 9-ounce dessert cups on your countertop. Evenly divide the remaining chocolate cookie crumbs among the cups and press them lightly with the back of a spoon to form a base layer. Spoon the prepared chocolate pudding filling over the cookie crumbs, ensuring an even layer in each cup.
Step 7: Add the “Dirt” Topping
Sprinkle the reserved chocolate cookie crumbs evenly over the pudding layers in each cup. This will create a realistic dirt topping, adding both texture and visual appeal to your delightful Christmas Tree Cake Dirt Cups.
Step 8: Chill the Cups
Cover the assembled dessert cups and place them in the refrigerator for about 30 minutes. Chilling helps the layers set properly, ensuring each bite has the perfect balance of flavors and textures when served.
Step 9: Prepare the Buttercream Frosting
In a clean large mixing bowl, beat the softened unsalted butter for about 3 minutes until it becomes pale and fluffy. Gradually add the 3 cups of powdered sugar while mixing on low speed, creating a smooth mixture.
Step 10: Mix in Cream and Flavor
Pour in the heavy whipping cream and add the remaining 1 teaspoon of vanilla extract. Beat the frosting on medium speed for 2 to 3 minutes until it reaches a thick, fluffy consistency that’s ideal for decorating your Christmas Tree Cake Dirt Cups.
Step 11: Color the Frosting
Add a few drops of green gel food coloring to the buttercream frosting. Mix until the frosting achieves a bright Christmas tree green color, making adjustments as necessary to reach your desired shade for festive appeal.
Step 12: Pipe the Frosting Trees
Remove the chilled dessert cups from the refrigerator and fit a large piping bag with an open star tip. Start at the center of the first dessert cup, piping a wide circular swirl of green frosting over the cookie “dirt” layer and then continue upward in smaller swirls, shaping it into a cone-like Christmas tree.
Step 13: Add Decorations
Repeat the piping process for the remaining dessert cups, creating beautiful green frosting trees. Sprinkle red and white Christmas sprinkles over each frosted tree, resembling ornaments, and gently press a yellow star-shaped candy on top to finish your festive masterpiece.
Step 14: Final Chill Before Serving
Place the decorated dessert cups back in the refrigerator for an additional 15 minutes. This will help the frosting hold its shape perfectly, ensuring your Christmas Tree Cake Dirt Cups are pristine when served to your family and friends.
Serving and pairing ideas
The festive feel of this dessert makes it perfect for holiday gatherings. Imagine the joyous expressions when you present the playful Christmas Tree Cake Dirt Cups alongside these complementary treats!
- Warm Gingerbread Cookies: The spicy warmth of gingerbread pairs beautifully with chocolate and adds a nostalgic holiday flavor.
- Sweet Peppermint Hot Chocolate: Serve this creamy drink alongside for a cozy, indulgent experience that warms the heart.
- Christmas Fruit Salad: A light, refreshing option that balances the decadent dessert with fresh fruit flavors and vibrant colors.
- Chewy Caramel Brownies: For an extra sweet touch, these fudgy brownies enhance the chocolatey goodness and are sure to please.
- Nutty Holiday Trail Mix: Offer a crunchy contrast with a mixture of nuts, dried fruit, and holiday-themed chocolates for a festive nibble.
- Eggnog Milkshakes: Celebrate the season with this spiced shake, bringing a rich, creamy flavor that echoes the holidays perfectly.
- Spiced Apple Cider: The warmth and sweetness of this drink complement the dessert's chocolate and provide a comforting touch.
- Vanilla Ice Cream: A classic pairing that adds creaminess and balances the dessert while allowing the chocolate flavors to shine.
- Chocolate-Dipped Pretzels: For those who love a sweet-and-salty combo, these bites are a delightful treat that enhances the overall experience!
These pairings not only enhance your dessert but create a delightful culinary experience that nurtures warmth and joy during the holiday season.
Keeping leftovers fresh
Fridge: Store any leftover Christmas Tree Cake Dirt Cups in an airtight container in the refrigerator for up to 3 days. This keeps the layers fresh and the frosting intact.
Before Serving: If the cups have been refrigerated for a day or two, gently stir the frosting layer to bring back its light, fluffy texture before serving.
Freezer: For longer storage, you can freeze the cookie crumb base separately without the layers for up to 2 months. Just thaw and reassemble when ready to serve.
Texture Tip: Avoid freezing the assembled cups, as the whipped topping and pudding may separate when thawed. Enjoy them fresh for the best taste and texture!
Ways to change it up
Feel free to get creative with your Christmas Tree Cake Dirt Cups and tailor them to your taste or dietary needs!
- Gluten-Free: Swap chocolate sandwich cookies for gluten-free chocolate cookies to make this treat suitable for those with gluten sensitivities.
- Dairy-Free Delight: Use coconut cream in place of cream cheese and coconut yogurt instead of whipped topping for a delicious dairy-free version.
- Minty Fresh: Add a few drops of peppermint extract to the filling for a festive mint chocolate twist that will refresh your palate.
- Nutty Addition: Fold in crushed nuts like walnuts or pecans into the pudding filling for an added crunchy texture that complements the chocolate.
- Layered Fruit: Add a layer of crushed strawberries or raspberries between the pudding layers for a fruity contrast that brightens up the dessert.
- Chili Chocolate: Introduce a pinch of cayenne pepper to the pudding mix for a surprising kick that contrasts beautifully with the sweetness.
- Alternative Frosting: Try using cream cheese frosting instead of buttercream for a tangy flavor that pairs wonderfully with the chocolate base.
- Colorful Sprinkles: Use a mix of colorful holiday sprinkles for extra festive flair, or even edible glitter to make your dessert sparkle!
Feel free to explore these variations and make this recipe your own. The kitchen is a canvas, and the fun lies in creating something uniquely delightful! And if you’re interested, check out our guide on festive baking for more fun ideas.
Tips for the best results
Perfect Cookie Crumbs: Ensure your chocolate sandwich cookies are finely crushed without any large chunks for a smoother base. This will enhance the texture of the Christmas Tree Cake Dirt Cups.
Chilling Time Matters: Don’t skip the chilling periods! Allowing the layers to set in the refrigerator helps maintain the structure of the dessert during serving.
Frosting Consistency: Be cautious not to overbeat the buttercream. It should be fluffy yet thick enough to hold its shape when piped.
Coloring Tips: When adding green gel food coloring, start with a small amount. You can always add more if needed to achieve your desired vibrant hue for the frosting.
Layering Technique: For the best visual appeal, layer your cookie crumbs and pudding evenly. Use a small spoon to smooth the surfaces for a neat finish before adding the frosting.
Christmas Tree Cake Dirt Cups Recipe FAQs
What type of chocolate sandwich cookies should I use?
Absolutely! For the best flavor and texture, use classic Oreos or any chocolate sandwich cookie you love. They create a delightful "dirt" layer. If you're looking for a gluten-free option, you can find gluten-free chocolate cookies at your local grocery store.
How should I store leftover Christmas Tree Cake Dirt Cups?
Store any leftover cups in an airtight container in the refrigerator for up to 3 days. This helps maintain the texture of the layers. If the frosting has been sitting for a day or two, gently stir it before serving to keep it light and fluffy!
Can I freeze the Christmas Tree Cake Dirt Cups?
I recommend against freezing the assembled cups, as the whipped topping and pudding may lose their creamy texture upon thawing. However, you can freeze the cookie crumb base separately for up to 2 months. Just thaw it and reassemble when you're ready to enjoy!
How do I know when my chocolate pudding is ready?
It's quite simple! After whisking the pudding and allowing it to sit in the refrigerator for about 5 minutes, check for a thick and smooth consistency. It should hold its shape when spooned out. If it feels runny, give it a bit more time in the fridge.
Can I use alternatives for dietary restrictions in this recipe?
Very! You can easily make substitutions for dietary needs. Use almond milk or oat milk in place of whole milk for a dairy-free option. Neufchâtel cheese works well for cream cheese, and vegan butter can replace unsalted butter in the frosting. Just keep in mind the flavor and texture may slightly vary.
What if my frosting is too runny?
If your frosting ends up too runny, don't worry! Simply add a bit more powdered sugar, one tablespoon at a time, while mixing until you reach the desired thick, spreadable consistency. Additionally, chilling it in the refrigerator for about 15-20 minutes can help firm it up.
Advertisement
Festive Chocolate Tree Dirt Cups for the Holidays
- Total Time: 1 hour 15 minutes
- Yield: 5 cups
Description
Delightful Christmas Tree Cake Dirt Cups combine rich chocolate pudding, crushed cookies, and festive buttercream frosting for a magical holiday dessert.
Ingredients
For the Base
- 15 cookies Chocolate sandwich cookies (Crushed for the ‘dirt’ layer.)
- 2 cups Cold whole milk (Can substitute with almond milk.)
For the Filling
- 1 box Instant chocolate pudding mix (Can substitute with vanilla pudding.)
- 8 oz Cream cheese (Softened, can use Neufchâtel cheese.)
- 1/4 cup Powdered sugar (Use sugar alternatives if desired.)
- 1 tsp Vanilla extract (Use pure vanilla for best taste.)
For the Frosting
- 1/2 cup Unsalted butter (Softened, can substitute with vegan butter.)
- 1 cup Heavy whipping cream (Can substitute with half-and-half.)
- 1 tbsp Green gel food coloring (Can use natural food coloring.)
For the Decorations
- 1/4 cup Red and white Christmas sprinkles (Use any holiday-themed sprinkles.)
- 5 pieces Yellow star-shaped candy decorations (Can use edible gold stars if unavailable.)
Instructions
Step-by-Step Instructions
- Prepare the Cookie Crumbs: Place chocolate sandwich cookies into a food processor and pulse until they become coarse crumbs, about 30 seconds.
- Transfer crushed cookies into a medium mixing bowl, keeping aside 1 cup of crumbs for topping.
- Make the Chocolate Pudding: Pour cold whole milk into a large bowl, add instant pudding mix and whisk for about 2 minutes until thick.
- Refrigerate the pudding for 5 minutes.
- Create the Cream Cheese Mixture: In another bowl, beat together softened cream cheese, 1/4 cup powdered sugar, and 1 tsp vanilla extract until smooth.
- Combine the Pudding and Cream Cheese: Add chocolate pudding to cream cheese mixture and beat on low speed until fully combined.
- Fold in the Whipped Topping: Gently fold the thawed whipped topping into the chocolate mixture until light and airy.
- Assemble the Cup Layers: Divide cookie crumbs among cups, pressing lightly. Spoon pudding filling over crumbs.
- Add the ‘Dirt’ Topping: Sprinkle reserved cookie crumbs over pudding layers.
- Chill the Cups: Cover and refrigerate for about 30 minutes.
- Prepare the Buttercream Frosting: Beat softened butter until pale and fluffy, then gradually add powdered sugar while mixing.
- Mix in Cream and Flavor: Add heavy whipping cream and remaining vanilla extract. Beat until frosting is thick and fluffy.
- Color the Frosting: Add green gel food coloring and mix until achieving desired shade.
- Pipe the Frosting Trees: Use a piping bag to create tree shapes on top of each cup.
- Add Decorations: Sprinkle red and white sprinkles and place a yellow star on top.
- Final Chill Before Serving: Refrigerate for an additional 15 minutes before serving.
Notes
Store leftovers in an airtight container in the fridge for up to 3 days. For longer storage, freeze the cookie crumb base separately.
- Prep Time: 30 minutes
- Category: Dessert
- Cuisine: American