

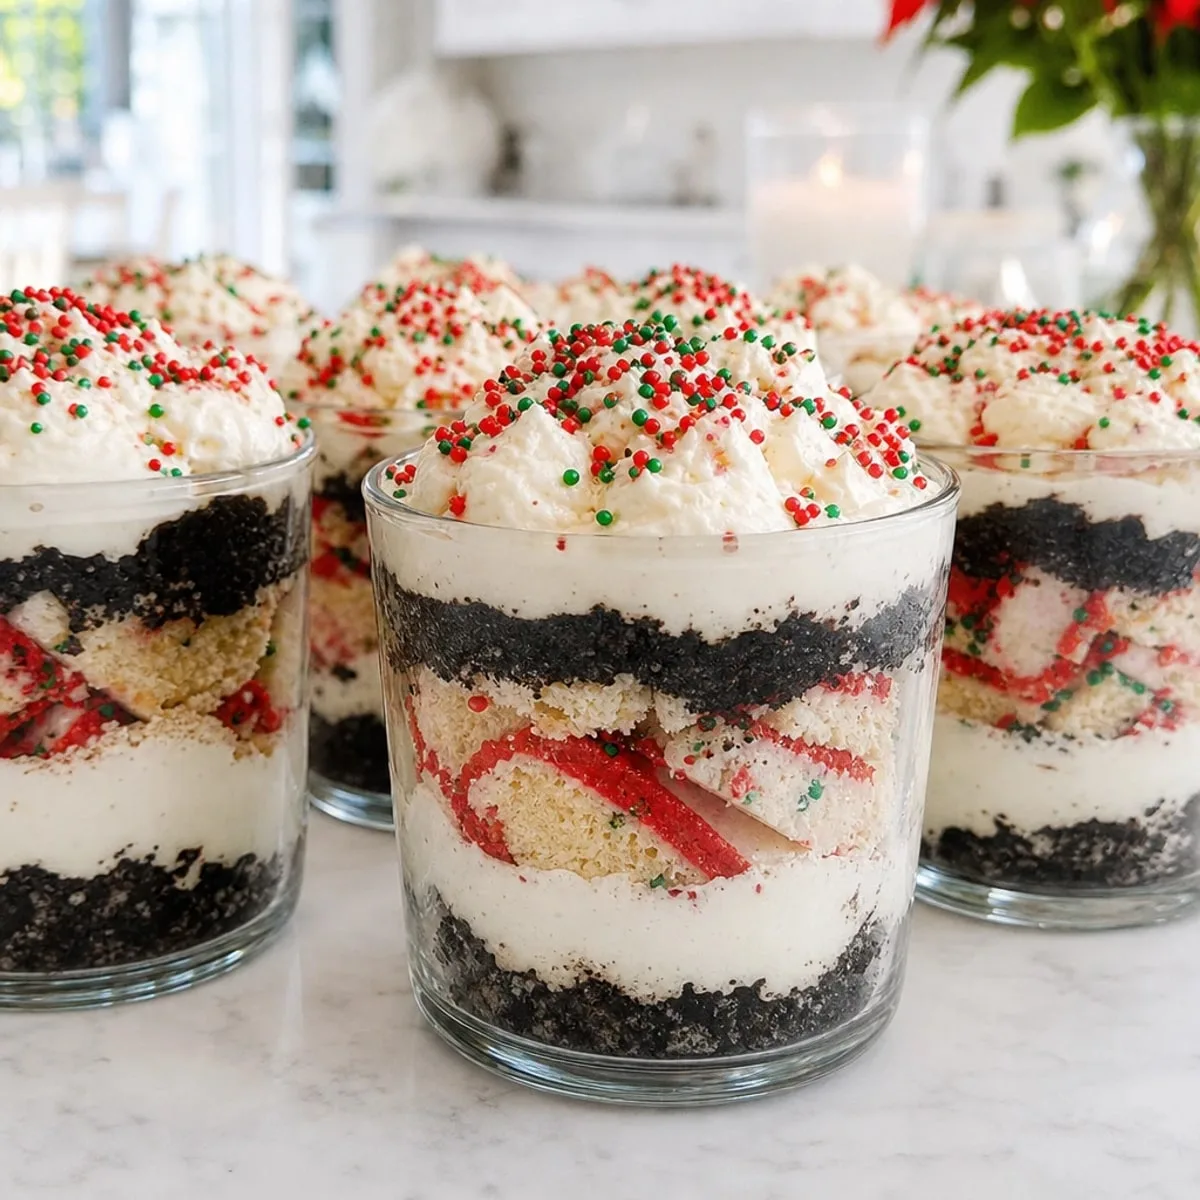
With the hustle and bustle of the holiday season, finding the perfect dessert that brings smiles without adding to your stress can feel like a challenge. Enter these delightful Christmas Tree Cake Dirt Cups—my secret weapon for festive gatherings! This whimsical dessert combines crushed chocolate sandwich cookies with a dreamy vanilla cheesecake filling and, of course, everyone’s favorite Little Debbie Christmas Tree Cakes. The best part? They’re not just show-stoppers; these cups are a breeze to whip up, making them perfect for both seasoned bakers and those still finding their footing in the kitchen. Plus, their individual servings keep things tidy while adding a special touch to your holiday table. Let’s dive into creating a dessert that’s sure to impress your loved ones!
What makes it special
- Easy to Assemble: Whip up these cups in just 25 minutes, perfect for busy holiday schedules.
- Charming Presentation: Individual clear cups showcase the colorful layers, making them a visual delight on any dessert table.
- Decadent Layers: Enjoy the rich combination of creamy vanilla cheesecake filling and crunchy cookie layers, delivering a variety of textures.
- Festive Flair: Adorned with holiday sprinkles and topped with Little Debbie cakes, these cups encapsulate the spirit of the season.
- Crowd-Pleasing Delight: Kids and adults alike will be begging for seconds—perfect for parties or family gatherings.
With such wonderful qualities, these Christmas Tree Cake Dirt Cups are destined to become a beloved holiday tradition!
Ingredient notes
When creating these delightful Christmas Tree Cake Dirt Cups, selecting quality ingredients is key. Here’s a breakdown of what you’ll need, along with tips on substitutions and the purpose of each ingredient to ensure your dessert shines this holiday season!
For the Cheesecake Filling
- Little Debbie Christmas Tree Cakes – These are the star of the show, providing both flavor and a festive touch to your cups.
- Instant Vanilla Pudding Mix – Quick and effortless, it helps create a creamy texture while adding sweetness. Feel free to substitute with another flavor if you're feeling adventurous!
- Cold Whole Milk – This is essential for making the pudding; whole milk yields a richer taste, but you can use any milk of your choice for a lighter option.
- Cream Cheese – Softened cream cheese creates a luscious filling, but for a lighter version, consider using Neufchâtel cheese.
- Powdered Sugar – This sweetens the cheesecake filling without the grittiness of granulated sugar, lending a smooth finish.
- Vanilla Extract – A splash of vanilla enhances the flavors, bringing warmth and depth to your dessert.
For the Cookie Crust
- Chocolate Sandwich Cookies – These crunchy cookies form the base of the cups, adding a delightful contrast to the creamy layers. You can substitute with any chocolate cookie for similar flavor.
- Red Decorating Icing – While optional, this icing adds a pop of color and festive flair to your dessert.
For the Toppings
- Whipped Topping – This lightens the filling texture, making it airy and fluffy. If you prefer a homemade touch, you can whip your own heavy cream instead.
- Christmas Sprinkles – These festive sprinkles add a joyful touch and finish off each cup beautifully. Feel free to use any color that suits your holiday theme!
- Miniature Christmas Tree Cakes – These cute toppers mirror the main ingredient and provide an extra layer of fun and sweetness.
With these thoughtfully chosen components, your Christmas Tree Cake Dirt Cups will be irresistibly delicious and visually stunning, ready to impress family and friends alike!
Step-by-Step Instructions for Christmas Tree Cake Dirt Cups
Step 1: Soften the Cream Cheese
Remove the cream cheese from the refrigerator and let it sit at room temperature for about 20-30 minutes until completely softened. This step ensures it blends smoothly into the cheesecake filling, creating a creamy texture in your delightful Christmas Tree Cake Dirt Cups.
Step 2: Crush the Cookies
Place the chocolate sandwich cookies into a food processor and pulse until they resemble fine chocolate crumbs, about 30-45 seconds. Once you achieve a sand-like consistency, transfer the crushed cookies into a medium bowl, setting them aside for a delicious base layer in your dessert cups.
Step 3: Chop the Christmas Tree Cakes
Take your Little Debbie Christmas Tree Cakes and chop them into small, bite-sized pieces, roughly the size of a marble. Reserve a few pieces for decoration later. This step adds festive flavor and texture to each layer of your Christmas Tree Cake Dirt Cups.
Step 4: Combine the Pudding Mix
In a large mixing bowl, pour in the cold whole milk and add both packages of instant vanilla pudding mix. Whisk together vigorously for about 2 minutes until the mixture thickens and becomes smooth, indicating that your base for the cheesecake filling is ready to go!
Step 5: Mix the Cream Cheese Filling
In a separate large bowl, place the softened cream cheese, powdered sugar, and vanilla extract. Using an electric mixer, beat the mixture on medium speed until it reaches a completely smooth and creamy texture, taking about 3-4 minutes. This luscious filling will be the heart of your Christmas Tree Cake Dirt Cups.
Step 6: Combine the Pudding and Cheese Mixtures
Carefully add the thickened pudding to the cream cheese mixture. Beat on low speed until the two mixtures are fully combined, about 1-2 minutes, creating a rich and creamy filling perfect for layering in your dessert cups.
Step 7: Fold in the Whipped Topping
Gently fold the thawed whipped topping into the combined pudding and cream cheese mixture using a rubber spatula. Continue folding until the filling becomes light, fluffy, and evenly blended, about 1-2 minutes. This airy texture will make your Christmas Tree Cake Dirt Cups irresistibly delicious.
Step 8: Prepare Your Dessert Cups
Arrange 12 individual clear dessert cups or small serving glasses on a counter. To create the base layer, spoon approximately 2 tablespoons of crushed chocolate cookies into the bottom of each cup, then press the crumbs gently to form an even, firm layer that sets the stage for the layers to come.
Step 9: Layer the Filling
Add a generous layer of the vanilla cheesecake filling over the pressed cookie crumbs in each cup, smoothing it out gently without disturbing the crust. This layer should be rich and creamy, filling about half of the cup's height, seamlessly blending with the crumbly base.
Step 10: Add the Christmas Tree Cakes
Sprinkle a generous layer of chopped Christmas Tree Cakes over the cream filling in each cup. Follow this by sprinkling a small amount of the crushed chocolate cookies over the cake pieces, giving each cup an extra layer of flavor and texture in your Christmas Tree Cake Dirt Cups.
Step 11: Finish with More Filling and Crumbs
Layer on another generous amount of the vanilla cheesecake filling, leveling it off just below the rim of each cup. For the final touch, add a layer of crushed chocolate cookie crumbs on top, adding a delightful crunch and visually appealing contrast.
Step 12: Decorate and Chill
Top each dessert cup with a small piece of Christmas Tree Cake and drizzle a little red decorating icing over the top. Finish by sprinkling red and green Christmas sprinkles on each serving. Carefully cover the dessert cups with plastic wrap and refrigerate for at least 4 hours, allowing the layers to chill, firm up, and blend beautifully before serving.
Serving and pairing ideas
What to serve with Christmas Tree Cake Dirt Cups?
Creating a festive spread around these delightful dessert cups adds to the holiday cheer and ensures a satisfying meal for your loved ones!
Festive Fruit Salad: A refreshing mix of seasonal fruits like pomegranate, oranges, and kiwi provides a vibrant contrast to the rich dessert.
Hot Cocoa: Indulge in a warm cup of cocoa topped with whipped cream; its sweetness balances the creamy layers of the dirt cups beautifully.
Chocolate Dipped Pretzels: The salty crunch of pretzels dipped in chocolate offers a delightful textural contrast that pairs wonderfully with the sweet layers.
Gingerbread Cookies: Classic holiday flavors come together; the spiced cookies complement the sweetness of the dirt cups while adding a homey touch.
Whipped Cream Topping: For an extra touch of elegance, serve a side of homemade whipped cream to spoon over the dessert cups, enhancing the creamy texture.
Peppermint Bark: The cool minty flavor in this treat adds a refreshing pop that contrasts beautifully with the richness of the cheesecake layers.
Eggnog: A classic holiday drink, its creamy, spiced flavor harmonizes perfectly with the festive elements in your dessert cups.
These pairings will elevate your festive experience, making your holiday gatherings truly memorable!
Substitutions and variations
Feel free to let your creativity shine when making these delightful Christmas Tree Cake Dirt Cups!
Gluten-Free: Substitute regular chocolate sandwich cookies with gluten-free varieties to keep the same delicious flavor while accommodating dietary needs.
Dairy-Free: Use coconut cream and a dairy-free pudding mix to create a luscious filling that everyone can enjoy without the dairy. You'll still get that creamy texture – no one will miss the original!
Flavor Twist: Experiment with different pudding flavors like chocolate or butterscotch for a unique take on this classic. Chocolate adds depth, while butterscotch brings a lovely caramel note.
Healthy Option: Swap the whipped topping with homemade whipped coconut cream for a lighter, yet equally delightful finish. It adds a subtle coconut flavor that pairs perfectly!
Nutty Crunch: For some extra crunch, incorporate chopped nuts like pecans or almonds in between the layers. They add an earthy flavor and delightful texture to your dessert.
Layer It Up: If you want to elevate the dessert further, add layers of crushed peppermint candies or crushed candy canes for a refreshing minty twist that ties in the holiday spirit beautifully.
Festive Colors: In place of the traditional red and green sprinkles, try using white chocolate shavings or edible glitter for a touch of glam. The shimmering finish looks stunning!
These variations and substitutions allow you to craft a version of Christmas Tree Cake Dirt Cups that suits your tastes or dietary preferences. Each twist brings a unique flavor and presentation that can become a new holiday tradition!
Storage and Freezing
Fridge: Store your Christmas Tree Cake Dirt Cups covered in the refrigerator for up to 3 days. This allows the layers to firm up while still keeping the dessert fresh and delicious.
Freezer: Although these cups are best enjoyed fresh, you can freeze them for up to 1 month. Make sure to wrap them tightly in plastic wrap and then place them in a sealed container to prevent freezer burn.
Reheating: Since this dessert is meant to be served chilled, there's no need to reheat. Just allow frozen cups to thaw in the fridge overnight before serving.
Serving Tips: If you have prepared layers separately (like the filling and crust), store them separately to maintain texture. Assemble just before serving for the best results!
Common mistakes to avoid
- Overmixing the Filling: Be gentle when folding in the whipped topping; overmixing can deflate your creamy filling, making it less fluffy in your Christmas Tree Cake Dirt Cups.
- Skipping the Chill Time: Allowing the dessert cups to chill for at least 4 hours is crucial. Skipping this step results in a loose texture and won’t allow the flavors to meld.
- Crushing Cookies Too Coarsely: Ensure the chocolate sandwich cookies are finely crushed for a stable base. Large chunks won't hold together well in your dessert cups.
- Using Cold Ingredients: Softening cream cheese is key for a smooth filling. If it’s too cold, it won’t blend well with the other ingredients, affecting your texture.
- Not Measuring Ingredients: Be precise with your ingredient measurements, especially for the pudding and cream cheese. Accurate amounts yield the best balance of flavor and texture.
Planning ahead
These Christmas Tree Cake Dirt Cups are not just festive; they’re also a perfect solution for busy home cooks looking to save time! You can prep various components up to 24 hours in advance, ensuring freshness while making assembly a breeze. Start by crushing the chocolate sandwich cookies and chopping the Little Debbie cakes the day before. You can also mix the vanilla pudding and cream cheese filling up to 3 days ahead; just store it tightly covered in the refrigerator to maintain that creamy texture. When you're ready to serve, simply layer the components in dessert cups, decorating them with sprinkles and icing just before presentation, to keep everything looking vibrant and exciting!
FAQ
What should I look for when selecting Little Debbie Christmas Tree Cakes?
Absolutely! When choosing Little Debbie Christmas Tree Cakes, look for packages that are intact with no signs of damage. Ideally, pick ones with a soft texture (not stale) and vibrant frosting colors. Check the expiration date to ensure freshness, as these cakes are best when consumed close to the production date.
How long can I store my Christmas Tree Cake Dirt Cups?
These delightful dessert cups will stay fresh in the refrigerator for up to 3 days. Just make sure to cover them well with plastic wrap or lids to maintain their flavor and appearance. This short time frame allows the layers to blend beautifully while ensuring they remain delicious!
Advertisement
Can I freeze the Christmas Tree Cake Dirt Cups?
Yes, you can! Wrap each cup tightly in plastic wrap and then place them in a sealed container. They can be frozen for up to 1 month. When you're ready to enjoy them, simply transfer the cups to the refrigerator overnight to thaw. This way, you get to savor their delightful textures without losing any flavor!
What should I do if my cream cheese mixture is lumpy?
If your cream cheese mixture turns out lumpy, don't worry! Ensure the cream cheese is fully softened; if it's still cold, it won’t blend smoothly. You can use a hand mixer to beat the cream cheese on its own until smooth before incorporating the pudding mixture. Just keep mixing on low speed, and it will become creamy!
Are there any common allergens in this dessert?
Yes, be cautious with allergens! This recipe contains dairy (cream cheese, whipped topping, milk) and gluten (chocolate sandwich cookies). For a gluten-free option, look for gluten-free chocolate cookies and ensure other ingredients are free from cross-contamination. Always check for specific dietary needs before serving!
How do I make these cups more festive for a party?
To add an extra touch of festivity, you can enhance your decoration! Consider adding edible glitter, different colored sprinkles, or even themed cookie toppers. You could also create a decorative tray or arrange the cups in a holiday-themed vase for a stunning presentation on your dessert table. Making things visually appealing brings even more joy!
Festive Christmas Tree Cake Dirt Cups for Holiday Indulgence
Ingredients
Equipment
Method
- Soften the cream cheese by letting it sit at room temperature for 20-30 minutes.
- Crush the chocolate sandwich cookies in a food processor until fine.
- Chop the Little Debbie Christmas Tree Cakes into bite-sized pieces.
- In a bowl, mix cold milk and pudding mix; whisk until thick.
- Beat softened cream cheese, powdered sugar, and vanilla until smooth.
- Combine pudding mixture with cream cheese and mix until blended.
- Fold in whipped topping until light and fluffy.
- Spoon crushed cookie crumbs into dessert cups for the base layer.
- Add a layer of vanilla cheesecake filling over the cookie base.
- Sprinkle generous amounts of chopped Christmas Tree Cakes on top.
- Add another layer of cheesecake filling and top with cookie crumbs.
- Decorate with a piece of Christmas Tree Cake and sprinkles; refrigerate for at least 4 hours.