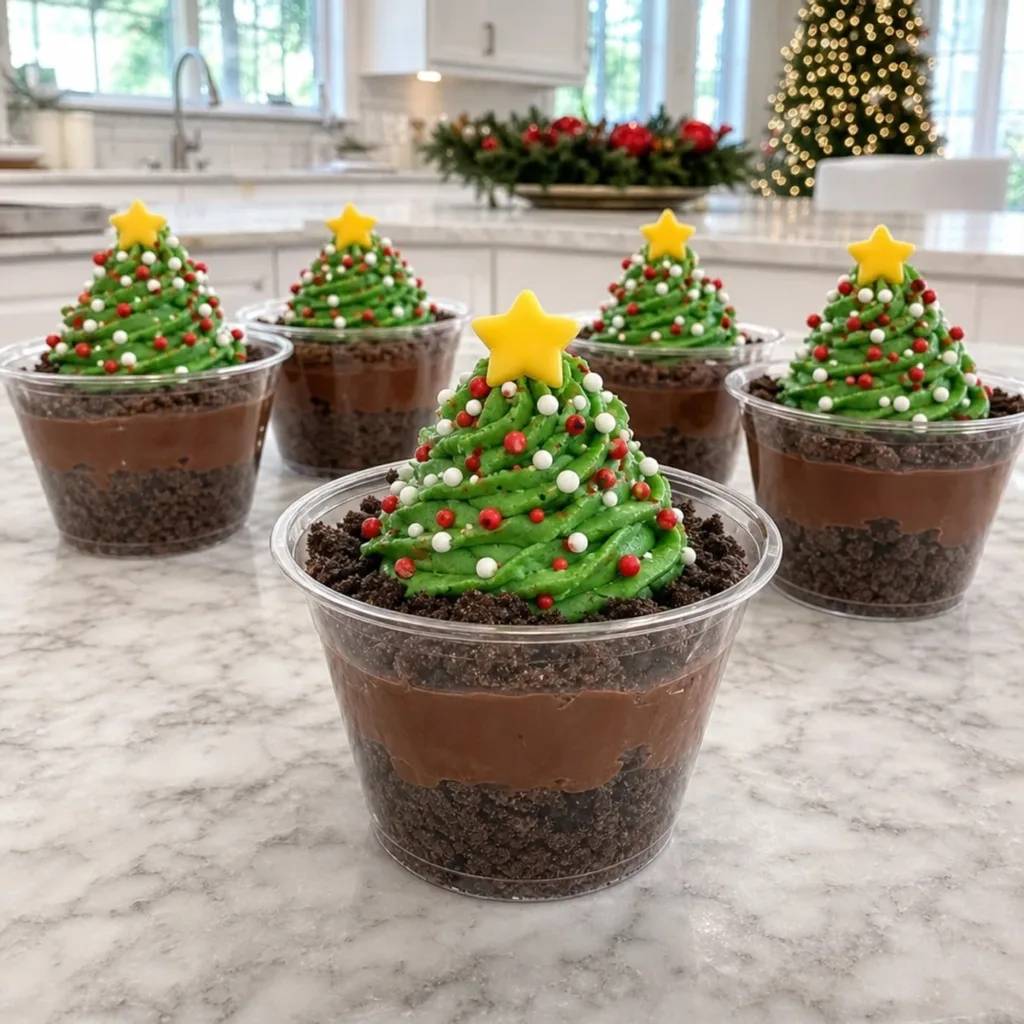


As the holiday season approaches, there's this magical buzz in the air that makes me crave something sweet and nostalgic. That's when I whip up my delightful Christmas Tree Cake Dirt Cups. This recipe combines layers of soft Christmas tree snack cake cubes and crunchy chocolate sandwich cookie crumbs, creating a festive dessert that dazzles the eyes and pleases the palate. Not only is it a crowd-pleaser, but with its quick prep and whimsical presentation, it’s perfect for both family gatherings and holiday parties. Imagine spoons diving into those clear dessert cups, uncovering hidden layers of creamy vanilla filling. Ready to spread some holiday cheer? Let’s dive into how to create these delightful Christmas Tree Cake Dirt Cups together!
Why Are These Dirt Cups So Special?
Irresistible layers make each scoop a festive delight! With soft Christmas tree snack cakes and crispy chocolate cookie crumbs, these cups truly shine. Quick to prepare, they’re perfect for busy holiday schedules, ensuring you spend less time in the kitchen and more time celebrating. Crowd-pleasing charm means everyone will be asking for seconds! Plus, the creative presentation in clear cups adds a vibrant touch to any gathering. For an extra festive feel, consider pairing them with other holiday desserts like chocolate peppermint cupcakes. Enjoy the joy of homemade treats without the hassle!
Christmas Tree Cake Dirt Cups Ingredients
For the Cake Layers
• Christmas tree snack cakes – 6 irresistible cakes that bring festive flavor and nostalgia.
For the Cream Filling
• Cream cheese – 8 ounces, softened for a rich, creamy texture.
• Powdered sugar – 1 cup adds sweetness and a smooth finish.
• Vanilla extract – 1 teaspoon enhances the filling's delightful flavor.
• Instant vanilla pudding mix – 3.4 ounces provides structure and creaminess.
• Cold whole milk – 2 cups required to activate the pudding mix.
• Whipped topping – 8 ounces, thawed for a light and airy finish.
For the Crunchy Layers
• Chocolate sandwich cookies – 20 cookies, crushed to create that delicious “dirt” texture.
• Reserved cookie crumbs – ½ cup for decorating the tops with added crunch.
For the Festive Garnish
• Red and green holiday sprinkles – ½ cup for a cheerful pop of color.
• Mini chocolate chips – ½ cup to add a sweet, textured contrast.
• Red and green candy-coated chocolates – ¼ cup for a little extra fun.
• Decorative sugar cookies – 6 Christmas tree cookies with icing to crown each cup proudly.
These Christmas Tree Cake Dirt Cups are not just a treat; they're a seasonal celebration layered with love!

Step-by-Step Instructions for Christmas Tree Cake Dirt Cups
Step 1: Prepare the Dessert Cups
Start by arranging 6 clear dessert cups, each holding 10 to 12 ounces, on a clean kitchen countertop. Ensure they are stable, as you’ll be layering the delightful components of your Christmas Tree Cake Dirt Cups in these containers.
Step 2: Crush the Cookies
Place 20 chocolate sandwich cookies into a food processor, securing the lid tightly. Pulse until the cookies become fine crumbs, resembling chocolate dirt. Once processed, transfer the crushed cookies into a medium mixing bowl and reserve ½ cup for decorating the tops later.
Step 3: Cube the Snack Cakes
Unwrap the 6 Christmas tree snack cakes and cut them into small, bite-sized cubes. Carefully arrange these cubes, as they will form the festive layers in your Christmas Tree Cake Dirt Cups, adding both flavor and visual appeal.
Step 4: Mix the Cream Filling
In a large mixing bowl, place 8 ounces of softened cream cheese. Using an electric mixer, beat the cream cheese until it’s completely smooth and free of lumps. This should take about 2 minutes, creating a creamy base for your filling.
Step 5: Sweeten the Mixture
Add 1 cup of powdered sugar and 1 teaspoon of vanilla extract to the cream cheese. Continue beating the mixture on medium speed until it becomes light and creamy, which should take about 3 minutes. The filling will be perfectly sweet, enhancing your Christmas Tree Cake Dirt Cups.
Step 6: Prepare the Pudding
In a separate mixing bowl, pour in 2 cups of cold whole milk and whisk in 3.4 ounces of instant vanilla pudding mix. Whisk continuously for about 2 minutes until the pudding begins to thicken, then let it rest for 5 minutes to achieve the desired consistency.
Step 7: Combine the Fillings
Once the pudding is thickened, add it to the cream cheese mixture. Beat on low speed until the two components are evenly combined, creating a luscious filling for your Christmas Tree Cake Dirt Cups.
Step 8: Fold in the Whipped Topping
Measure out 6 ounces of thawed whipped topping and gently fold it into the cream cheese and pudding mixture. Keep folding until the filling becomes fluffy and smooth, ensuring a light texture in each layer of your dessert cups.
Step 9: Layer the Ingredients
Begin with a generous layer of Christmas tree cake cubes at the bottom of each dessert cup. Follow with a thin layer of crushed chocolate sandwich cookies on top, then spoon a thick layer of the creamy filling over the crumbs. Use the back of a spoon to smooth it out gently.
Step 10: Add Toppings and Repeat
Sprinkle a small amount of red and green holiday sprinkles over the vanilla cream filling. Layer more Christmas tree cake cubes, then add additional crushed chocolate cookies followed by another generous layer of the filling. Repeat this process, leaving space for the final decorative touches.
Step 11: Pipe and Decorate
For the top layer, add crushed chocolate cookies again. Transfer the remaining 2 ounces of whipped topping into a piping bag fitted with a star tip, and pipe decorative swirls onto each of the dessert cups.
Step 12: Final Touches
Sprinkle the reserved cookie crumbs over the whipped topping, scatter mini chocolate chips, and toss in the red and green candy-coated chocolates. Finally, place one decorated Christmas tree sugar cookie upright into each cup to crown your delightful Christmas Tree Cake Dirt Cups.
Step 13: Chill and Serve
Once decorated, place the dessert cups into the refrigerator for at least 2 hours to let the cream filling firm up and flavors meld together beautifully. When ready to serve, remove from the fridge and enjoy your delightful Christmas Tree Cake Dirt Cups cold!

Expert Tips for Christmas Tree Cake Dirt Cups
Layering Order: Start with cake cubes and finish with cookie crumbs to ensure pristine layers that look festive and delicious.
Avoid Overmixing: When combining the cream cheese and pudding mixture, mix on low to keep the filling light and fluffy.
Cookie Consistency: Make sure your chocolate sandwich cookies are finely crushed, resembling dirt, for the best texture contrast.
Chill Time: Don’t rush the refrigeration step; allowing the cups to chill for at least 2 hours helps flavors meld beautifully in your Christmas Tree Cake Dirt Cups.
Decorative Touch: Use a variety of sprinkles and candies to make each cup unique and enticing for your guests; presentation matters!
What to Serve with Christmas Tree Cake Dirt Cups?
Create the perfect holiday gathering with delightful additions that complement your festive dessert!
Warm Gingerbread Cookies: Their spice complements the sweetness of the dirt cups, creating a classic holiday pairing.
Peppermint Hot Chocolate: The rich, minty flavor of this drink balances the creaminess of the dessert, perfect for warming up guests.
Fruit Salad with Citrus Dressing: Bright, refreshing fruit adds a zingy contrast and a festive pop of color, enhancing the overall aesthetic.
Savory Cheese Platter: Include sharp cheddars and creamy bries to offset the sweet layers in your dirt cups. This savory bite balances dessert indulgence beautifully.
Christmas Sweater Charcuterie Board: Fill it with holiday-themed cheeses, dried fruits, and mixed nuts for fun snacks that everyone will love.
Powdered Sugar Donuts: Their airy texture and light sweetness create a playful, nostalgic vibe, reminiscent of childhood holiday treats.
Pair these delicious options to make your gathering one to remember!
Perfect Prep for Christmas Tree Cake Dirt Cups
These Christmas Tree Cake Dirt Cups are ideal for busy home cooks who want to save time while enjoying a festive treat! You can prepare the chocolate sandwich cookie crumbs, cream cheese filling, and cake cubes up to 24 hours in advance, storing them separately to maintain freshness. For optimum quality, keep the whipped topping and assembled cups refrigerated for up to 3 days but avoid adding the sugar cookie toppers until you're ready to serve, ensuring they stay crisp. When it’s time to enjoy, simply layer your prepped components in the cups, pipe on the whipped topping, and garnish before serving. This way, you’ll have delicious, layered delights ready to impress your guests with minimal effort!
Christmas Tree Cake Dirt Cups Variations
Feel free to customize your dessert cups to suit your tastes and those of your loved ones!
- Gluten-Free: Use gluten-free chocolate sandwich cookies and gluten-free cake options to make this a safe treat for everyone.
- Lower Sugar: Swap powdered sugar for a sugar substitute and use light whipped topping to lighten the sweetness.
- Nutty Twist: Add crushed nuts, like pecans or walnuts, between the layers for extra crunch and a delightful nutty flavor. A sprinkle of toasted nuts adds a cozy touch!
- Fruit-Filled: Incorporate layers of fresh berries, like strawberries or raspberries, for a fruity contrast to the creamy and crunchy layers. It’s a refreshing option!
- Minty Refresh: Mix in mint extract with the cream filling for a festive chocolate-mint flavor. It adds a refreshing twist to the holiday dessert!
- Pumpkin Spice: Fold in 1 cup of pumpkin puree along with pumpkin spice for a seasonal twist that brings cozy fall flavors into the holiday season.
- Chocolate Lovers: Substitute half the vanilla pudding mix with chocolate pudding for a rich, chocolatey base that pairs perfectly with the chocolate cookies.
- Dairy-Free: Use dairy-free cream cheese and whipped topping, plus almond or oat milk, to create a delicious vegan version without sacrificing flavor.
These variations are not only fun but also allow you to personalize your Christmas Tree Cake Dirt Cups! For more creative dessert ideas, check out our holiday dessert guide. Enjoy the joy of making festive treats that truly reflect your culinary flair!
How to Store and Freeze Christmas Tree Cake Dirt Cups
Fridge: Store any leftover Christmas Tree Cake Dirt Cups covered tightly in the refrigerator for up to 3 days to keep the flavors fresh and creamy.
Freezer: While it’s best enjoyed fresh, you can freeze the unassembled layers (cake cubes, cream filling, and cookie crumbs) for up to 1 month; assemble before serving for optimal texture.
Thawing: If frozen, transfer the layers to the refrigerator overnight to thaw before assembling your cups for a festive treat.
Reheating: These cups are best served cold and do not require reheating; simply enjoy them straight from the fridge!
Advertisement

Christmas Tree Cake Dirt Cups Recipe FAQs
What type of Christmas tree snack cakes should I use?
For the best flavor and nostalgia, I recommend using commercially available Christmas tree snack cakes, as they bring the festive spirit to your dessert while blending in perfectly with the other layers. You can find these at most grocery stores during the holiday season!
How should I store leftover Christmas Tree Cake Dirt Cups?
Absolutely! Store any leftover dessert cups covered tightly in the refrigerator for up to 3 days. This keeps them fresh and the cream filling creamy. Just be aware that the layers may meld a bit more over time, but they'll still taste delightful!
Can I freeze the Christmas Tree Cake Dirt Cups?
While it's best enjoyed fresh, you can freeze the unassembled layers for up to 1 month. To do this, store the cake cubes, cream filling, and cookie crumbs separately. When you're ready to indulge, transfer the layers to the refrigerator overnight to thaw, then assemble your cups for the best texture and taste!
What should I do if my cream filling isn't thickening?
If your cream filling isn’t thickening, it's likely that the pudding mixture didn’t sit long enough after whisking. Allow it to rest for the full 5 minutes, then gently fold it into the cream cheese mixture. If it still doesn’t come together, try adding a bit more whipped topping slowly until you achieve the desired consistency.
Are these dessert cups pet-friendly?
Not at all! These Christmas Tree Cake Dirt Cups contain ingredients like cream cheese and chocolate that can be harmful to pets, especially dogs. Always keep them safely out of reach to avoid any potential health risks.
How do I make these gluten-free?
To make these dessert cups gluten-free, substitute the chocolate sandwich cookies with gluten-free chocolate cookies and ensure that your Christmas tree snack cakes are gluten-free as well. There are many delicious gluten-free options available that can replicate the flavor and texture!
Delicious Christmas Tree Cake Dirt Cups Recipe
Ingredients
Equipment
Method
- Arrange 6 clear dessert cups on a clean countertop.
- Crush 20 chocolate sandwich cookies in a food processor.
- Cube the 6 Christmas tree snack cakes into small pieces.
- Mix cream cheese in a large bowl until smooth.
- Add powdered sugar and vanilla extract to the cream cheese and mix until creamy.
- Whisk cold milk and instant pudding mix together until thickened.
- Combine pudding with cream cheese mixture until fully mixed.
- Fold in the thawed whipped topping until fluffy.
- Layer cake cubes at the bottom of each cup, followed by crushed cookies, then creamy filling.
- Repeat the layers and finish with crushed cookies on top.
- Pipe decorative swirls of whipped topping on top.
- Add reserved cookie crumbs, mini chocolate chips, and candy-coated chocolates on top.
- Place a decorative cookie in each cup and chill for at least 2 hours before serving.