The kettle was boiling as I watched a crowd gather in my living room, all eyes glued to the big screen for the game. Suddenly, I panicked—what would I serve to keep everyone fueled and happy? Enter my Sheet Pan Loaded Nachos, the ultimate game day appetizer. With a double-decker technique that’s both crowd-pleasing and customizable, these nachos are not just a meal; they’re an experience! In just a few simple steps, you’ll create layers of crispy tortilla chips, savory ground beef, and melty cheese that are sure to ignite excitement and satisfy those post-game cravings. Plus, the high-protein ingredients ensure everyone feels full and content. So, are you ready to transform your next gathering into a nacho extravaganza? Let’s dive in!
Why Choose Sheet Pan Loaded Nachos?
Effortless Assembly: Just layer your ingredients on a sheet pan for a quick prep—perfect for busy game days!
Crowd-Pleasing Delight: Everyone loves nachos! This dish invites sharing and conversation, making it ideal for gatherings.
Customizable to Taste: Mix and match toppings or swap proteins easily; you can satisfy every palate in your group.
Hearty Satisfaction: With lean ground beef and plenty of cheese, these nachos deliver a fulfilling punch for hungry fans.
Double-Decker Approach: The unique layering method ensures each bite has that delightful combination of crispy, gooey, and savory goodness.
Bring out the drinks and enjoy your nacho feast alongside chilled beverages like craft beer or sparkling limeade for an unforgettable experience!
Sheet Pan Loaded Nachos Ingredients
• Get ready to create your crowd-pleasing delight!
For the Beef Layer
- Lean Ground Beef – Provides not only protein but a hearty flavor that keeps everyone coming back for more; can be substituted with ground turkey or plant-based protein for a lighter option.
- Olive Oil – Essential for cooking the beef, adding richness without overpowering flavors; feel free to use any neutral oil in its place.
- Taco Seasoning – This spice blend is vital for that Mexican flavor profile; homemade or store-bought, just adjust the spice level to your taste.
For the Chips and Cheese
- Corn Tortilla Chips – The crunchy foundation of the nachos; opt for thicker, restaurant-style chips so they hold up under the toppings.
- Monterey Jack Cheese – Offers that incredible creaminess and meltability; for a milder profile, substitute with Mozzarella, or add a kick with Pepper Jack.
- Sharp Cheddar Cheese – The perfect tangy contrast to the creamy cheeses; you can replace it with a milder cheddar if desired.
For the Toppings
- Cherry Tomatoes (diced) – Add a burst of freshness and acidity to balance the richness; diced bell peppers can be a sweet alternative.
- Red Onion (finely minced) – Offers a sharp taste; green onions make a great stand-in for a milder flavor.
- Pickled Jalapeños (sliced) – Bring heat and tanginess to the party; skip them for a milder profile or use fresh peppers for variety.
- Fresh Cilantro (chopped) – This herb adds freshness and a pop of color; if cilantro isn’t your thing, parsley works well too!
- Lime (cut into wedges) – A squeeze of lime elevates the whole dish with acidity; substituting lemon is a great option if necessary.
Get your ingredients ready and prepare to impress your guests with these Sheet Pan Loaded Nachos!
Step‑by‑Step Instructions for Sheet Pan Loaded Nachos
Step 1: Brown the Beef
In a large skillet, heat 1 tablespoon of olive oil over medium-high heat for about 1 minute. Add 1 pound of lean ground beef, breaking it apart with a spatula. Cook for about 6-8 minutes until browned and fully cooked, stirring occasionally. The beef should be browned without any pink remaining; this sets the foundation for your delicious Sheet Pan Loaded Nachos!
Step 2: Season the Beef
Once the beef is nicely browned, stir in 2 tablespoons of taco seasoning along with 1/4 cup of water. Reduce heat to medium-low, allowing the mixture to simmer for about 3-5 minutes until the sauce thickens slightly. You’ll notice the spices combining wonderfully with the beef, enhancing the overall flavor profile of your nachos.
Step 3: Prepare the Baking Sheet
While the beef is simmering, preheat your oven to 400°F (200°C). Line a large rimmed baking sheet with parchment paper for easy cleanup. This will help the layers of your Sheet Pan Loaded Nachos cook evenly and prevent any sticking, ensuring a crunchy base for all the amazing toppings to come.
Step 4: Layer Chips & Cheese
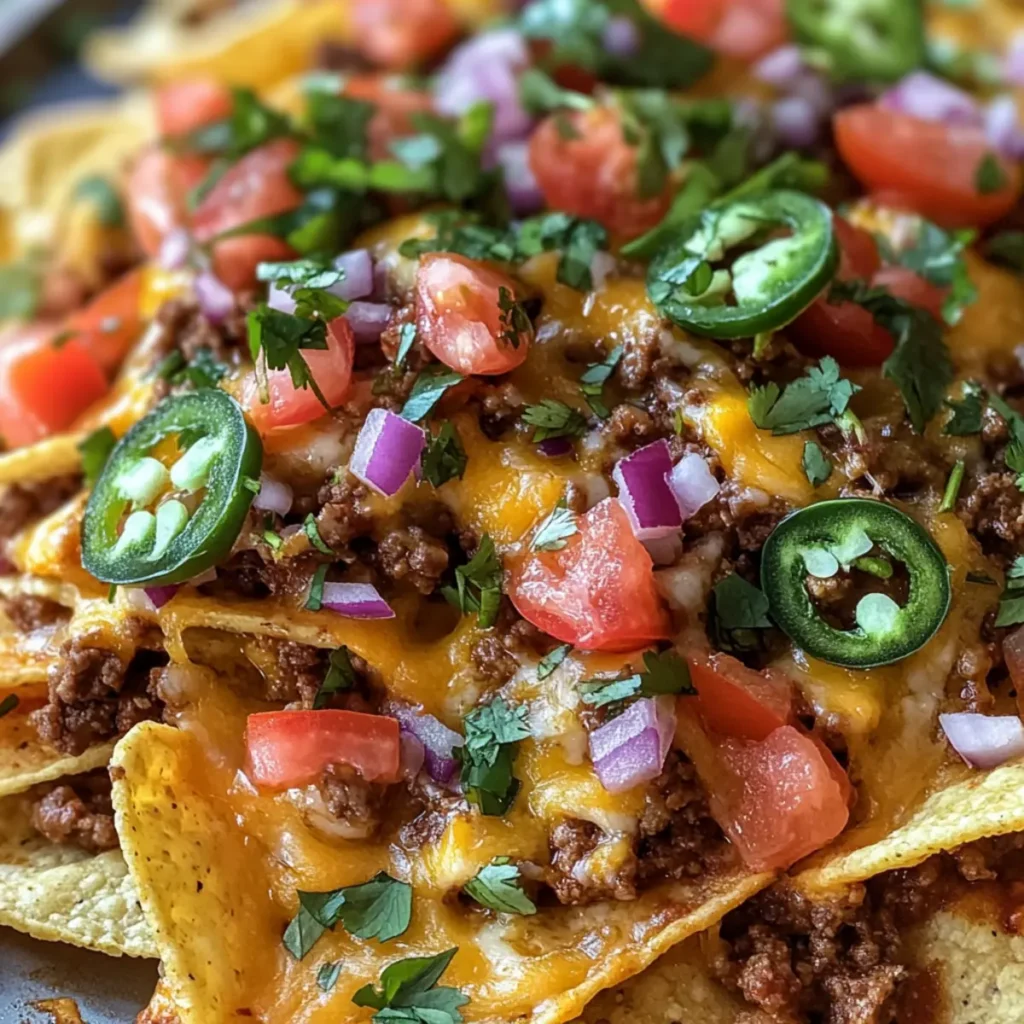
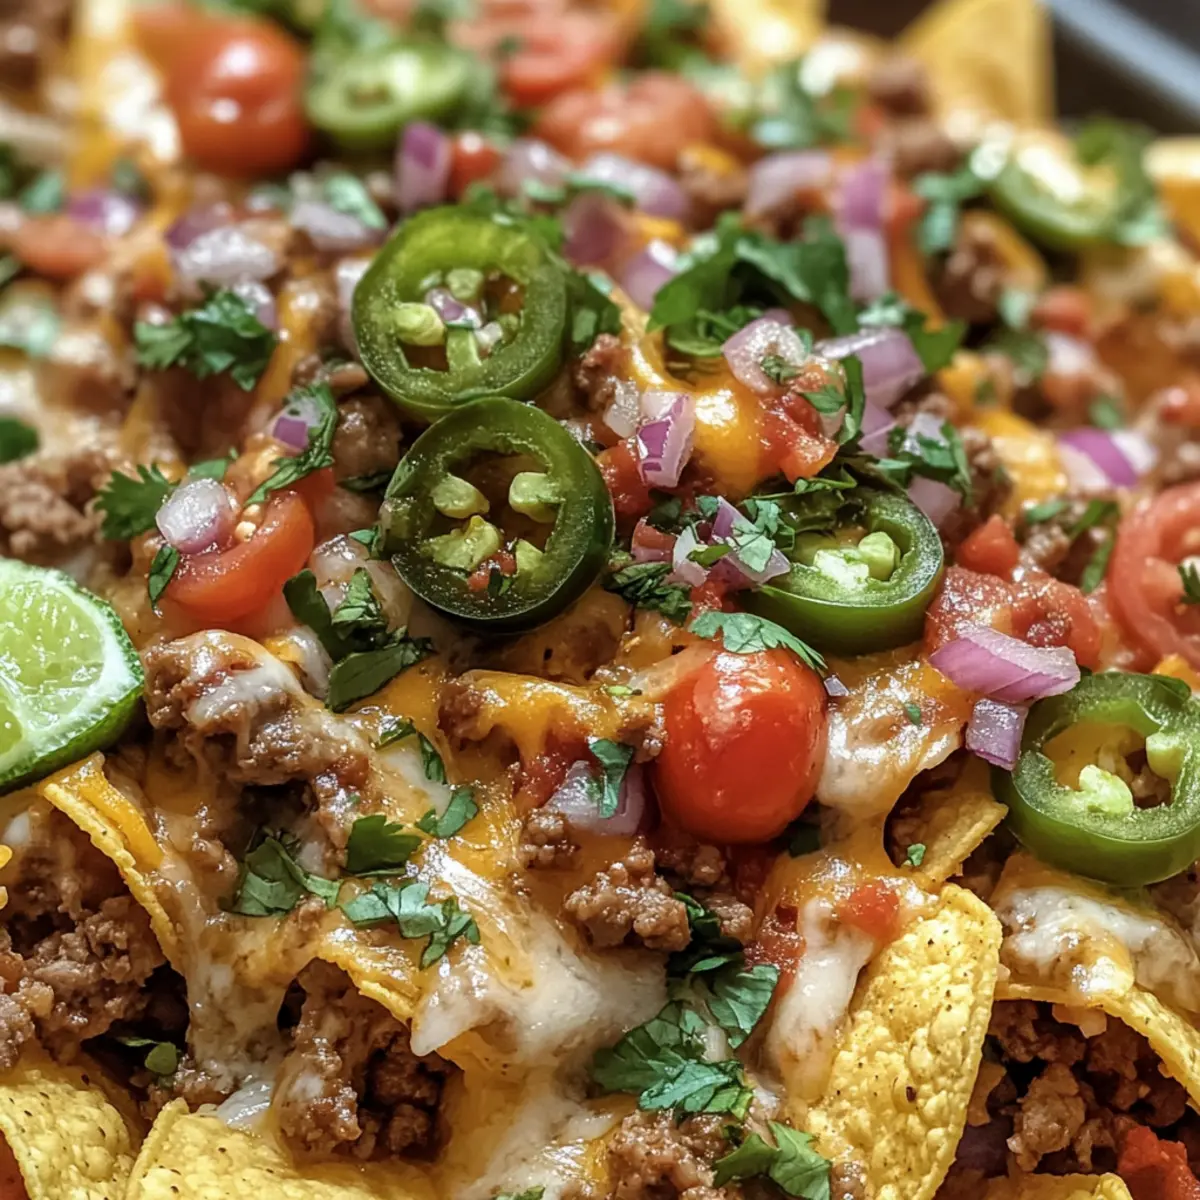
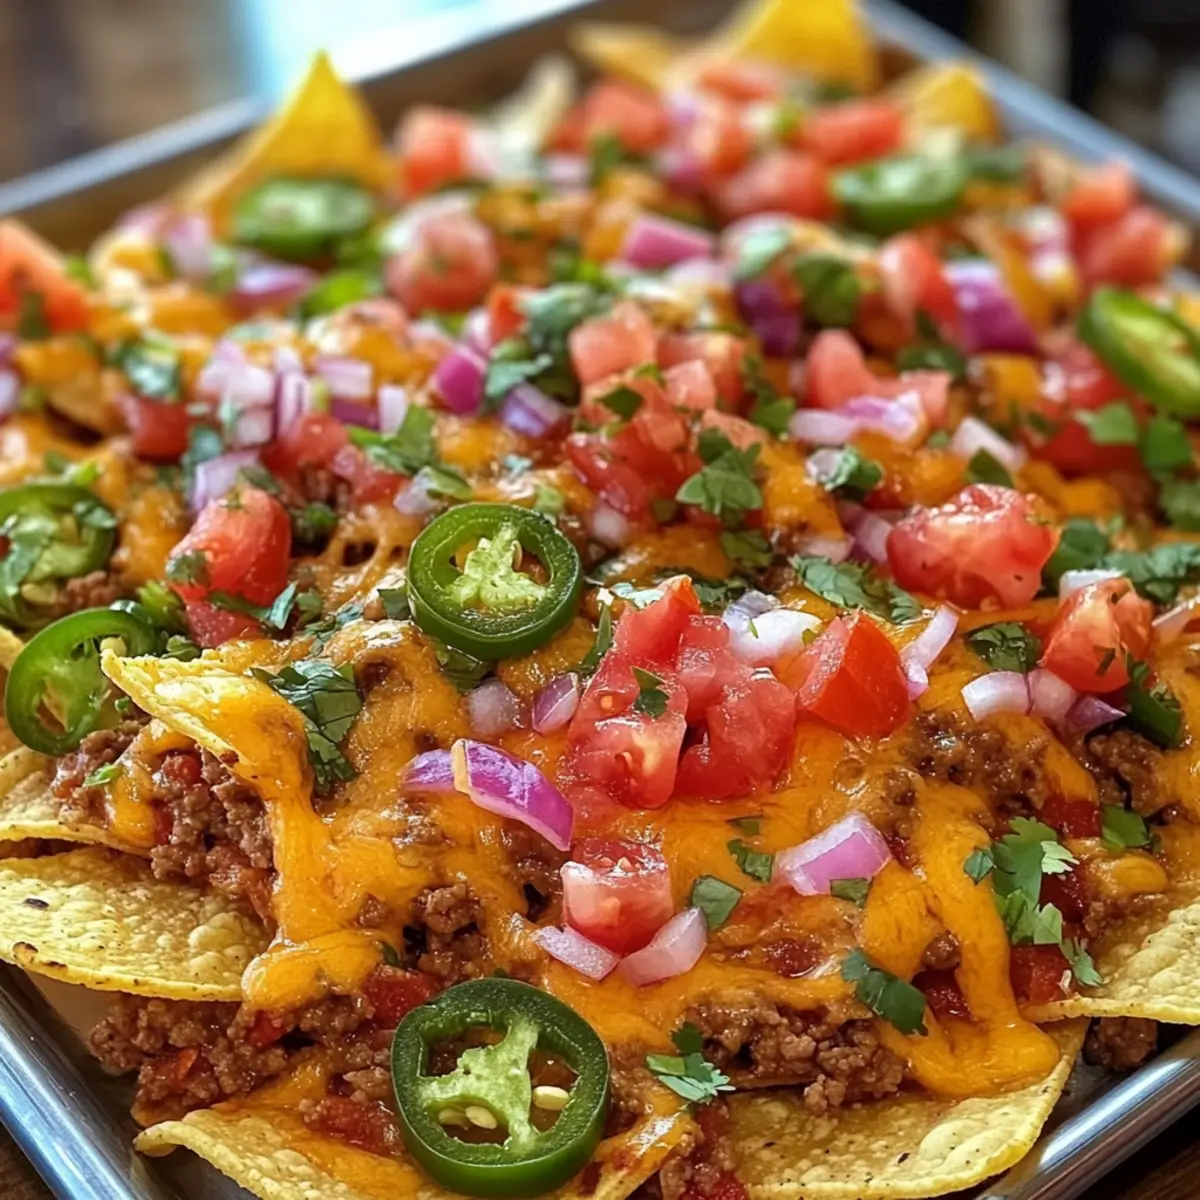
Start assembling by spreading half of your corn tortilla chips evenly across the prepared baking sheet. Next, sprinkle half of the Monterey Jack and sharp cheddar cheese over the chips, ensuring that the cheese melts beautifully as it bakes and adds richness to your nacho layers.
Step 5: Add Beef
Evenly distribute the seasoned ground beef over the first layer of cheese. Make sure to cover the chips fully to enhance flavor in every bite. The savory beef layer will create a great contrast with the melty cheese, making your Sheet Pan Loaded Nachos irresistible.
Step 6: Finish Layering
Top the beef layer with the remaining corn tortilla chips, creating a second layer. Then, generously sprinkle the rest of the Monterey Jack and sharp cheddar cheese on top. Ensure even coverage to maximize melty goodness, preparing your nachos to reach cheesy perfection in the oven.
Step 7: Bake
Place your assembled nachos in the preheated oven and bake for about 7-10 minutes. Keep an eye out for the cheese to bubble and become slightly golden. This bubbling is the perfect indicator that your Sheet Pan Loaded Nachos are ready to be taken out and enjoyed!
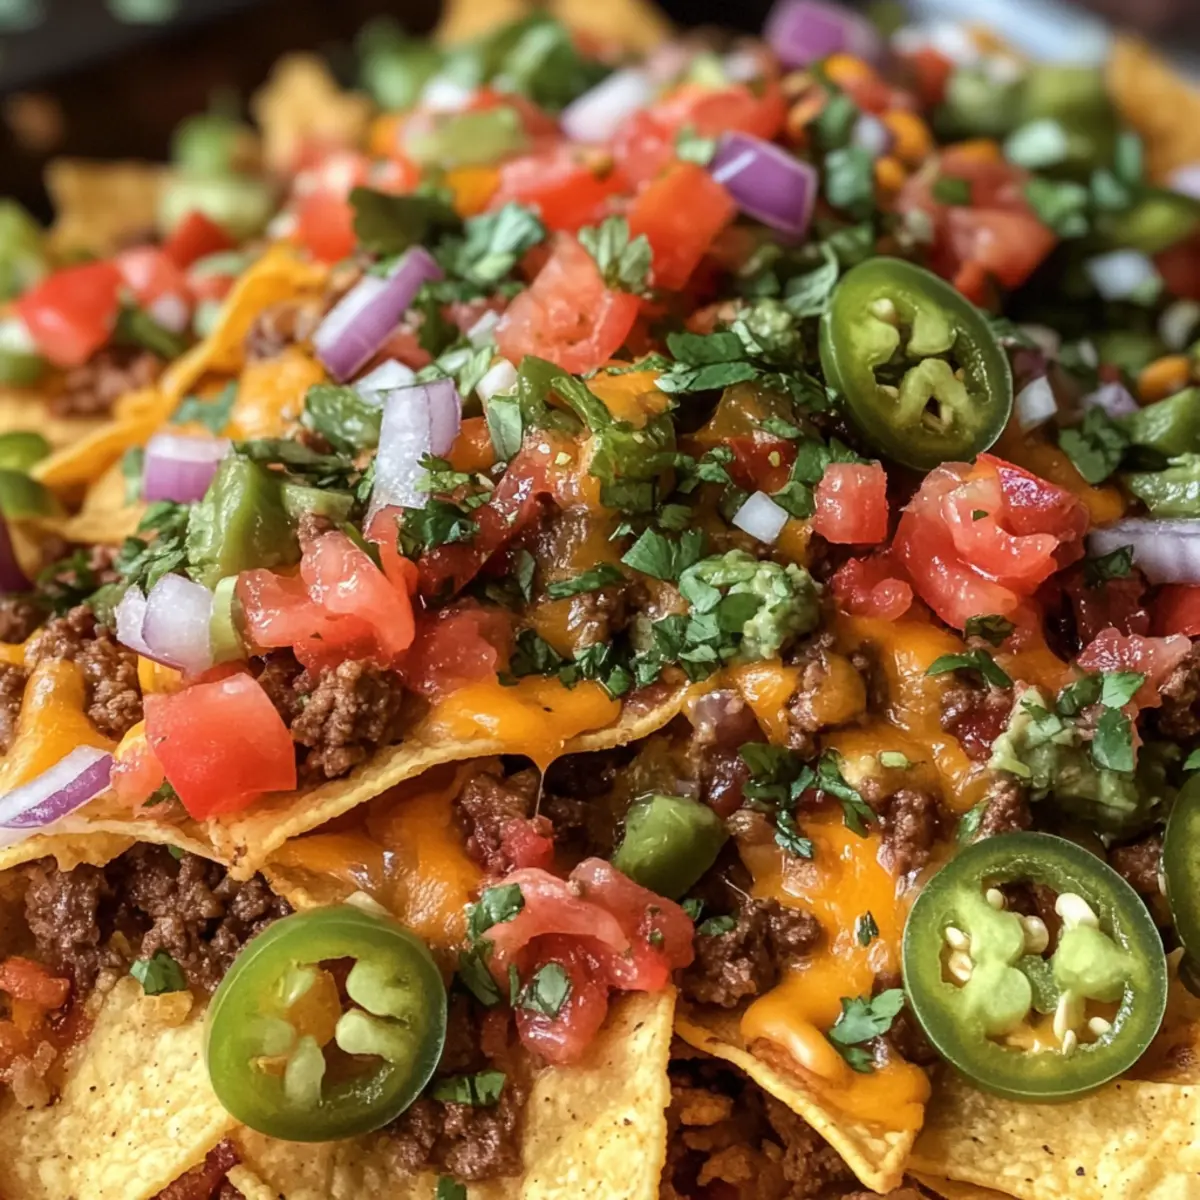
Step 8: Final Touches
Once baked, remove the nachos from the oven and let them cool for just a moment. Top generously with freshly diced cherry tomatoes, finely minced red onion, and sliced pickled jalapeños. Serve immediately with lime wedges on the side, allowing guests to add a squeeze of lime to elevate the flavor of these mouthwatering nachos.
Variations & Substitutions for Sheet Pan Loaded Nachos
Feel free to mix and match ingredients in this recipe; your taste buds are in for a treat!
- Vegetarian: Swap out the ground beef for black beans or roasted vegetables to create a colorful, hearty option. Roasted corn or seasoned mushrooms can add a delicious twist too!
- Spicy Kick: Upgrade your nachos by adding diced jalapeños or a drizzle of sriracha for an extra layer of heat. Consider throwing in some chipotle crema on top for smoky goodness.
- Dairy-Free: For a dairy-free alternative, try using cashew cheese or a plant-based cheese shred. These options melt surprisingly well while keeping all the creamy texture.
- Whole Grain Chips: Opt for whole grain tortilla chips for a healthier twist that packs in some extra fiber, making your nachos not only delicious but good for you too!
- Baked Instead of Fried: Try baking your tortilla chips before assembling the nachos to avoid extra oil and achieve a perfectly crispy base.
- Different Proteins: Use shredded chicken, grilled shrimp, or even pulled pork as great substitutes for ground beef. Each brings a unique flavor that can take your nachos in delightful new directions.
- Herb Swap: If cilantro isn’t your favorite, parsley works nicely as a fresh substitute. Basil could also be an interesting and unexpected herb to try out!
- Zesty Citrus: In place of lime, grapefruit juice offers a unique twist of acidity; it’s a refreshing way to brighten up your loaded nachos.
And if you’re looking for more comforting recipes, check out our Moist Carrot Sheet or give the Loaded Philly Cheesesteak a try—a feast your friends won’t forget!
Expert Tips for Sheet Pan Loaded Nachos
-
Fresh Ingredients Matter: Use fresh toppings like cilantro and tomatoes to elevate flavor; avoid wilted or overly processed veggies.
-
Double-Dip Protection: Prevent soggy chips by layering half underneath, then toppings, and finish with remaining chips on top—each layer will stay crispy!
-
Cheese Choices: Always shred your own cheese for optimal meltiness; pre-shredded varieties often contain anti-caking agents that hinder melting.
-
Mind the Oven Time: Keep a close eye while baking; nachos can go from perfectly bubbly to overdone quickly, so set a timer.
-
Serve It Hot: For the best experience, serve your Sheet Pan Loaded Nachos immediately; they taste best fresh out of the oven, when all layers shine!
How to Store and Freeze Sheet Pan Loaded Nachos
Fridge: Store leftovers in an airtight container for up to 3 days, ideally separating chips from toppings to maintain crunchiness.
Freezer: For optimal freshness, freeze assembled but unbaked nachos on a baking sheet, then transfer to a freezer bag for up to 2 months.
Reheating: Reheat baked nachos in the oven at 350°F (175°C) for about 10 minutes, covering with foil to avoid burning while allowing cheese to melt again.
Make-Ahead Tips: Prepare all ingredients in advance, storing them separately, so you can quickly assemble and bake your Sheet Pan Loaded Nachos when guests arrive.
What to Serve with Sheet Pan Loaded Nachos?
Create the perfect game day spread that will have everyone talking and raving!
-
Creamy Guacamole: Adds a smooth, fresh taste that balances the crunch and richness of the nachos. Scoop up the guacamole with each bite for extra oomph!
-
Zesty Salsa: A classic choice that introduces a tangy freshness, complementing the savory notes of the nachos perfectly. Look for a chunky variety to add texture.
-
Spicy Queso Dip: Elevate your nacho experience with velvety cheese dip that brings an additional layer of flavor and warmth. It’s a must for cheese lovers!
-
Crisp Garden Salad: A light salad made with mixed greens, tomatoes, and a tangy vinaigrette refreshes your palate amidst the flavorful nachos. It’s a great way to add some veggies!
-
Chilled Craft Beer: Enjoy the robust flavors of craft beer alongside your nachos; its hoppy notes beautifully contrast the richness of the melted cheese.
-
Sparkling Limeade: This refreshing beverage adds a playful fizz, enhancing the flavors while providing a citrusy brightness that uplifts the entire meal experience.
-
Sweet Churros: For dessert, indulge in cinnamon-sugar churros served with chocolate dipping sauce for a delightful sweet finish. The contrast of warm and crispy complements your savory feast!
Make Ahead Options
These Sheet Pan Loaded Nachos are perfect for meal prep enthusiasts looking to save time during busy game days! You can prep the beef filling and cheese layers up to 24 hours in advance. Simply cook the ground beef with taco seasoning, allow it to cool, and refrigerate in an airtight container. For the cheese, combine Monterey Jack and sharp cheddar in a separate container. When you’re ready to serve, layer the chips, beef, and cheese, then bake in a preheated oven at 400°F (200°C) for 7-10 minutes until bubbly. This way, you’ll enjoy delicious, warm nachos without the last-minute stress!
Sheet Pan Loaded Nachos Recipe FAQs
How should I select the best ingredients for my nachos?
Absolutely! When choosing ingredients, opt for lean ground beef with a bright red color—this indicates freshness. For tortilla chips, go for thicker, restaurant-style ones; they hold up better under toppings. Select ripe cherry tomatoes—look for those that are plump and firm. Fresh herbs like cilantro should be vibrant green and fragrant. Avoid wilted or yellowing greens!
Advertisement
What’s the best way to store leftover nachos?
Very simple! Place any leftovers in an airtight container and store them in the fridge for up to 3 days. For the best results, I recommend separating the chips from the toppings to keep everything as crispy as possible. This way, when you’re ready for a snack, they’ll still have that delightful crunch.
Can I freeze the nachos, and how should I do it?
Yes, you can! To freeze your Sheet Pan Loaded Nachos, assemble them without baking first. Place them on a baking sheet lined with parchment paper and freeze them for about 1 hour until solid. Once frozen, transfer them to a freezer-safe bag or container, and they’ll keep well for up to 2 months. When you’re ready to enjoy, bake directly from frozen at 400°F (200°C) for 10-12 minutes, or until the cheese is bubbly!
What if my nachos turn out soggy after cooking?
Great question! To avoid sogginess, make sure to layer chips evenly on the bottom and use a double-decker layering style, as I’ve described. If you’ve already made soggy nachos, don’t worry! You can pop them under the broiler for a couple of minutes to crisp them up again. Just watch closely to prevent burning, as they can go from great to burnt quickly!
Are there any dietary considerations I should keep in mind?
Yes, definitely! If you or your guests have allergies, it’s wise to check all ingredient labels. For instance, some taco seasonings contain gluten or are processed in facilities with common allergens. For a vegetarian variation, you can replace beef with black beans or sautéed veggies. If you’re concerned about dairy, try dairy-free cheese alternatives to create equally satisfying nachos that everyone can enjoy!
How can I serve these nachos, and what drinks pair best?
These nachos are fantastic for sharing! Serve with a side of creamy guacamole, zesty sour cream, or spicy salsa for dipping. They pair wonderfully with chilled beverages such as craft beer, sparkling limeade, or even zesty margaritas, contributing to an unforgettable game day experience!

Sheet Pan Loaded Nachos for Effortless Game Day Fun
Ingredients
Equipment
Method
- In a large skillet, heat 1 tablespoon of olive oil over medium-high heat. Add 1 pound of lean ground beef, breaking it apart with a spatula. Cook for 6-8 minutes until browned.
- Stir in 2 tablespoons of taco seasoning and 1/4 cup of water. Reduce heat to medium-low and simmer for 3-5 minutes until the sauce thickens slightly.
- Preheat your oven to 400°F (200°C). Line a large rimmed baking sheet with parchment paper.
- Spread half of the corn tortilla chips evenly across the prepared baking sheet. Sprinkle half of the Monterey Jack and sharp cheddar cheese over the chips.
- Evenly distribute the seasoned ground beef over the first layer of cheese.
- Top with the remaining corn tortilla chips and sprinkle the rest of the cheese on top.
- Bake in the preheated oven for 7-10 minutes, watching for the cheese to bubble and become slightly golden.
- Remove from the oven and top with diced cherry tomatoes, red onion, and sliced jalapeños. Serve with lime wedges.