
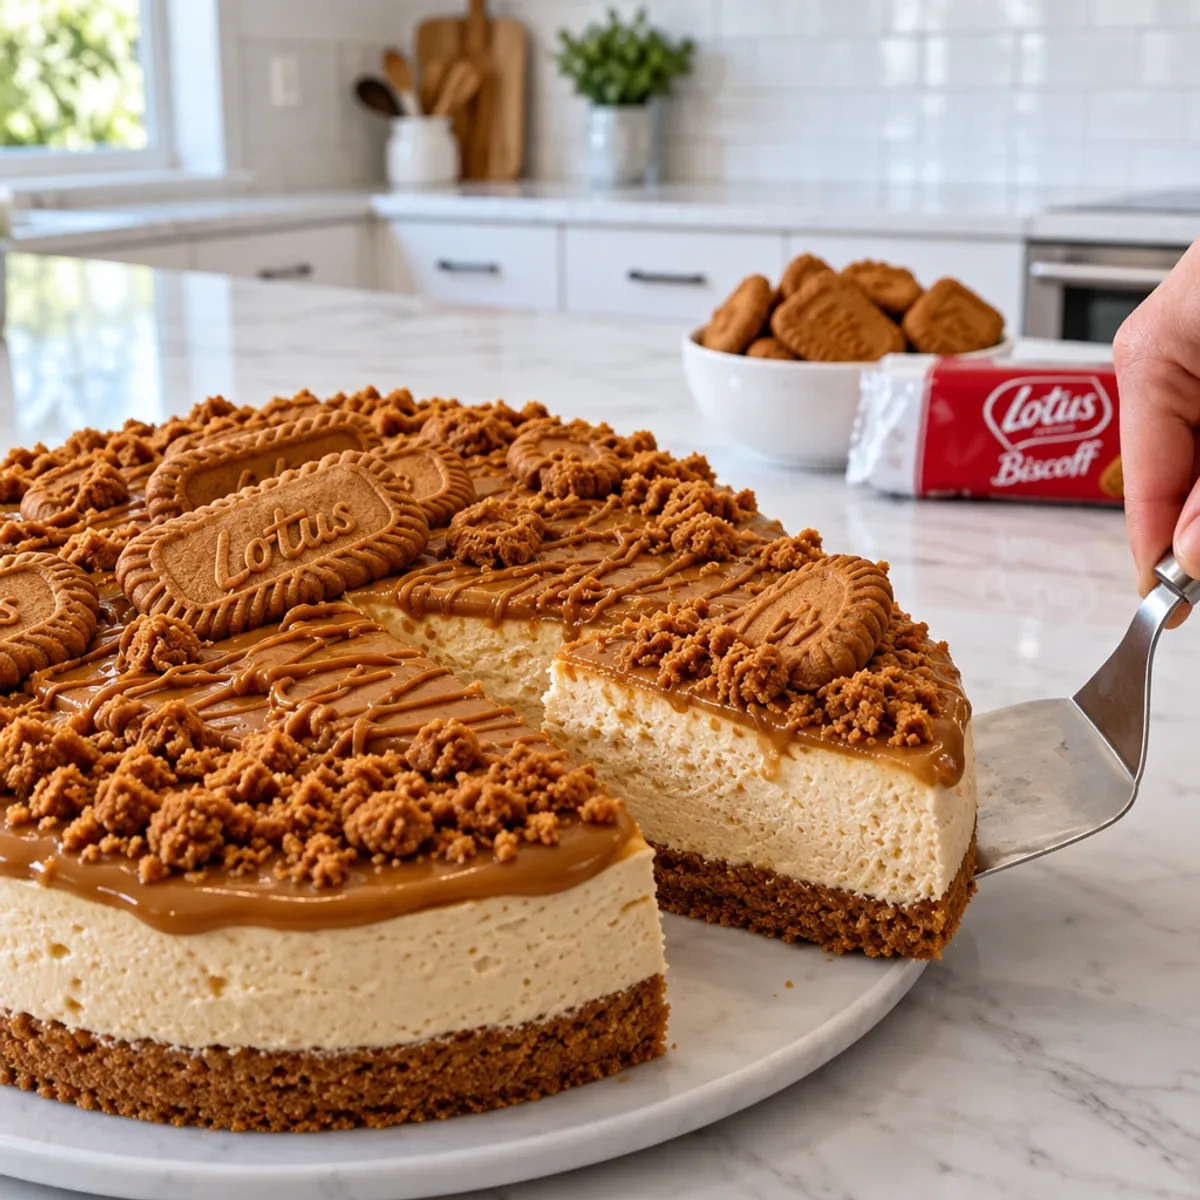
As I stood in my kitchen, a wave of nostalgia hit me with the familiar scent of crushed Lotus Biscoff biscuits wafting through the air. It's amazing how a single bite of this No-Bake Lotus Biscoff Cheesecake can transport you back to cozy afternoons with friends and family. This recipe not only eliminates the hassle of baking, making it perfect for those last-minute dessert cravings, but it also blends creamy goodness with a delightful crunch that will sweep anyone off their feet. Whether you're welcoming guests or indulging in some much-deserved self-care, this cheesecake offers a sweet escape that’s simply irresistible. Have you ever tasted a dessert that feels like a warm hug? Let’s dive into this delightful treat that’s sure to brighten up your day!
Why is this cheesecake a game changer?
Unforgettable Taste: The rich, caramel notes of Lotus Biscoff blend perfectly with creamy cheesecake, creating a dessert that's a true crowd-pleaser. No-Bake Ease: With minimal prep required, this recipe saves time without sacrificing flavor, perfect for busy days or spontaneous get-togethers. Versatile Delight: Ideal for any occasion, it pairs well with coffee or as a show-stopping dessert at parties. Visual Appeal: Topped with glossy Biscoff spread and decorative biscuits, it’s a feast for the eyes as much as the palate. Once you serve this cheesecake, your friends may just beg for the recipe! For more easy dessert ideas, check out our delicious options in the dessert section.
No-Bake Lotus Biscoff Cheesecake Ingredients
For the Crust
• Lotus Biscoff biscuits – perfect for creating a sweet and crunchy base.
• Unsalted butter – binds the crumbs together and adds richness.
For the Creamy Filling
• Cream cheese – softened for a smooth consistency; this is the heart of your No-Bake Lotus Biscoff Cheesecake.
• Lotus Biscoff spread – adds that signature flavor and creamy texture; you'll want the good stuff!
• Powdered sugar – sweetens the filling without grittiness, ensuring a velvety finish.
• Vanilla extract – a splash of flavor that enhances all the sweet notes.
For the Whipped Topping
• Heavy whipping cream – whipped to stiff peaks for that fluffy texture in your filling; chill your bowl for best results.
• Lotus Biscoff spread (for topping) – warmed to create a glossy finish that’s irresistible.
• Whole Lotus Biscoff biscuits – for decoration and an extra crunch on top.
• Crushed Lotus Biscoff biscuits – for sprinkling, giving your cheesecake a delightful texture contrast.
Enjoy making this decadent cheesecake that’s bound to impress everyone at your table!

Step-by-Step Instructions for No-Bake Lotus Biscoff Cheesecake
Step 1: Prepare the Crust
Start by lining the bottom of a 9-inch springform pan with parchment paper. In a food processor, crush 250 grams of Lotus Biscoff biscuits into fine crumbs. Transfer these crumbs into a medium mixing bowl, and pour 100 grams of melted unsalted butter over the crumbs. Mix thoroughly until the crumbs are evenly coated and have a sandy texture.
Step 2: Form the Base
Transfer the biscuit mixture into the prepared springform pan and firmly press it down using the back of a spoon or the flat bottom of a glass. Ensure the crust is evenly spread across the bottom. Once pressed, place the pan in the refrigerator for 20 to 30 minutes to firm up while you prepare the filling.
Step 3: Make the Cream Cheese Filling
In a large mixing bowl, add 500 grams of softened cream cheese. Beat it with an electric mixer until smooth and creamy, ensuring there are no lumps. Then, add 200 grams of Lotus Biscoff spread, 1 cup of powdered sugar, and 1 teaspoon of vanilla extract. Continue beating the mixture until all ingredients are fully combined and the filling is silky.
Step 4: Whip the Cream
In a separate chilled mixing bowl, pour in 1 and 1 quarter cups of cold heavy whipping cream. Whip the cream with an electric mixer until stiff peaks form, about 3 to 5 minutes. Once ready, add one-third of the whipped cream to the cream cheese mixture, gently folding it in with a spatula.
Step 5: Combine the Fillings
Next, add the remaining whipped cream in two separate additions, folding gently after each addition until the filling is light and fluffy. Ensure all components are well combined, creating a luscious texture for your No-Bake Lotus Biscoff Cheesecake.
Step 6: Assemble the Cheesecake
Remove the chilled crust from the refrigerator and spoon the cheesecake filling over the biscuit base. Use a spatula to spread the filling evenly across the pan, smoothing the surface to perfection. Cover the pan tightly with plastic wrap and refrigerate for at least 6 to 8 hours, or overnight for the best results.
Step 7: Prepare the Topping
When ready to serve, place 150 grams of Lotus Biscoff spread in a microwave-safe bowl. Microwave in intervals of 10 to 15 seconds until softened and pourable, stirring after each interval. With the cheesecake firm and chilled, carefully pour the warmed Biscoff spread over the top, spreading it towards the edges.
Step 8: Add the Finishing Touches
Sprinkle the crushed Lotus Biscoff biscuits evenly over the topping, then arrange whole Lotus Biscoff biscuits on top for a beautiful decoration. Return the cheesecake to the refrigerator for an additional 15 to 20 minutes to allow the topping to set perfectly.
Step 9: Serve the Cheesecake
Once set, carefully release the sides of the springform pan. Transfer the cheesecake to a serving plate if desired. For neat slices, dip a sharp knife in warm water and wipe it dry before cutting the cheesecake into 10 to 12 even pieces. Remember to wipe the knife clean between cuts for precision. Enjoy your No-Bake Lotus Biscoff Cheesecake chilled!

What to Serve with No-Bake Lotus Biscoff Cheesecake
Imagine a charming gathering, where friends savor every bite of the light, creamy cheesecake, perfectly paired with delightful accompaniments.
Fresh Berries: Juicy strawberries or raspberries add a vibrant, tart contrast to the luscious cheesecake, making each bite unforgettable.
Chocolate Mousse: Creamy and decadent, a rich chocolate mousse heightens the dessert experience, offering a delightful balance of flavors and textures.
Coffee or Espresso: The robust bitterness of a fresh brew cuts through the sweetness, providing a perfect match for this indulgent cheesecake.
Vanilla Ice Cream: A scoop of creamy vanilla ice cream creates a beautiful harmony, melting slightly against the chilled cheesecake for a luxurious treat.
Mint-Infused Water: Refreshing and aromatic, this light drink cleanses the palate between bites, enhancing the overall experience of the dessert.
Dark Chocolate Shavings: Garnishing the cheesecake with dark chocolate adds a touch of elegance and an extra layer of flavor that guests will adore.
This combination of flavors and textures not only complements the No-Bake Lotus Biscoff Cheesecake but elevates the entire dessert experience, turning any occasion into a memorable celebration.
No-Bake Lotus Biscoff Cheesecake Variations
Feel free to let your creativity shine by customizing this dreamy cheesecake! Each variation invites new textures and flavors to explore.
Gluten-Free: Use gluten-free biscuits instead of Lotus Biscoff to keep the delightful flavor without gluten. You won’t miss a beat with this swap!
Nutty Twist: Add crushed hazelnuts or pecans to the crust for an extra layer of flavor and crunchy texture. The nuttiness balances the sweetness beautifully.
Vegan Delight: Swap cream cheese for a plant-based alternative and use coconut cream instead of heavy whipping cream. You’ll still enjoy a luscious cheesecake without dairy.
Chocolate Lovers: Mix in cocoa powder to the filling for a rich chocolate flavor. A sprinkle of chocolate shavings on top will also add a lovely touch!
Spicy Kick: Incorporate a pinch of cinnamon or a splash of espresso in the filling for a warm flavor profile. It makes every bite feel cozy and inviting.
Fruity Freshness: Top the cheesecake with fresh fruits like sliced strawberries or blueberries for a refreshing contrast. The bright colors will wow any crowd!
Salted Caramel: Drizzle some salted caramel sauce over the Biscoff spread for an indulgent finish. This sweet-salty combo is simply irresistible.
Citrus Zest: Add lemon or orange zest to the filling for a bright and zesty undertone. It’s a lovely surprise that lightens the decadent cheesecake!
Each variation opens the door to a delightful culinary adventure. For more inspiration, explore our delightful dessert section or check out other creative cheesecake ideas!
Easy Prep for No-Bake Lotus Biscoff Cheesecake
These No-Bake Lotus Biscoff Cheesecakes are a lifesaver for busy home cooks! You can prepare the crust (250 grams of Lotus Biscoff biscuits and 100 grams of melted unsalted butter) up to 24 hours in advance; just store it tightly covered in the refrigerator to maintain that crunchy texture. Additionally, the cheesecake filling can be made up to 3 days ahead; simply combine the cream cheese mixture and fill it into the crust, covering it tightly with plastic wrap. For the final touch, warm the topping (150 grams of Lotus Biscoff spread) just before serving, and gently spread it over the cheesecake, decorating it with whole and crushed biscuits for a stunning presentation. This way, you’ll have a delightful dessert ready to impress at a moment's notice!
How to Store and Freeze No-Bake Lotus Biscoff Cheesecake
Fridge: Store any leftover No-Bake Lotus Biscoff Cheesecake in the refrigerator, covered tightly with plastic wrap or in an airtight container for up to 3 days.
Freezer: For longer storage, freeze slices of cheesecake wrapped in plastic wrap and aluminum foil for up to 3 months. Thaw in the fridge before serving.
Reheating: This cheesecake is best enjoyed cold. If frozen, allow it to thaw in the fridge overnight before slicing and serving for the best texture.
Serving Suggestions: Drizzle with extra warmed Lotus Biscoff spread just before serving for an indulgent touch!
Expert Tips for No-Bake Lotus Biscoff Cheesecake
• Chill Your Tools: Ensure your mixing bowls and beaters are cold before whipping cream. This helps achieve stiff peaks more easily.
• Gentle Folding: When combining the whipped cream with the cream cheese mixture, fold gently to maintain the light and fluffy texture of your No-Bake Lotus Biscoff Cheesecake.
• Avoid Overheating: When warming the Biscoff spread for the topping, microwave in short intervals and stir in between. This prevents burning or losing its smooth texture.
• Perfect Slicing: Dip your knife in warm water before cutting the cheesecake. Wiping it between slices ensures clean cuts, enhancing presentation.
• Refrigerate Overnight: For the best results, refrigerate the cheesecake overnight. This allows flavors to meld beautifully and gives a firmer texture.

No-Bake Lotus Biscoff Cheesecake Recipe FAQs
What type of Lotus Biscoff biscuits should I use?
You should use the classic Lotus Biscoff biscuits for the base of the cheesecake. They provide the perfect balance of crunch and sweetness. Look for biscuits that are fresh and unbroken, as broken pieces may not hold the crust well.
Advertisement
How long can I store the cheesecake in the refrigerator?
Your No-Bake Lotus Biscoff Cheesecake can be stored in the refrigerator for up to 3 days. Make sure it’s covered tightly with plastic wrap or kept in an airtight container to prevent it from absorbing any odors or moisture.
Can I freeze the cheesecake? What’s the best way to do it?
Absolutely! You can freeze your cheesecake slices for up to 3 months. Wrap each slice securely in plastic wrap and then in aluminum foil to prevent freezer burn. When you're ready to enjoy, simply thaw them in the refrigerator overnight before serving for the best texture.
What should I do if my cheesecake filling is too runny?
If your filling turns out too runny, it could be due to not whipping the cream long enough. Make sure your heavy whipping cream reaches stiff peaks. If it’s already mixed and too runny, you can whip up an additional cup of heavy cream and gently fold it into the mixture to add more structure.
Are there any dietary considerations for this recipe?
Yes! This cheesecake contains dairy products (cream cheese and heavy cream), making it unsuitable for vegans or those with dairy allergies. For a dairy-free version, you can try using plant-based cream cheese and coconut cream instead of heavy whipping cream, although this may alter the flavor and texture slightly.
How do I ensure perfect slices when serving?
To achieve clean and neat slices of your No-Bake Lotus Biscoff Cheesecake, dip a sharp knife in warm water and wipe it dry between cuts. This method helps the knife glide through the cheesecake smoothly, ensuring each piece looks beautiful for serving.
Indulge in No-Bake Lotus Biscoff Cheesecake Bliss
Ingredients
Equipment
Method
- Line the bottom of a 9-inch springform pan with parchment paper. Crush 250 grams of Lotus Biscoff biscuits into fine crumbs.
- Mix the crushed biscuits with 100 grams of melted unsalted butter until the crumbs are evenly coated.
- Press the biscuit mixture firmly into the prepared springform pan and refrigerate for 20-30 minutes to firm up.
- Beat 500 grams of softened cream cheese until smooth. Add 200 grams of Lotus Biscoff spread, 1 cup of powdered sugar, and 1 teaspoon of vanilla extract; mix until silky.
- In a separate bowl, whip 1 and 1 quarter cups of cold heavy whipping cream until stiff peaks form. Fold one-third into the cream cheese mixture.
- Add the remaining whipped cream in two additions, folding gently after each until well combined.
- Pour the cheesecake filling over the chilled crust and smooth the top. Cover with plastic wrap and refrigerate for at least 6-8 hours.
- Microwave 150 grams of Lotus Biscoff spread until softened and pourable. Pour it over the cheesecake and spread to the edges.
- Sprinkle crushed Biscoff biscuits over the top and decorate with whole biscuits. Refrigerate for an additional 15-20 minutes.
- Release the springform pan, slice the cheesecake, and serve chilled.