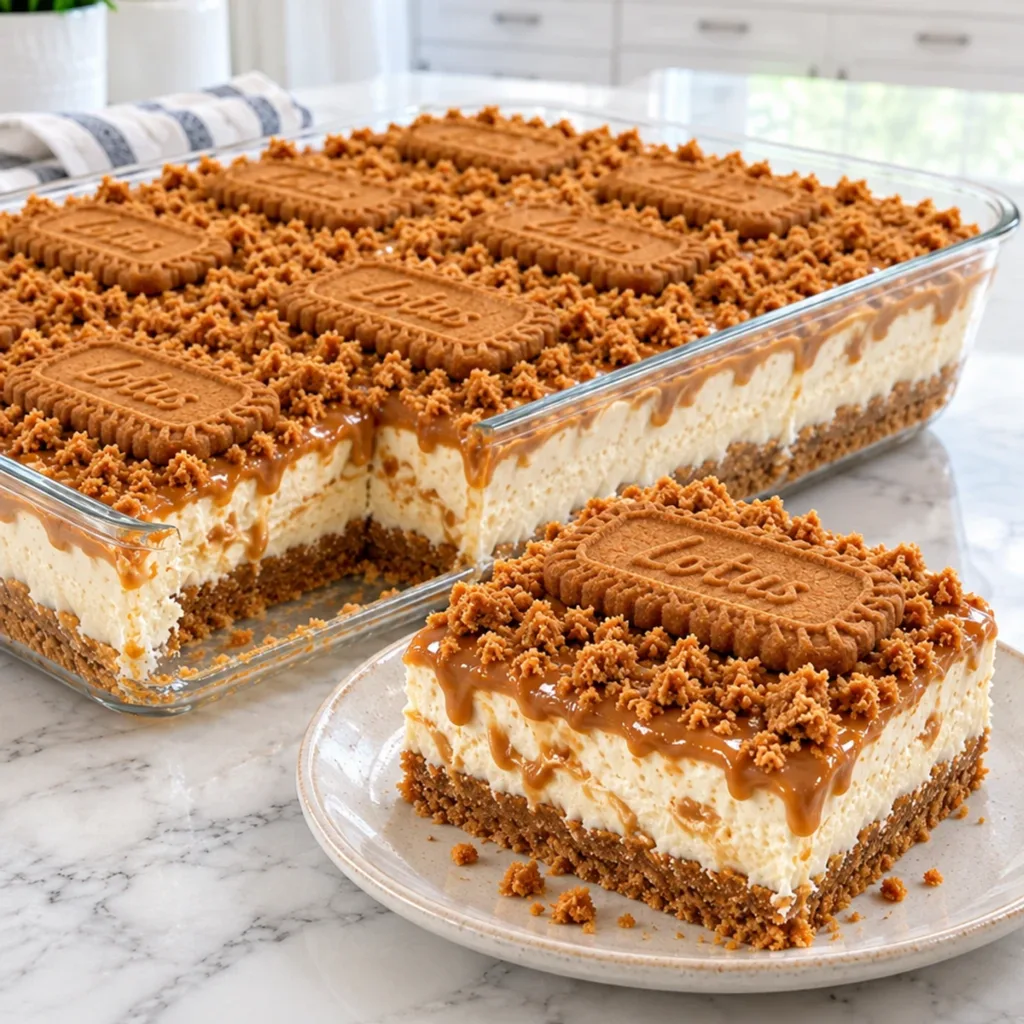
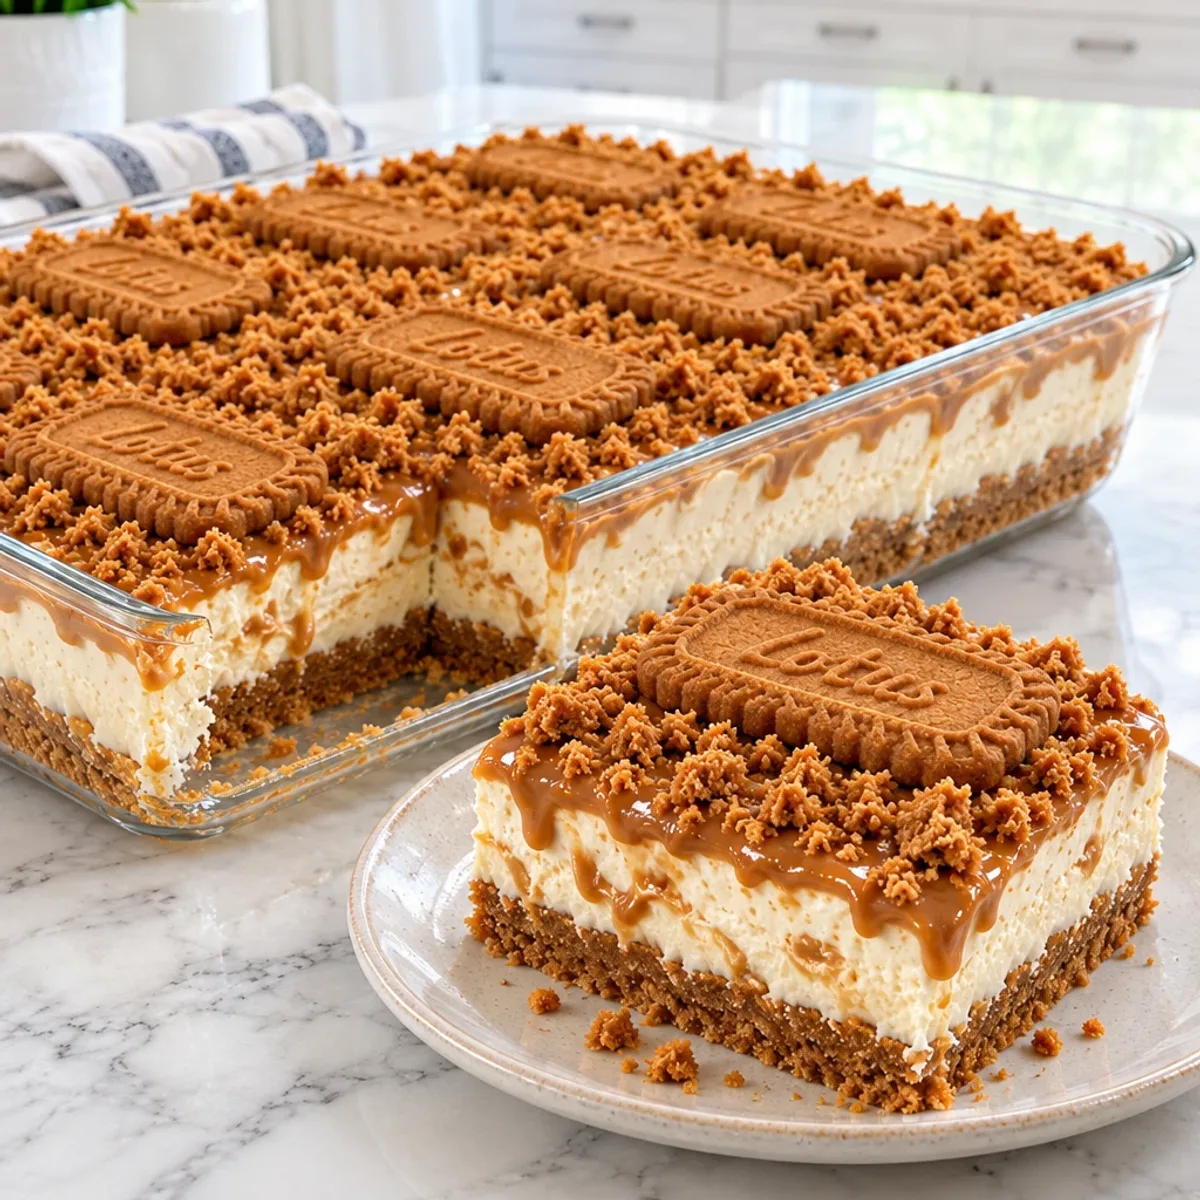
While rummaging through my pantry one lazy afternoon, I stumbled upon a stash of Lotus Biscoff cookies, and a spark of inspiration ignited within me. That's how these No-Bake Lotus Biscoff Cheesecake Bars were born—an effortless delight that transforms simple ingredients into something extraordinary. The best part? This recipe comes together quickly with no baking required, making it a perfect choice for any kitchen novice or a seasoned chef looking for a sweet escape. Each bite combines a creamy, decadent cheesecake filling with a buttery, crunchy crust, and just the right amount of indulgence topped with luscious cookie butter. Plus, you can prepare it in advance, so whenever those dessert cravings hit, you’re ready to impress your family or guests with minimal effort. Isn't it delightful to have a showstopper like this at your fingertips? Dive into the recipe and get ready to savor every creamy, cookie-infused moment!
Why Are No-Bake Lotus Biscoff Cheesecake Bars Irresistible?
Decadent Creaminess: The combination of cream cheese and whipped cream creates an incredibly smooth and rich filling that melts in your mouth.
Effortless Preparation: With no baking involved, this recipe is perfect for anyone who wants a stunning dessert without the fuss.
Crunchy Cookie Crust: The layer of finely crushed Lotus Biscoff cookies provides a delightful crunch that pairs beautifully with the creamy filling.
Versatile & Adaptable: Feel free to experiment with toppings or mix-ins—perhaps a drizzle of caramel or a sprinkle of sea salt for added flavor.
Crowd-Pleasing Treat: These bars are sure to impress friends and family at gatherings, making you the star of any dessert table!
Simply put, these No-Bake Lotus Biscoff Cheesecake Bars are a delicious indulgence that will have everyone asking for the recipe. If you're searching for a delightful dessert that brings both ease and elegance, you won’t want to miss this one!
No-Bake Lotus Biscoff Cheesecake Bars Ingredients
For the Crust
• Lotus Biscoff cookies – finely crushed for a deliciously crunchy base.
• Unsalted butter – melted to bind the cookie crumbs together perfectly.
For the Cheesecake Filling
• Cream cheese – softened to ensure a velvety smooth texture.
• Powdered sugar – sweetens the filling while keeping it ultra-creamy.
• Lotus Biscoff cookie butter spread – adds that signature rich flavor throughout.
• Heavy whipping cream – whipped cold to achieve light, fluffy peaks.
• Vanilla extract – enhances the overall flavor with a touch of warmth.
• Fresh lemon juice – brightens the flavor profile with a hint of zest.
For the Topping
• Lotus Biscoff cookie butter spread – warmed and drizzled on top for extra indulgence.
• Crushed Lotus Biscoff cookies – provide a crunchy texture contrast on the surface.
• Whole Lotus Biscoff cookies – added for an appealing decorative touch.
These No-Bake Lotus Biscoff Cheesecake Bars ingredients will combine to create a dessert that everyone will adore, making it a must-try in your kitchen!

Step-by-Step Instructions for No-Bake Lotus Biscoff Cheesecake Bars
Step 1: Prepare the Baking Dish
Begin by preparing a 9 by 13-inch rectangular glass baking dish. To ensure ease of removal later, lightly grease the bottom with a bit of melted butter or line it with parchment paper. Having the dish ready will streamline the process as you create your No-Bake Lotus Biscoff Cheesecake Bars.
Step 2: Crush the Cookies
Using a food processor, finely crush the Lotus Biscoff cookies until they resemble fine crumbs. This step is essential for creating a crunchy crust that holds together beautifully. Transfer the crushed cookies to a mixing bowl, and set them aside while you prepare the remaining ingredients for the cheesecake filling.
Step 3: Combine Cookies and Butter
Pour the melted butter over the crushed Lotus Biscoff cookies in the mixing bowl. Using a spatula or your hands, mix the ingredients until the crumbs achieve a consistency similar to wet sand. This texture is crucial, as it will allow the crust to hold firm when pressed into the baking dish.
Step 4: Press the Crust
Firmly press the cookie and butter mixture into the bottom of the prepared baking dish, ensuring an even layer. Use the back of a measuring cup or your fingers for a compact, uniform surface. Place the crust in the refrigerator for 20 minutes to set while you prepare the cheesecake filling.
Step 5: Mix the Cheesecake Filling
In a large mixing bowl, add the softened cream cheese and beat it with a hand mixer until smooth and creamy. Once fully blended, gradually add the powdered sugar while continuing to mix, ensuring there are no lumps. This will create a rich, velvety base for your No-Bake Lotus Biscoff Cheesecake Bars.
Step 6: Incorporate Cookie Butter
Add the Lotus Biscoff cookie butter spread to the cream cheese mixture. Beat the mixture until fully combined and smooth, ensuring the cookie butter is evenly dispersed. This step adds depth and a signature flavor to the cheesecake filling that is simply irresistible.
Step 7: Whip the Cream
In a separate chilled bowl, pour in the cold heavy whipping cream. Use a hand mixer to whip the cream until stiff peaks form, which may take about 3-5 minutes. Careful not to overwhip, as you want to maintain a light, fluffy texture to fold into the cheesecake mixture.
Step 8: Fold in the Whipped Cream
Gently fold the whipped cream into the cheesecake mixture using a spatula. Be patient and mix until just combined, ensuring you maintain the airy texture. This light folding technique is what will create the dreamy creaminess of your No-Bake Lotus Biscoff Cheesecake Bars.
Step 9: Spread the Cheesecake Filling
Evenly spread the cheesecake filling over the chilled crust in the baking dish, smoothing the top with a spatula. Ensure the filling is level for a polished appearance. After this, the cheesecake needs to set and chill completely to achieve the perfect final texture.
Step 10: Prepare the Topping
Warm the remaining Lotus Biscoff cookie butter in the microwave for about 20 seconds, stirring until it becomes smooth and pourable. Carefully pour this luscious layer over the cheesecake filling, spreading it gently into an even layer for a beautiful finish.
Step 11: Add Finishing Touches
Sprinkle the crushed Lotus Biscoff cookies over the top of the melted cookie butter layer. For a decorative touch, arrange whole Lotus Biscoff cookies across the surface. This adds not only visual appeal but also extra crunch against the creamy filling.
Step 12: Chill and Serve
Cover the baking dish with plastic wrap and refrigerate for at least 6 hours, or overnight for best results. After chilling, cut into 16 rectangular bars using a sharp knife, wiping the blade clean between cuts for smooth edges. Serve these No-Bake Lotus Biscoff Cheesecake Bars chilled for maximum creaminess and enjoy!

What to Serve with No-Bake Lotus Biscoff Cheesecake Bars
Imagine the delight of a dessert table brimming with flavors that dance beautifully together, enhancing your No-Bake Lotus Biscoff Cheesecake Bars.
Fresh Berry Salad: A vibrant mix of strawberries, blueberries, and raspberries adds a refreshing pop, balancing the rich creaminess of the cheesecake.
Chocolate Drizzle Espresso: The boldness of coffee paired with a hint of sweet chocolate elevates the dessert, creating a beautiful harmony of flavors.
Whipped Cream Swirls: A dollop of lightly sweetened whipped cream on the side complements the cheesecake, inviting you to savor each creamy bite even more.
Vanilla Ice Cream: The smoothness of vanilla bean ice cream contrasts perfectly with the chewy cookie crust, making each mouthful a delightful indulgence.
Mint Tea: A soothing cup of mint-infused tea enhances the overall experience, offering a light, aromatic complement that cleanses the palate beautifully.
Dark Chocolate Shavings: Sprinkling some dark chocolate shavings on top adds an extra layer of luxury, incorporating a rich, bittersweet note that pairs delightfully with the Biscoff flavors.
Expert Tips for No-Bake Lotus Biscoff Cheesecake Bars
Chill Your Ingredients: Ensure your cream cheese and whipping cream are at room temperature for easier blending and a smoother filling.
Don't Overwhip Cream: Whip the heavy cream only until stiff peaks form. Overwhipping can turn it grainy and affect the cheesecake's texture.
Press Firmly: When making the crust, press down firmly on the cookie mixture; a compact base helps prevent it from crumbling.
Mind the Layering: Pour the cookie butter topping gently and spread evenly to avoid disturbing the cheesecake layer beneath.
Clean Cuts: Wipe your knife clean between cuts for neat, attractive bars, which makes for a more inviting presentation!
These tips will help you create the perfect No-Bake Lotus Biscoff Cheesecake Bars that everyone will love!
No-Bake Lotus Biscoff Cheesecake Bars Variations
Feel free to explore these delightful twists on your No-Bake Lotus Biscoff Cheesecake Bars for a personal touch that’ll leave taste buds dancing.
Gluten-Free: Substitute regular Lotus Biscoff cookies with gluten-free options to create a gluten-free version everyone can enjoy.
Nutty Delight: Add crushed almonds or walnuts to the crust for an added crunch and nutty flavor that enhances the overall profile.
Chocolate Drizzle: Melt dark chocolate and drizzle it over the top for a decadent twist that complements the sweet Biscoff layers beautifully.
Fruit Fusion: Incorporate fresh fruits like sliced strawberries or banana into the filling for a refreshing pop of flavor and a vibrant presentation.
Spicy Kick: Include a pinch of cinnamon or nutmeg in the filling for a warm, aromatic flavor that balances the sweetness perfectly.
Dairy-Free: Replace cream cheese with a plant-based alternative and use coconut cream instead of heavy whipping cream for a dairy-free treat.
Caramel Swirl: Add a swirl of caramel sauce into the cheesecake filling for an extra layer of sweetness and complexity.
Biscoff Trifle: Turn these bars into a trifle by layering the cheesecake filling and crust with whipped cream and crumbled Biscoff cookies in individual cups for a fun presentation!
By trying these variations, you can transform your No-Bake Lotus Biscoff Cheesecake Bars into a new favorite every time! Celebrate each bite with your favorite accompanying flavors like fresh berry salad, or perhaps a dollop of whipped cream swirls.
Prepare Your No-Bake Lotus Biscoff Cheesecake Bars in Advance
These No-Bake Lotus Biscoff Cheesecake Bars are perfect for busy home cooks aiming to simplify meal prep! You can make the crust and cheesecake filling up to 24 hours in advance. Simply crush the Lotus Biscoff cookies and mix with melted butter, then press into the dish. Store it covered in the fridge while prepping the filling; beat the cream cheese, powdered sugar, cookie butter, lemon juice, and vanilla. Whip the cream and fold it in just before spreading it over the crust, ensuring the filling stays airy. Once assembled, refrigerate for at least 6 hours or overnight. Just remember, serving them chilled enhances the texture, ensuring they remain just as delicious when serving!
How to Store and Freeze No-Bake Lotus Biscoff Cheesecake Bars
Room Temperature: These bars should not be stored at room temperature for more than 2 hours, as the creamy filling requires refrigeration for safety and freshness.
Fridge: Store leftovers covered in the refrigerator for up to 4 days. Keep them tightly wrapped to maintain their delightful creaminess and prevent any absorption of fridge odors.
Freezer: For longer storage, freeze the bars in an airtight container for up to 2 months. Cut into individual portions before freezing for easy thawing.
Reheating: Thaw frozen cheesecake bars in the refrigerator overnight before serving. Enjoy chilled for the best taste and texture!
Advertisement

No-Bake Lotus Biscoff Cheesecake Bars Recipe FAQs
What cookies are best for the crust?
Absolutely, using Lotus Biscoff cookies ensures a perfect flavor match for this dessert! If you can't find them, graham crackers or digestive biscuits can serve as good alternatives, although the flavor profile will differ slightly.
How should I store leftovers?
Leftovers should be stored covered in the refrigerator for up to 4 days. Keeping them tightly wrapped will maintain their delightful creaminess and prevent any absorption of other fridge odors.
Can I freeze No-Bake Lotus Biscoff Cheesecake Bars?
Yes, you can! For longer storage, freeze the cheesecake bars in an airtight container for up to 2 months. It’s best to cut them into individual portions before freezing for easy thawing later on.
What should I do if my filling is too runny?
If your cheesecake filling is too runny, double-check that the heavy whipping cream is whipped to stiff peaks. If everything looks good but it's still too thin, consider adding a tablespoon of cornstarch to set the filling—a step you can mix in carefully after everything else is combined.
Can I make this recipe gluten-free?
Absolutely! Look for gluten-free Biscoff cookies or use gluten-free alternatives like almond flour mixed with coconut oil for the crust. Just be sure to check all labels to ensure they're gluten-free and safe for your dietary needs.
How long should I chill the cheesecake bars?
Chill the cheesecake bars for at least 6 hours for them to set properly. For the best texture, it’s recommended to leave them overnight in the refrigerator. This allows all flavors to meld beautifully and ensures a delightful creamy experience when served chilled.
No-Bake Lotus Biscoff Cheesecake Bars You’ll Love
Ingredients
Equipment
Method
- Prepare a 9 by 13-inch glass baking dish by greasing it or lining it with parchment paper.
- Finely crush the Lotus Biscoff cookies using a food processor.
- Mix melted butter with the crushed cookies until resembling wet sand.
- Press the cookie mixture firmly into the bottom of the baking dish and refrigerate for 20 minutes.
- In a mixing bowl, beat softened cream cheese until smooth, then gradually add powdered sugar.
- Mix in the Lotus Biscoff cookie butter until fully combined.
- Whip cold heavy cream until stiff peaks form, then fold into the cheesecake mixture.
- Spread the cheesecake filling evenly over the chilled crust.
- Warm the remaining cookie butter spread and drizzle it over the cheesecake filling.
- Sprinkle crushed cookies on top, and add whole cookies for decoration.
- Cover and refrigerate for at least 6 hours or overnight, then cut into bars.