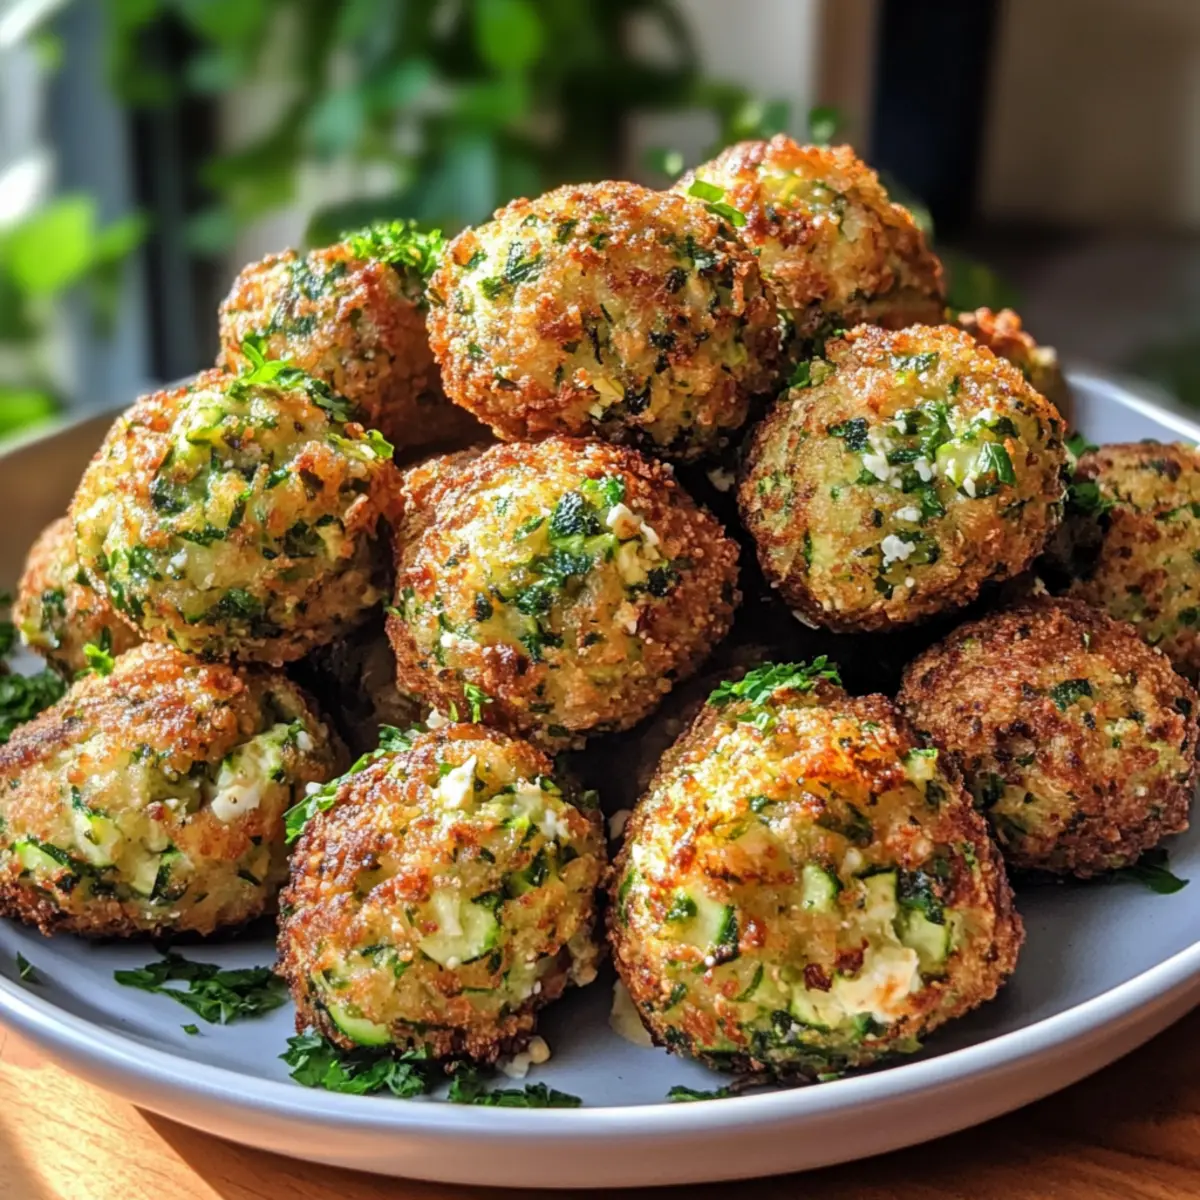
As I was chopping fresh zucchini the other day, the vibrant green reminded me of summer markets bustling with colorful produce. There’s something undeniably comforting about making Crispy Greek Zucchini Balls (Kolokithokeftedes) that warms the heart and satisfies the palate! These delightful bites are a fantastic way to embrace fresh vegetables, practically dancing with flavor from crumbled feta and aromatic herbs. Perfect for a quick snack, elegant appetizer, or a light meal, they fit effortlessly into a healthy lifestyle, especially when made gluten-free. Plus, they’re a breeze to whip up, making them a go-to recipe for even the busiest weeknights. What’s your favorite way to enjoy zucchini? Let’s dive in and create something delicious together!
Why Are Greek Zucchini Balls So Special?
Absolutely Delicious: Each bite of these crispy Greek zucchini balls bursts with flavors of fresh zucchini, tangy feta, and aromatic herbs, making them an irresistible treat!
Quick and Easy: This recipe boasts a simple prep process, ideal for busy weeknights when you crave something wholesome and satisfying.
Versatile Delight: Enjoy them as a flavorful appetizer, a healthy snack, or even a light meal paired with Grinch Oreo Balls for a sweet finish!
Crispy Perfection: Achieve that perfect crunch with minimal effort, delighting your family and friends at any gathering.
Healthy Indulgence: With just about 150 calories per serving, these gluten-free bites make for a guilt-free culinary experience that aligns beautifully with your healthy lifestyle.
Greek Zucchini Balls Ingredients
• Discover the magic of flavors with these crispy bites!
For the Zucchini Mix
- Grated Zucchini – Key to creating a flavorful base; make sure it’s well-drained to avoid sogginess.
- Salt – This essential ingredient helps draw moisture from the zucchini, enhancing its natural taste.
- Eggs – These act as a binding agent, giving structure to your Greek zucchini balls.
- Black Pepper – Adds a touch of warmth and a little kick to each bite.
For the Flavor Boost
- Feta Cheese – Greek feta is preferred for its creaminess and tanginess, elevating the overall flavor.
- Green Onions – Infuses the mixture with a fresh mild onion taste, brightening the dish.
- Fresh Mint – This herb adds a refreshing note, capturing the essence of Greek cuisine.
For the Binding and Frying
- Self-Rising Flour – Provides just the right amount of structure; substituting with gluten-free flour keeps it friendly for all diets.
- Olive Oil – Essential for frying to achieve a great crispiness; ensure it’s hot enough for the perfect fry.
Explore the deliciousness of Greek Zucchini Balls and infuse your home with the delightful aromas of Mediterranean cooking!
Step‑by‑Step Instructions for Crispy Greek Zucchini Balls
Step 1: Prepare Zucchini
Begin by washing your zucchini, then cut off both ends and grate using a box grater. To draw out excess moisture from the grated zucchini, place it in a colander, sprinkle with salt, and let it sit for 15-30 minutes. You’ll know it’s ready when the zucchini appears slightly wilted and has released its juices.
Step 2: Remove Water
After the zucchini has rested, take a clean kitchen towel and squeeze out as much moisture as possible. This step ensures that your Greek Zucchini Balls will turn out crispy rather than soggy. Aim for a dry texture before proceeding to the next step to achieve the perfect consistency in your batter.
Step 3: Mix Batter
In a large mixing bowl, combine the beaten eggs, sliced green onions, crumbled feta cheese, fresh mint, and black pepper. Stir everything together until well combined, creating a flavorful mixture that will bind and season your zucchini balls. Once evenly mixed, gently fold in the drained zucchini until it’s fully incorporated into the batter.
Step 4: Add Flour
Gradually add the self-rising flour to your zucchini mixture, stirring slowly to achieve a soft dough consistency. The flour should be mixed in just until incorporated—avoid over-mixing to keep your Greek Zucchini Balls light and airy. If the mixture feels too wet, add a bit more flour to reach the desired texture.
Step 5: Heat Oil
In a deep skillet or fryer, pour enough olive oil to submerge the zucchini balls, about 1-2 inches deep. Heat the oil over medium-high heat until it reaches 375°F (190°C). You can test the oil’s readiness by dropping a small amount of the batter into it; it should sizzle and rise to the surface, indicating perfect frying conditions.
Step 6: Fry Balls
Carefully drop tablespoonfuls of the batter into the hot oil, ensuring not to overcrowd the pan. Fry in batches for 2-3 minutes, or until the balls are golden brown and crispy on all sides. Gently flip them halfway through cooking to ensure even browning and a lovely crisp exterior that complements the soft interior of the Greek Zucchini Balls.
Step 7: Drain
Once fried to perfection, use a slotted spoon to remove the zucchini balls from the oil. Place them on paper towels to absorb any excess oil. This last step will help retain their crunch and prevent them from becoming greasy. Serve warm to fully enjoy the crispy, delicious goodness of your homemade Greek Zucchini Balls.

Expert Tips for Crispy Greek Zucchini Balls
-
Avoid Sogginess: Make sure to squeeze out excess moisture from the zucchini after draining. This ensures your Greek Zucchini Balls stay crispy, not soggy.
-
Maintain Oil Temperature: Fry in small batches to keep the oil temperature consistent. This prevents greasy results and promotes even cooking.
-
Healthier Alternative: For a lighter option, consider baking the zucchini balls at 400°F for 25-30 minutes, flipping halfway through for even crispiness.
-
Customize Your Flavor: Feel free to experiment with different herbs or grated vegetables, like carrots or bell pepper, to enhance your Greek Zucchini Balls.
-
Perfect Consistency: If your mixture feels too wet, gradually add more self-rising flour until it reaches a soft dough consistency, ensuring optimal frying results.
Greek Zucchini Balls Variations & Substitutions
Customize your Greek Zucchini Balls with these delightful variations that will spark your culinary creativity!
-
Dairy-Free: Swap out feta cheese with a plant-based cheese alternative for a creamy texture minus the dairy. Nutritional yeast can also add a cheesy, umami flavor.
-
Herb Infusion: Replace fresh mint with dill or parsley to bring a whole new aroma and taste that perfectly complements the zucchini.
-
Spicy Kick: Add a pinch of red pepper flakes or diced jalapeños to the mixture for a delightful heat that complements the fresh veggies.
-
Vegetable Blend: Incorporate grated carrots, finely chopped spinach, or even roasted red bell pepper to add sweetness, color, and nutrition to your zucchini balls.
-
Weight Watchers: Use oat flour instead of self-rising flour to keep the recipe wholesome while catering to dietary needs. It adds a slightly nutty flavor too!
-
Baking Option: For those avoiding frying, shape the mixture into balls and bake at 400°F for about 25-30 minutes, flipping halfway to ensure even browning.
-
Snack Size: Form smaller bites for party appetizers that are perfect for dipping in tzatziki, or serve them alongside your favorite homemade hummus for a healthy snack.
-
Inspired Pairing: Instead of tzatziki, serve these delicious zucchini balls with a spicy harissa yogurt or a fresh tomato salsa for a whole new flavor experience. You can even indulge in a sweet treat like Grinch Oreo Balls for a festive finish!
Feel free to mix and match these ideas to tailor the recipe to your taste. Happy cooking!
What to Serve with Crispy Greek Zucchini Balls?
Serving up crispy golden bites opens the door to a world of delicious pairings that enhance every meal experience.
- Creamy Tzatziki: This refreshing cucumber yogurt dip complements the rich flavors of zucchini balls and adds a cooling contrast.
- Greek Salad: A vibrant mix of tomatoes, olives, and feta brings a burst of freshness and color to your plate, enhancing the meal’s Mediterranean theme.
- Pita Bread: Soft, warm pita is perfect for dipping into tzatziki or loading up with zucchini balls, creating satisfying bite-sized wraps.
- Roasted Red Pepper Hummus: The smoky notes from hummus balance the dish beautifully, while providing another tasty option for dunking.
- Lemon Quinoa Salad: Light and zesty, this salad packed with herbs and veggies offers a wholesome side that pairs wonderfully with the zucchini balls.
For a full experience, consider serving these along with a chilled glass of crisp white wine or a refreshing mint lemonade. Enjoy!
Make Ahead Options
Crispy Greek Zucchini Balls are perfect for meal prep enthusiasts! You can prepare the zucchini mixture up to 24 hours in advance and store it in an airtight container in the refrigerator to maintain quality. Simply follow the first few steps of draining and squeezing the zucchini, mixing in the other ingredients, and then cover it tightly. To ensure the best flavor and texture, add the self-rising flour just before frying. When you’re ready to serve, heat your oil and fry the balls for about 2-3 minutes until golden brown. This way, you’ll have delicious homemade Greek Zucchini Balls ready in no time, making your busy weeknights a little easier!
How to Store and Freeze Greek Zucchini Balls
Fridge: Store cooled Greek Zucchini Balls in an airtight container for up to 3 days. This keeps them fresh while ensuring easy access for quick snacks or meals.
Freezer: To freeze, arrange cooled zucchini balls in a single layer on a baking sheet and freeze until solid. Transfer to a freezer-safe bag or container for up to 2 months.
Reheating: Reheat from frozen in a preheated oven at 350°F for 15-20 minutes or until heated through. This method helps maintain their crispy texture, making them delightful all over again.
Make-Ahead Tip: You can prepare the zucchini mixture ahead of time and store it in the fridge until you’re ready to fry, simplifying the meal prep process for busy days.

Advertisement
Greek Zucchini Balls Recipe FAQs
How do I select the best zucchini for this recipe?
When choosing zucchini, look for firm, shiny specimens without dark spots or softness. Medium-sized zucchinis are ideal; they possess enough moisture without being overly watery, which ensures your Greek Zucchini Balls will be crispy and delightful!
What is the best way to store leftover Greek Zucchini Balls?
Absolutely! After they cool, store your Greek Zucchini Balls in an airtight container in the fridge for up to 3 days. Reheating is easy; simply place them in a preheated oven at 350°F for about 10-15 minutes to regain their crispiness, making them just as delicious as they were fresh!
Can I freeze the zucchini balls? If so, how?
Definitely! To freeze, first arrange the cooled zucchini balls in a single layer on a baking sheet and freeze them until solid. Then, transfer them to a freezer-safe bag or container, where they can stay fresh for up to 3 months. When you’re ready to enjoy, bake them from frozen at 350°F for 15-20 minutes—this will help keep that magnificent crunch intact!
What should I do if my mixture is too watery?
Very! If your zucchini mixture has excess moisture, simply sprinkle a bit more self-rising flour into the mix, stirring gently until it reaches a soft, scoopable consistency. Just remember, too much mixing can lead to dense balls, so just fold it in until it’s combined without overdoing it!
Can these zucchini balls be made gluten-free?
For sure! To make Greek Zucchini Balls gluten-free, substitute the regular self-rising flour with a gluten-free self-rising flour blend. This adjustment maintains the light texture while ensuring everyone can enjoy these tasty bites, regardless of dietary preferences.

Crispy Greek Zucchini Balls That Will Wow Your Taste Buds
Ingredients
Equipment
Method
- Wash zucchini, cut off ends, and grate them using a box grater. Sprinkle with salt and let sit for 15-30 minutes in a colander.
- Squeeze out excess moisture from the drained zucchini with a clean kitchen towel.
- In a mixing bowl, combine beaten eggs, sliced green onions, crumbled feta, fresh mint, and black pepper. Mix well.
- Gradually add self-rising flour, stirring slowly until you achieve a soft dough consistency. Avoid over-mixing.
- Heat olive oil in a deep skillet or fryer until it reaches 375°F (190°C).
- Drop tablespoonfuls of the batter into the hot oil and fry for 2-3 minutes until golden brown.
- Use a slotted spoon to remove balls from oil and place on paper towels to drain excess oil.