
Walking through a quiet café one afternoon, I caught a whiff of something unforgettable—sweet caramel, buttery crumbs, and a hint of spice. That delicious scent tickled my senses and instantly transported me to my happy place: the kitchen! Today, I’m excited to share my recipe for No-Bake Lotus Biscoff Cheesecake Bars, a dessert that combines luscious creaminess with the unmistakable crunch of Lotus Biscoff biscuits. Not only is this recipe incredibly easy to throw together—perfect for those busy weeknights—but it’s also a total crowd-pleaser, guaranteed to impress friends and family alike. With minimal effort and no baking required, these bars become a delightful treat that you’ll want to indulge in again and again. Curious about how this sweet masterpiece comes together? Let’s dive into the delicious details!
Why Are These Bars So Irresistible?
Unforgettable Flavor: These No-Bake Lotus Biscoff Cheesecake Bars deliver a delightful balance of creamy and crunchy with every bite. The Lotus Biscoff spread takes the flavor to new heights, making them truly memorable.
Effortless Preparation: With no baking required, you can whip these bars up in just 30 minutes, perfect for a last-minute gathering!
Crowd Favorite: Whether you’re hosting a party or just have a sweet craving, these bars are sure to impress friends and family alike.
Make-Ahead Convenience: Prep them the night before and let them chill—easy peasy! Their deliciousness intensifies as they sit, making them even more delectable.
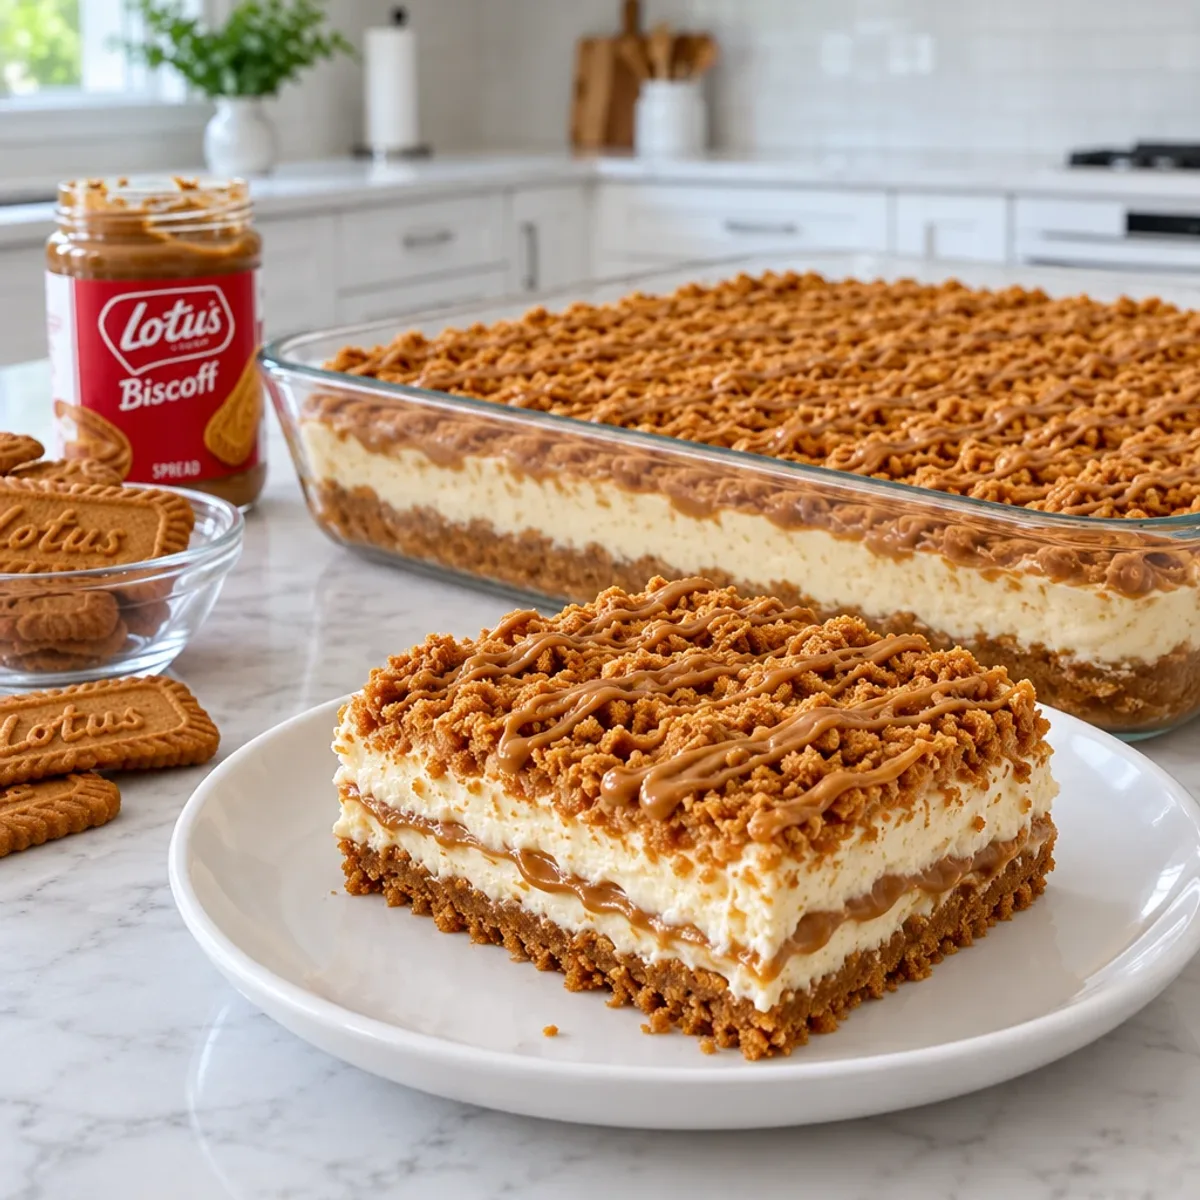
Visually Stunning: Their layers of crust, creaminess, and chocolaty drizzle make for a stunning presentation that’s sure to wow.
Dive deeper into the world of desserts with more of our no-bake recipes!
No-Bake Lotus Biscoff Cheesecake Bars Ingredients
For the Crust
- Lotus Biscoff biscuits – 250 g, crushed to create a sweet, buttery base.
- Unsalted butter – 100 g, melted to help bind the crust together.
For the Cheesecake Filling
- Cream cheese – 500 g, softened to ensure a smooth and creamy texture.
- Powdered sugar – 100 g, for sweetness that blends beautifully into the filling.
- Lotus Biscoff spread – 200 g, bringing that signature flavor right into the filling.
- Vanilla extract – 1 tsp, enhancing the overall dessert with warm notes.
- Cold heavy whipping cream – 300 ml, whipped to fluffy perfection to lighten the filling.
For the Topping
- Lotus Biscoff spread – 150 g, melted for a decadent drizzle on top.
- Crushed Lotus Biscoff biscuits – 6 biscuits, adding a delightful crunch as a topping.
- Whole Lotus Biscoff biscuits – 4 biscuits, optional for an elegant garnish.
These No-Bake Lotus Biscoff Cheesecake Bars are not only simple to create but are bursting with flavor! Enjoy the magic of no-bake desserts that everyone will love!

Step-by-Step Instructions for No-Bake Lotus Biscoff Cheesecake Bars
Step 1: Prepare the Pan
Line a 9 x 9 inch square baking pan with parchment paper, ensuring some overhang on the sides. This will help in easily removing the cheesecake bars later. Set the pan aside as you create the crust.
Step 2: Make the Crust
Place the 250 g of Lotus Biscoff biscuits in a food processor and pulse until you achieve fine, even crumbs. If you don’t have a processor, crush them in a sealed plastic bag using a rolling pin. Transfer the crumbs to a mixing bowl, pour in 100 g of melted unsalted butter, and mix until the texture resembles wet sand.
Step 3: Press the Crust
Pour the crumb mixture into the prepared baking pan. Use the back of a spoon or the bottom of a flat measuring cup to press the mixture firmly into an even, compact layer. This will form the sturdy base for your No-Bake Lotus Biscoff Cheesecake Bars.
Step 4: Chill the Crust
Place the crust in the refrigerator for 20 minutes to firm up. This step helps to create a stable foundation for the cheesecake filling once it’s added, ensuring that the bars hold their shape.
Step 5: Prepare the Filling
In a large mixing bowl, add 500 g of softened cream cheese and beat with an electric mixer until it’s smooth and creamy, with no lumps remaining. This should take about 2-3 minutes. Scrape down the bowl sides as needed for consistency.
Step 6: Add Sweetness and Flavor
Mix in 100 g of powdered sugar and 1 tsp of vanilla extract to the cream cheese. Beat everything together until fully incorporated. At this stage, the filling should be smooth, sweet, and inviting—perfect for these No-Bake Lotus Biscoff Cheesecake Bars.
Step 7: Incorporate the Lotus Spread
Add 200 g of Lotus Biscoff spread to the cream cheese mixture. Continue beating until the mixture becomes smooth and evenly colored, which should take about 1-2 minutes. The rich caramel flavor will enhance the bars beautifully.
Step 8: Whip the Cream
In a separate chilled bowl, pour in 300 ml of cold heavy whipping cream and whip until stiff peaks form when the beaters are lifted. This process should take about 3-4 minutes. The whipped cream will make the filling light and fluffy.
Step 9: Fold the Mixtures Together
Gently fold the whipped cream into the cream cheese mixture in two to three additions using a spatula. Carefully combine until you see no streaks, keeping the mixture light and airy for the perfect filling texture in your No-Bake Lotus Biscoff Cheesecake Bars.
Step 10: Add the Filling to the Crust
Remove the chilled crust from the refrigerator and spoon the cheesecake filling over it. Smooth the surface with an offset spatula or the back of a spoon, spreading it evenly into the corners. It should look invitingly creamy at this point.
Step 11: Refrigerate to Set
Cover the pan with plastic wrap and refrigerate for at least 6 hours, or overnight if possible. This chilling time allows the cheesecake filling to set thoroughly, ensuring clean slices once you're ready to serve.
Step 12: Prepare the Topping
Heat 150 g of Lotus Biscoff spread in a microwave-safe bowl in short 10 to 15 second intervals, stirring in between until pourable but not hot. This will create a luscious drizzle for the topping of your bars.
Step 13: Drizzle and Decorate
Once the spread has cooled slightly, drizzle it evenly over the chilled cheesecake layer. Sprinkle the crushed Lotus Biscoff biscuits on top, and optionally place whole biscuits for decoration. This adds texture and visual appeal to your No-Bake Lotus Biscoff Cheesecake Bars.
Step 14: Final Chill
Return the pan to the refrigerator for another 15 to 20 minutes to allow the topping to set properly. This final chilling step ensures a beautiful finish to your bars, making them ready for slicing.
Step 15: Slice and Serve
Lift the cheesecake out of the pan using the parchment paper overhang and place it on a cutting board. Use a sharp knife, warmed in hot water and wiped dry between cuts, to slice the cheesecake into 12 to 16 beautiful bars. Keep them refrigerated until you’re ready to serve.

How to Store and Freeze No-Bake Lotus Biscoff Cheesecake Bars
Refrigerator: Keep the bars stored in an airtight container in the fridge for up to 5 days. This ensures they stay fresh and maintain their creamy texture.
Freezer: For longer storage, freeze the bars in an airtight container with parchment paper between layers for up to 2 months. Thaw them in the fridge overnight before serving.
Serving Tips: To enjoy the best flavor, let the bars sit at room temperature for about 10–15 minutes after removing from the refrigerator. This enhances the deliciousness of the No-Bake Lotus Biscoff Cheesecake Bars.
Reheating: No need to reheat these bars; simply slice and serve cold for the most enjoyable experience!
Expert Tips for No-Bake Lotus Biscoff Cheesecake Bars
Crust Consistency: Ensure your crushed biscuits and melted butter form a texture similar to wet sand. This will prevent a crumbly crust that can't hold together.
Cream Cheese Temperature: Use cream cheese that’s softened to room temperature. Cold cream cheese can result in lumps in your filling, ruining that smooth texture we crave in No-Bake Lotus Biscoff Cheesecake Bars.
Whipping Cream Technique: Whip your heavy cream to stiff peaks. This lightens the filling and gives that airy texture—just be careful not to over-whip, which can turn it grainy.
Chill Duration: Don’t rush the chilling process! Aim for at least 6 hours or ideally overnight for the cheesecake filling to set. It ensures cleaner slices and a more defined flavor.
Slicing Tips: When cut, use a sharp knife warmed in hot water. This simple trick helps create clean slices and keeps your layers beautifully intact.
Prepare Ahead for No-Bake Lotus Biscoff Cheesecake Bars
Preparing the No-Bake Lotus Biscoff Cheesecake Bars in advance is a game-changer for busy home cooks! You can make the crust and cheesecake filling up to 24 hours ahead of time, allowing the flavors to deepen while you manage your schedule. Simply prepare the crust, refrigerate it for 20 minutes to firm up, and then proceed with the filling, which can also be made a day in advance. To maintain the quality, ensure the bars are tightly covered in the refrigerator, preventing them from any fridge odors. When you're ready to serve, just drizzle the warmed Lotus Biscoff spread and add your toppings, allowing for a delicious dessert that tastes just as fresh as the day you made it!
What to Serve with No-Bake Lotus Biscoff Cheesecake Bars
Indulging in bite-sized squares of creamy bliss is just the beginning; let's create a memorable meal experience together!
Fresh Berries: Pair with ripe strawberries or blueberries to add a refreshing sweetness that cuts through the richness of the cheesecake bars.
Coffee: A warm espresso or latte complements the flavors beautifully, enhancing the caramel notes of the Lotus Biscoff spread.
Chocolate Tart: For chocolate lovers, serving a slice of rich chocolate tart brings a different texture and depth, contrasting deliciously with the cheesecake.
Whipped Cream: A dollop of vanilla whipped cream enhances the creaminess, adding a light, airy element to each bite of the bars.
Salted Caramel Sauce: Drizzling some homemade salted caramel sauce over the bars intensifies the sweet and savory notes, making each bite even more indulgent.
Elevate your dessert experience even further with these delightful pairings that will leave everyone raving about your dessert table!
No-Bake Lotus Biscoff Cheesecake Bars Variations
Looking to add your own twist to these delightful cheesecake bars? Let your imagination run wild with these delicious ideas!
Gluten-Free: Substitute the Lotus Biscoff biscuits with gluten-free cookies for a similar taste without the gluten. Perfect for accommodating dietary needs!
Nutty Crunch: Add 100 g of finely chopped nuts—like pecans or almonds—to the crust for extra texture and a nutty flavor that complements the sweetness.
Chocolate Lover's Dream: Blend in 100 g of melted dark chocolate into the cheesecake filling for a rich, chocolatey version that's simply irresistible.
Fruity Delight: Fold in 200 g of finely chopped fresh fruit, such as strawberries or raspberries, into the cream cheese mixture for a burst of freshness in every bite.
Coffee Kick: Stir in 1-2 tablespoons of instant coffee granules into the cheesecake filling for a coffee-infused flavor that’s perfect for caffeine lovers.
Spicy Touch: Add a pinch of cinnamon or nutmeg to the filling for a warm, spiced flavor that makes each bite feel like a hug.
Vegan Option: Swap cream cheese for vegan cream cheese and use coconut cream instead of heavy whipping cream for a cruelty-free treat everyone can enjoy.
Extra Toppings: Top with caramel sauce and chopped walnuts for an indulgent finish, making each slice even more divine and satisfying.
Feel free to explore these variations and make them your own! If you’re curious about other delightful creations, check out our collection of no-bake recipes for more inspirations.
Advertisement

No-Bake Lotus Biscoff Cheesecake Bars Recipe FAQs
How do I select the best Lotus Biscoff biscuits?
Look for biscuits that are free from any visible dark spots or signs of damage. Fresh Lotus Biscoff biscuits should have that delightful caramel flavor and crunch! If they feel stale or lack aroma, it’s best to find a new pack.
How should I store leftover No-Bake Lotus Biscoff Cheesecake Bars?
Store the bars in an airtight container in the refrigerator for up to 5 days to maintain their creamy texture. If you don’t finish them within that timeframe, don’t worry! You can freeze them for even longer enjoyment.
Can I freeze the No-Bake Lotus Biscoff Cheesecake Bars?
Absolutely! To freeze, place the bars in an airtight container with parchment paper between layers. They can be stored for up to 2 months. When you’re ready to enjoy, simply thaw them in the fridge overnight for the best texture.
Why did my cheesecake filling turn out lumpy?
This can happen if the cream cheese isn’t softened to room temperature. Always let it sit out for at least 30 minutes before mixing. If you’re still having trouble, try using a hand mixer instead of a stand mixer for better control.
Are there any allergy concerns with this recipe?
Yes, these No-Bake Lotus Biscoff Cheesecake Bars contain dairy and gluten. For those with allergies, consider using gluten-free biscuits and a dairy-free cream cheese and whipping cream alternative to make a delicious variation.
How do I achieve the best slicing technique for these bars?
To slice the bars neatly, use a sharp knife warmed in hot water. Wipe it dry between cuts to ensure clean, crisp slices. This technique helps maintain the beautiful layers of the cheesecake and topping without smearing!
Creamy No-Bake Lotus Biscoff Cheesecake Bars
Ingredients
Equipment
Method
- Line a 9x9 inch square baking pan with parchment paper, leaving some overhang.
- Crush the Lotus Biscoff biscuits into fine crumbs and mix with melted butter.
- Press the crumb mixture into the base of the prepared pan.
- Chill the crust in the refrigerator for 20 minutes.
- In a mixing bowl, beat the softened cream cheese until smooth.
- Add powdered sugar and vanilla extract, mix until combined.
- Incorporate Lotus Biscoff spread, blending until smooth.
- Whip the cold heavy cream until stiff peaks form.
- Gently fold the whipped cream into the cream cheese mixture.
- Spread the cheesecake filling over the chilled crust.
- Cover and refrigerate for at least 6 hours or overnight.
- Melt Lotus Biscoff spread for topping, then drizzle over the set cheesecake.
- Sprinkle with crushed biscuits and garnish with whole biscuits.
- Chill again for 15-20 minutes to set the topping.
- Slice into bars and serve cold.