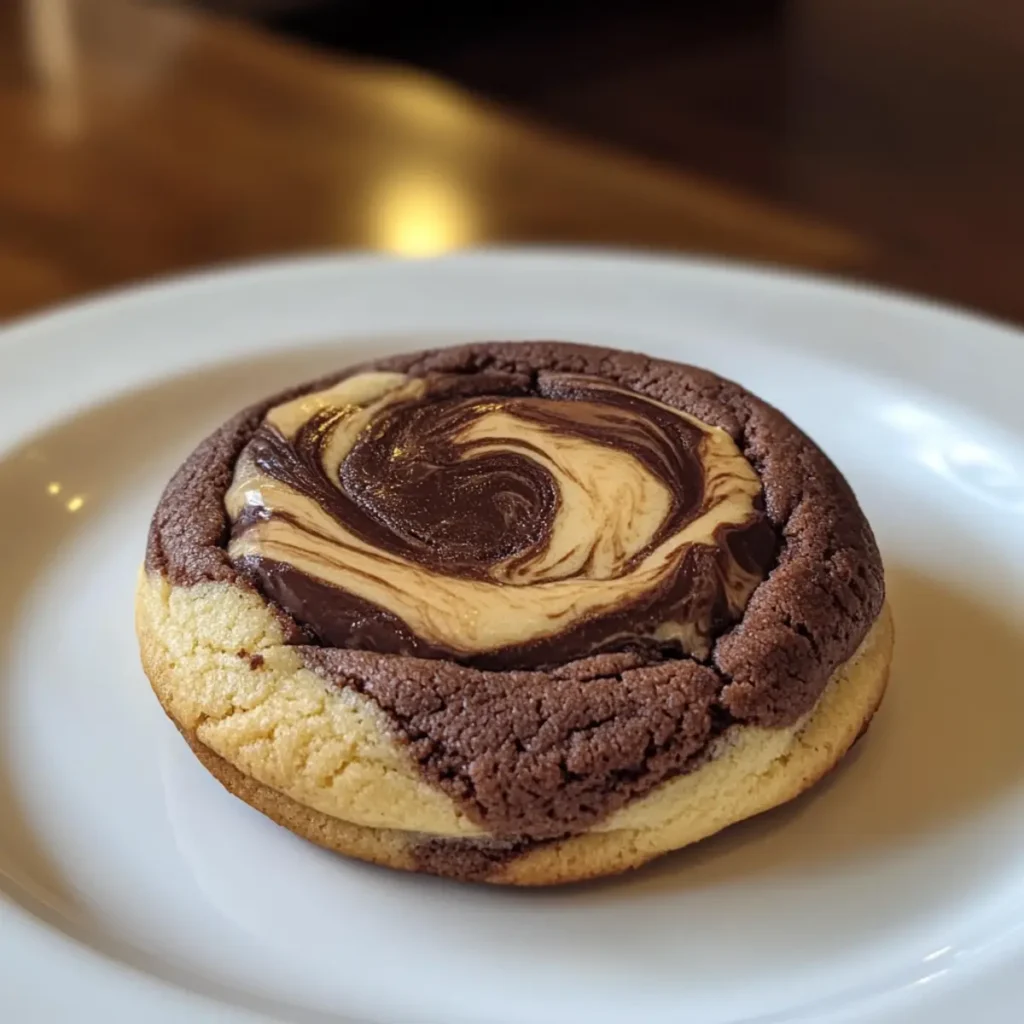
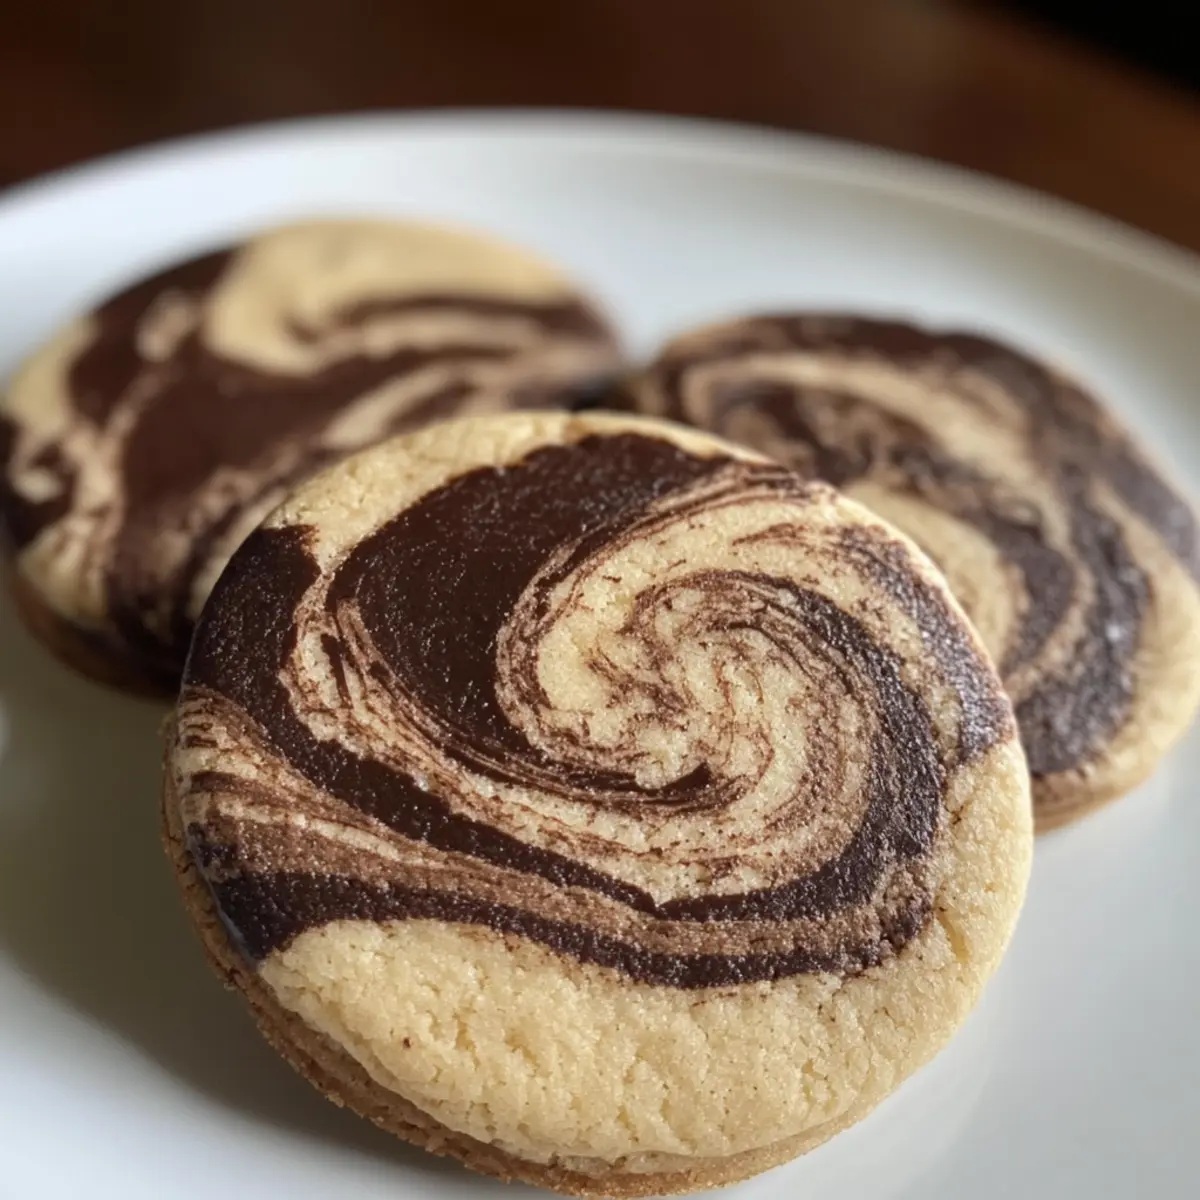
The aroma of freshly brewed coffee wafting through the air can instantly transport you to a delightful corner café. But what if I told you that you can capture that experience right in your own kitchen? These Easy Vietnamese Coffee Marble Cookies are a revelation, merging the rich boldness of coffee with a fun twist. Within just minutes, you can whip up a dessert that’s not only a crowd-pleaser but also incredibly adaptable—perfect for customizing based on what you have on hand! With their crispy edges and melty centers, these cookies promise to bring a smile to the face of every coffee lover. Are you ready to elevate your baking game with this quick and spectacular treat?

Why are Vietnamese Coffee Marble Cookies a Must-Try?
Exquisite flavor: The fusion of rich coffee and buttery cookie dough creates a mouthwatering combination that’s hard to resist.
Quick preparation: This recipe allows you to indulge in freshly baked goodies in no time—perfect for spontaneous cravings!
Versatile options: Feel free to adapt the ingredients; swap out for gluten-free flour or mix in cocoa powder for a chocolatey delight.
Impressive look: The marbled design not only tastes amazing but also makes for an attractive treat to share with friends—perfect for those get-togethers!
These cookies are a delightful companion to a warm cup of coffee, just like having your own café experience at home. For more delicious ideas, don’t miss my recipes for Caramel Apple Cookies and Chocolate Thumbprint Cookies.
Easy Vietnamese Coffee Marble Cookies Ingredients
For the Cookie Dough
• All-purpose flour – Provides structure and texture; can be substituted with gluten-free flour for a gluten-free option.
• Baking powder – Acts as a leavening agent to create a light cookie; no direct substitute recommended.
• Salt – Enhances flavor; use kosher salt for the best results.
• Unsalted butter – Adds richness to the dough; can be replaced with coconut oil for dairy-free cookies.
• Sugar – Sweetens the cookies; consider using brown sugar for added moisture and flavor.
• Egg – Binds ingredients while adding moisture; aquafaba can replace it for a vegan version.
• Espresso/strong brewed coffee – Infuses the cookie with deep coffee flavor; adjust the amount of liquid if using brewed coffee instead.
• Vanilla extract – Enhances overall flavor, and for the best taste, use pure vanilla extract.
For the Marble Effect
• Extra coffee or cocoa powder – Blend in for a coffee or chocolate twist, creating that beautiful marbled look in your cookies.
With these ingredients, you’re one step closer to baking up a batch of delightful Vietnamese Coffee Marble Cookies that will whisk you away to your favorite café!
Step‑by‑Step Instructions for Easy Vietnamese Coffee Marble Cookies
Step 1: Preheat and Prepare
Preheat your oven to 350°F (175°C). Line a baking sheet with parchment paper for easy cookie removal later. This step ensures an even baking surface for your Easy Vietnamese Coffee Marble Cookies, helping them develop that desired crispy edge while keeping the centers soft and melty.
Step 2: Mix Dry Ingredients
In a medium bowl, whisk together the all-purpose flour, baking powder, and salt until well combined. This mixture is crucial for creating the proper texture in your cookies. The baking powder will help them rise, so make sure there are no lumps. Set this bowl aside as you prepare the wet ingredients.
Step 3: Cream Butter and Sugar
In a stand mixer, beat together the unsalted butter and granulated sugar on medium speed until the mixture is light and fluffy, about 2–3 minutes. Add in the egg and vanilla extract, mixing until fully combined. This process ensures your dough will be rich and flavorful, setting the stage for delicious Vietnamese Coffee Marble Cookies.
Step 4: Combine Wet and Dry Ingredients
Gradually add the flour mixture to the wet ingredients, mixing on low speed. Just mix until the dough is combined; be careful not to overmix, as this can lead to tough cookies. This step ensures that your cookie dough has that perfect balance of structure and soft chewiness.
Step 5: Add Coffee Flavor
Incorporate the espresso or strong brewed coffee into the dough using a spatula. Mix until just combined to ensure an even distribution of coffee flavor throughout the dough. The rich coffee notes are what make Easy Vietnamese Coffee Marble Cookies truly special, infusing them with that café essence.
Step 6: Create the Marble Effect
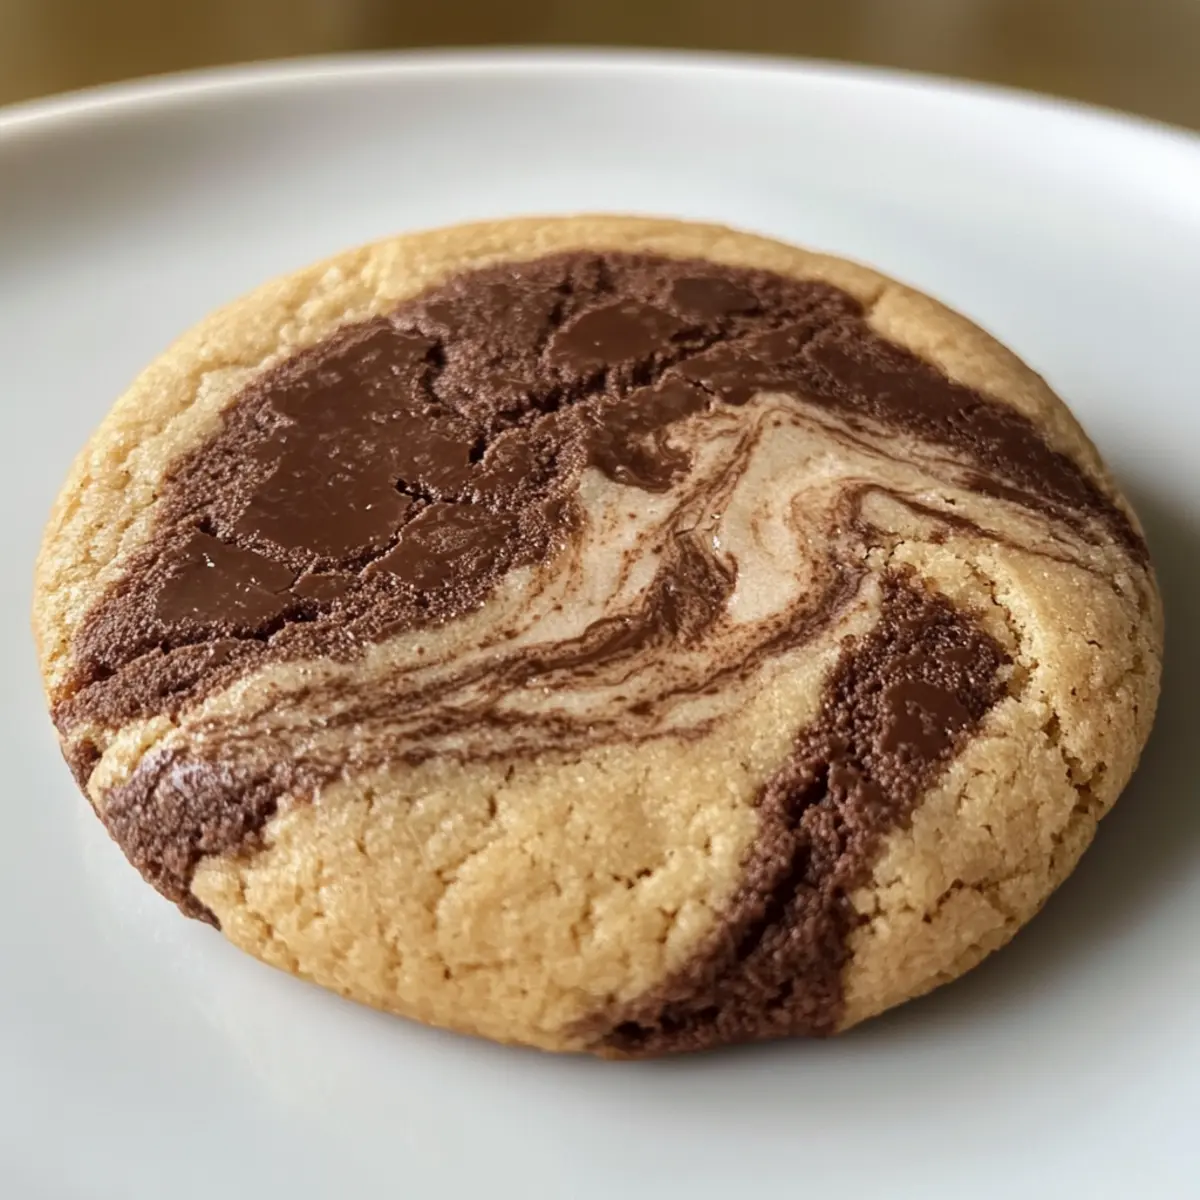
Take a portion of the dough, about one-third, and blend in extra coffee or cocoa powder to achieve a marbled look. Divide the plain and flavored dough into smaller pieces, then swirl them together with a gentle hand. This fun technique creates a visually appealing pattern, making your cookies irresistible.
Step 7: Shape the Cookies
Using a tablespoon, drop rounded portions of the marbled dough onto the prepared baking sheet, spacing them about 2 inches apart. The cookies will spread as they bake, so give them room to grow. Ensure they are roughly equal in size for even baking and a beautiful finish.
Step 8: Bake to Perfection
Place the baking sheet in the preheated oven and bake for 10–12 minutes, or until the edges are golden and the centers appear slightly soft. Keep an eye on your cookies, as they will continue to set while cooling. The aroma of coffee will fill your kitchen, instantly elevating the baking experience.
Step 9: Cool and Serve
Remove the baking sheet from the oven and allow the cookies to cool for about 5 minutes. Gently transfer them to a wire rack to cool completely. This cooling stage is essential for achieving the perfect texture; your Easy Vietnamese Coffee Marble Cookies will have a delightful crispy edge and a soft, luscious center.
Storage Tips for Vietnamese Coffee Marble Cookies
Fridge: Store baked cookies in an airtight container in the fridge for up to 5 days to maintain freshness and flavor.
Freezer: Baked cookies can be frozen for up to 2 months. Place them in a single layer in a freezer-safe container or bag, and separate layers with parchment paper.
Dough Storage: Prepare the cookie dough ahead of time and store it in the fridge for up to 2 days before baking. This allows the flavors to develop and makes for quick baking whenever cravings hit.
Reheating: To restore texture, reheat frozen cookies in a preheated oven at 350°F (175°C) for 5-7 minutes, letting that delightful coffee aroma fill your home once again.
Vietnamese Coffee Marble Cookies Variations
Get creative and tantalize your taste buds with whimsical twists on these delightful cookies!
-
Dairy-Free: Replace unsalted butter with coconut oil. This swap keeps your cookies rich and indulgent without dairy! The coconut oil adds a subtle, tropical vibe that will surprise your palate.
-
Chocolate Lovers: Mix in cocoa powder to one-third of the dough for a decadent chocolate marble. This delightful addition creates an irresistible balance of coffee and chocolate that is simply heavenly!
-
Vegan Delight: Substitute the egg with aquafaba for a delicious vegan version. Your cookies will still maintain their fluffy texture and coffee flavor, leaving everyone grateful for these plant-based wonders.
-
Nutty Crunch: Fold in chopped nuts like walnuts or pecans for an added crunch. They bring a delightful contrast to the soft centers, making each bite a new experience!
-
Spiced Up: Add a sprinkle of cinnamon or cardamom for a warm spice twist. These aromatic spices will take your Vietnamese Coffee Marble Cookies to an exotic level, perfect for cozy evenings!
-
Coffee Kick: Use espresso instead of brewed coffee to intensify the coffee flavor. It’s a delightful boost for those who really want to savor that café experience, with every cookie feeling like a caffeinated hug!
-
Citrus Zing: Incorporate a splash of orange or lemon zest into the dough for a citrusy brightness. This unexpected twist will awaken your taste buds and add a refreshing depth to the rich coffee flavor!
-
Sweet and Salty: Sprinkle flaky sea salt on top before baking for a salty-sweet combo. This simple addition enhances the flavors beautifully, elevating the cookie from delicious to divine!
No matter how you choose to customize these cookies, each variation is bound to impress your family and friends. If you’re intrigued by other sweet treats, be sure to check out my recipes for Cheesecake Cookies Salted and Eggnog Snickerdoodle Cookies!
What to Serve with Easy Vietnamese Coffee Marble Cookies
Indulge in a delightful café-inspired experience with these cookies, perfectly complemented by sweet and savory sides.
- Creamy Vanilla Ice Cream: The smooth and rich ice cream pairs fantastically with the coffee flavors, enhancing every bite’s indulgence.
- Fresh Berries: Juicy strawberries or raspberries add a refreshing tartness that balances the sweetness of the cookies beautifully.
- Espresso or Strong Coffee: A classic match! Sip on a hot cup while savoring the cookies for a full-on coffee lover’s feast.
- Salted Caramel Sauce: Drizzled on top, this sweet-salty treat elevates the cookies to a gourmet delight, perfect for special occasions.
- Chocolate Dipping Sauce: For an extra layer of decadence, dip these cookies into warm chocolate sauce—pure bliss!
- Toasted Almonds: Crunchy, toasted almonds add a delightful texture and nutty flavor, enhancing the cookies without overshadowing their coffee essence.
- Coconut Whipped Cream: Light and airy, this vegan-friendly topping complements the rich coffee flavor while providing a lovely contrast.
- Chai Tea: The spices in chai tea harmoniously blend with the coffee, creating a comforting and aromatic pairing perfect for afternoon tea.
- Lemon Zest Cookies: For a twist, serve alongside lemon-flavored cookies; the bright citrus notes will create a delightful flavor contrast.
- Milk Chocolate Squares: A simple addition, but the creamy milk chocolate brings out the cookie’s sweetness and is a nostalgic classic for dessert lovers.
Expert Tips for Easy Vietnamese Coffee Marble Cookies
Check for Doneness: Look for golden edges and a slight softness in the center; cookies will continue to firm up as they cool.
Avoid Overmixing: Be cautious when combining wet and dry ingredients. Overmixing can result in tough cookies rather than the tender, melt-in-your-mouth texture you want.
Room Temperature Butter: Ensure your unsalted butter is at room temperature before creaming for the best incorporation and fluffy texture in your Vietnamese Coffee Marble Cookies.
Customize Flavors: Don’t hesitate to experiment! Mix in cocoa powder for chocolatey marbling or play with the type of coffee you use for unique flavor profiles.
Chilling Dough: If time allows, refrigerate your dough for 30 minutes before baking. This helps maintain shape and improve flavor depth in your cookies.
Make Ahead Options
These Easy Vietnamese Coffee Marble Cookies are perfect for meal prep enthusiasts! You can prepare the cookie dough up to 3 days in advance and refrigerate it, tightly wrapped in plastic wrap or an airtight container, to maintain freshness. For the best results, shape the dough into balls before chilling, as this helps them retain their form when baked. Additionally, the cookies can be baked and stored in an airtight container for up to 5 days. When you’re ready to enjoy, simply take out the dough and bake directly from the fridge for a few extra minutes, or reheat baked cookies in a 350°F (175°C) oven for delightful, soft cookies that taste just as delicious as when they were fresh!
Advertisement
Easy Vietnamese Coffee Marble Cookies Recipe FAQs
What should I look for when selecting coffee for the cookies?
Absolutely! When choosing coffee for your Vietnamese Coffee Marble Cookies, opt for a high-quality espresso or strong brewed coffee. Look for freshly roasted beans for the best flavor; a dark roast will impart a richer taste. If you have whole beans, grind them just before brewing to maximize aroma and flavor—your cookies will be all the better for it!
How should I store my baked Vietnamese Coffee Marble Cookies?
To keep your cookies fresh, store them in an airtight container at room temperature for up to 5 days. If you want to enjoy them later, you can refrigerate them, but they may lose a bit of their delightful texture. To maintain optimal flavor and softness, I suggest placing a slice of bread in the container—this helps keep the cookies moist.
Can I freeze the dough for Vietnamese Coffee Marble Cookies?
Yes indeed! Freezing your cookie dough is a fantastic option. Simply shape the dough into discs, wrap tightly in plastic wrap, then place in a freezer-safe bag or container. They’ll be good for up to 3 months! When you’re ready to bake, thaw in the fridge overnight, then pop them in the oven as directed; homemade cookies on demand!
What should I do if my cookie dough is too sticky?
If you find your dough is too sticky, sprinkle in a little extra flour, one tablespoon at a time, while mixing until it reaches a manageable consistency. Always be cautious about adding too much flour, as it can upset the texture of your cookies. You can also chill the dough for 30 minutes; this will help firm it up, making it easier to scoop and shape.
Are there any dietary considerations I should keep in mind?
Certainly! If you’re baking for those with dietary restrictions, you can easily adapt the recipe. Substitute the all-purpose flour with a gluten-free blend for gluten-sensitive individuals. For a dairy-free option, using coconut oil instead of butter works well. Additionally, if you’re catering to vegans, replace the egg with aquafaba (chickpea brine) for a similar binding effect in your Vietnamese Coffee Marble Cookies!

Irresistible Vietnamese Coffee Marble Cookies for Your Sweet Cravings
Ingredients
Equipment
Method
- Preheat your oven to 350°F (175°C). Line a baking sheet with parchment paper.
- In a medium bowl, whisk together the all-purpose flour, baking powder, and salt until well combined.
- In a stand mixer, beat together the unsalted butter and sugar on medium speed until light and fluffy, about 2–3 minutes. Add in the egg and vanilla extract.
- Gradually add the flour mixture to the wet ingredients, mixing on low speed until just combined.
- Incorporate the espresso or strong brewed coffee into the dough using a spatula.
- Take a portion of the dough and blend in extra coffee or cocoa powder to create a marbled look.
- Using a tablespoon, drop rounded portions of the marbled dough onto the prepared baking sheet, spacing them about 2 inches apart.
- Bake for 10–12 minutes, or until edges are golden and centers are slightly soft.
- Remove from the oven and allow to cool for about 5 minutes before transferring to a wire rack.