A Sweet Memory in Every Bite
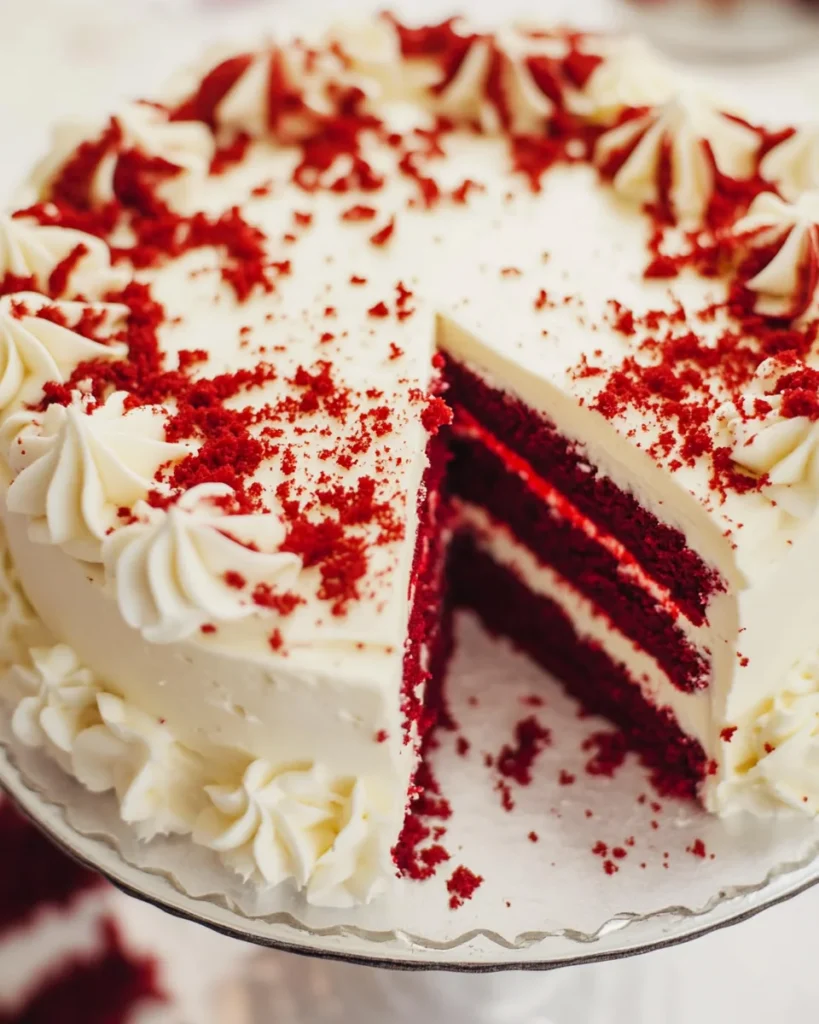
Baking has always been more than just mixing ingredients; it is a journey back in time, a connection to moments we cherish. The first time I made a red velvet cake, I was trying to recreate a childhood memory—the taste of my grandmother’s famous cake that she made every Valentine’s Day. The aroma of cocoa and vanilla filling the kitchen, the sight of vibrant red layers, and the rich, tangy cream cheese frosting all brought back warm feelings of love and togetherness.
There’s something magical about red velvet cake. It is not just a dessert; it is an experience. Whether you are baking it for a special occasion, a romantic evening, or simply to indulge in something decadent, this cake holds the power to make any moment feel extraordinary.
But what exactly makes red velvet so special? Some say it’s the balance between chocolate and vanilla flavors, while others swear by the signature tang from the buttermilk and vinegar. Whatever it may be, one thing is certain—this cake has stood the test of time and continues to be one of the most beloved desserts around the world.
The Story Behind Red Velvet Cake
Red velvet cake is more than just a visually striking dessert; it has a history that dates back decades. Some food historians trace its origins to the Victorian era when cocoa powder was added to cakes to create a softer, more delicate texture. During that time, cakes were considered a luxury, and the addition of cocoa powder was believed to enhance the overall “velvety” texture, giving rise to the name “velvet cake.”
However, red velvet as we know it today truly gained popularity in the early 20th century. Some stories claim that it became widely known thanks to the Waldorf Astoria Hotel in New York City, where it was served as a signature dessert. Others believe that during the Great Depression, food companies promoted red velvet cake by introducing food coloring and special extracts to make baked goods more visually appealing.
The deep red hue of the cake was traditionally achieved through the reaction between natural cocoa powder and acidic ingredients like vinegar and buttermilk. While modern recipes often rely on red food coloring to intensify the shade, the original chemistry behind the cake remains an essential part of its uniqueness.
Today, red velvet cake is a symbol of love, celebration, and indulgence. It is a staple for holidays like Christmas and Valentine’s Day, but it is also a year-round favorite for birthdays, weddings, and everyday treats.
Why This Red Velvet Cake is Worth Making
There are countless red velvet cake recipes out there, but what makes this one stand out? Here’s why this version of the classic is a must-try:
- Perfectly Balanced Flavor – Unlike some overly sweet or bland versions, this cake finds the ideal middle ground between chocolatey, tangy, and sweet.
- Unbelievably Moist Texture – Thanks to a combination of butter, oil, and buttermilk, every bite is rich, tender, and irresistibly soft.
- Decadent Cream Cheese Frosting – No red velvet cake is complete without a smooth, tangy, and sweet cream cheese frosting that melts in your mouth.
- Versatility in Form – Whether you want a layer cake, sheet cake, cupcakes, or even cake pops, this recipe adapts beautifully to different styles of baking.
Ingredients
For the Cake:
- 1 cup unsalted butter (room temperature)
- ½ cup vegetable oil
- 1 ¾ cups granulated sugar
- 4 large eggs (room temperature)
- 2 teaspoons pure vanilla extract
- 1 ½ tablespoons LorAnn’s red velvet emulsion (or red food coloring)
- ¼ cup full-fat sour cream (room temperature)
- 1 teaspoon white distilled vinegar
- 1 tablespoon cocoa powder
- 2 teaspoons baking powder
- 1 teaspoon baking soda
- 1 teaspoon salt
- 2 ¾ cups all-purpose flour
- 1 cup buttermilk (room temperature)
For the Cream Cheese Frosting:
- 1 ½ cups unsalted butter (room temperature)
- 6 oz. cream cheese (room temperature)
- 6 cups powdered sugar (sifted)
- 3 tablespoons heavy whipping cream
- 2 teaspoons vanilla extract
- Pinch of salt
Directions
Crafting the Perfect Red Velvet Cake
- Preheat & Prep: Preheat oven to 325°F. Grease three 8-inch cake pans, line with parchment paper, and grease again.
- Mix Dry Ingredients: In a medium bowl, whisk together cocoa powder, baking powder, baking soda, salt, and flour. Set aside.
- Cream Butter & Sugar: In a stand mixer, beat butter, oil, and sugar on medium-high speed for 4 minutes until light and fluffy.
- Add Eggs: Scrape the bowl, then add eggs one at a time, mixing for 30 seconds after each.
- Incorporate Wet Ingredients: Mix in vanilla, red velvet emulsion, sour cream, and vinegar on low speed until just combined.
- Alternate Dry & Wet: Add half the dry ingredients and half the buttermilk to the batter, mixing on low. Repeat with the remaining halves, mixing only until combined.
- Bake to Perfection: Divide batter evenly among prepared pans and bake for 33-35 minutes. Insert a toothpick—if it comes out clean or with a few crumbs, the cake is done.
- Cool Down: Let cakes cool in pans for 15 minutes, then transfer to a wire rack to cool completely.
Creating the Luscious Cream Cheese Frosting
- Cream It Up: Beat butter and cream cheese together for 2 minutes. Scrape the bowl and beat again for another 2 minutes.
- Sweeten & Smooth: Add powdered sugar, heavy cream, vanilla, and salt. Mix on low until combined.
- Fluff It Up: Beat on medium-high for 3-5 minutes for a light and airy texture.
- Remove Air Pockets: Use a spatula or wooden spoon to smooth out air bubbles.
Assembling the Masterpiece
- Layering: Pipe a small dollop of frosting onto a cake board. Place the first cake layer top-side up. Spread ¾ cup frosting evenly on top.
- Stack & Frost: Repeat with the second layer. Place the final layer top-side up.
- Crumb Coat: Apply a thin layer of frosting around the cake to trap crumbs. Freeze for 10-15 minutes.
- Final Touches: Frost the cake completely with remaining frosting. Serve at room temperature.
Nutritional Breakdown (Per Serving)
- Calories: ~450 kcal
- Carbohydrates: ~60g
- Fats: ~22g
- Protein: ~4g
- Sugars: ~40g
- Sodium: ~250mg
Enjoy your velvety-smooth, indulgent red velvet cake with cream cheese frosting!
FAQs About Red Velvet Cake
What Makes Red Velvet Cake Different from Chocolate Cake?
Many assume that red velvet is just chocolate cake with food coloring, but that’s not quite true. While both contain cocoa powder, red velvet cake has a lower cocoa content, giving it a more subtle chocolate flavor. Additionally, it includes buttermilk and vinegar, which contribute to its unique tangy taste and tender texture. The combination of these ingredients creates a flavor profile that is more complex than a standard chocolate cake.
Do I Need to Use Red Food Coloring?
While traditional red velvet cake relies on natural cocoa powder’s reaction with acidic ingredients for its reddish hue, modern versions often use food coloring to achieve a more vibrant red. If you prefer to avoid artificial dyes, you can use beet powder or natural red food coloring as an alternative. However, the color may be more muted compared to the bright red that food dye provides.
Can I Make This Cake Ahead of Time?
Yes! You can bake the cake layers in advance and store them tightly wrapped in plastic wrap. They will keep well in the refrigerator for up to 3 days or in the freezer for up to 3 months. The frosting can also be prepared ahead and stored in an airtight container in the fridge for up to a week. When ready to assemble, bring the frosting to room temperature and whip it again to restore its creamy texture.
Why is Buttermilk Important in Red Velvet Cake?
Buttermilk plays a crucial role in red velvet cake. It not only adds a slight tang that balances the sweetness but also helps break down gluten in the flour, resulting in a softer crumb. If you don’t have buttermilk on hand, you can make a quick substitute by mixing 1 cup of milk with 1 tablespoon of white vinegar or lemon juice. Let it sit for 5-10 minutes before using.
How Do I Get a Smooth and Fluffy Frosting?
To achieve the perfect cream cheese frosting, make sure your butter and cream cheese are at room temperature before beating them together. Sift the powdered sugar before adding it to the mixture to prevent lumps. Finally, after whipping, use a spatula to beat out any air pockets for a silky-smooth finish.
Can This Recipe Be Made Into Cupcakes?
Absolutely! This recipe yields about 18-20 standard-sized cupcakes. Adjust the baking time to 20-22 minutes and check for doneness by inserting a toothpick into the center—if it comes out clean or with a few moist crumbs, they are ready.
What’s the Best Way to Store Leftover Cake?
If you have leftover cake, store it in an airtight container in the refrigerator for up to 5 days. For longer storage, wrap individual slices tightly in plastic wrap and freeze them for up to 3 months. When ready to enjoy, let them thaw at room temperature for about 30 minutes before serving.
Final Thoughts: A Cake That Brings People Together
Red velvet cake is more than just a dessert—it is a nostalgic, heartwarming experience that brings people together. Whether you’re baking it for a special occasion or simply to indulge in a homemade treat, every bite of this soft, velvety cake topped with creamy frosting is pure joy.
There is a reason why red velvet cake has remained a favorite for generations. It is the perfect blend of flavor, texture, and aesthetic appeal. And while there may be different variations of this classic, the essence of red velvet remains the same—a cake that feels as luxurious as it tastes.
So the next time you are looking for a show-stopping dessert, whether for a birthday, anniversary, or just a cozy weekend at home, give this red velvet cake a try. Who knows? It might just become a tradition in your home, just like it did in mine.
Advertisement

The Timeless Charm of Red Velvet Cake
- Total Time: 55 minutes
- Yield: 12 servings
Description
Indulge in the ultimate red velvet cake, a decadent treat with a velvety texture, rich cocoa flavor, and a luscious cream cheese frosting. This cake is perfect for celebrations, special occasions, or when you simply crave something irresistibly delicious!
Ingredients
For the Cake:
- 1 cup unsalted butter (room temperature)
- ½ cup vegetable oil
- 1 ¾ cups granulated sugar
- 4 large eggs (room temperature)
- 2 teaspoons pure vanilla extract
- 1 ½ tablespoons LorAnn’s red velvet emulsion (or red food coloring)
- ¼ cup full-fat sour cream (room temperature)
- 1 teaspoon white distilled vinegar
- 1 tablespoon cocoa powder
- 2 teaspoons baking powder
- 1 teaspoon baking soda
- 1 teaspoon salt
- 2 ¾ cups all-purpose flour
- 1 cup buttermilk (room temperature)
For the Cream Cheese Frosting:
- 1 ½ cups unsalted butter (room temperature)
- 6 oz. cream cheese (room temperature)
- 6 cups powdered sugar (sifted)
- 3 tablespoons heavy whipping cream
- 2 teaspoons vanilla extract
- Pinch of salt
Instructions
Making the Cake:
- Preheat oven to 325°F. Grease three 8-inch cake pans, line with parchment paper, and grease again.
- In a medium bowl, whisk together cocoa powder, baking powder, baking soda, salt, and flour. Set aside.
- In a stand mixer, beat butter, oil, and sugar on medium-high speed for 4 minutes until light and fluffy.
- Scrape the bowl, then add eggs one at a time, mixing for 30 seconds after each addition.
- Mix in vanilla, red velvet emulsion, sour cream, and vinegar on low speed until just combined.
- Alternate adding half the dry ingredients and half the buttermilk, mixing on low. Repeat with the remaining halves, mixing until just combined.
- Divide batter evenly among prepared pans and bake for 33-35 minutes. A toothpick inserted should come out clean or with a few crumbs.
- Let cakes cool in pans for 15 minutes, then transfer to a wire rack to cool completely.
-
Making the Frosting:
- Beat butter and cream cheese together for 2 minutes. Scrape the bowl and beat again for another 2 minutes.
- Add powdered sugar, heavy cream, vanilla, and salt. Mix on low until combined.
- Beat on medium-high for 3-5 minutes until light and airy.
- Use a spatula to smooth out air bubbles before frosting the cake.
Assembling the Cake:
- Place the first cake layer on a cake board. Spread ¾ cup frosting evenly on top.
- Repeat with the second layer. Place the final layer top-side up.
- Apply a thin crumb coat of frosting around the cake and freeze for 10-15 minutes.
- Frost the cake completely with remaining frosting and serve at room temperature.
Notes
- Use room temperature ingredients for the best texture.
- The crumb coat helps achieve a clean, polished look.
- For an extra moist cake, brush layers with simple syrup before frosting.
- Store leftovers in an airtight container in the fridge for up to 4 days.
- Prep Time: 20 minutes
- Cook Time: 25 minutes
- Category: Dessert
- Method: Baking
- Cuisine: American