The delightful aroma of citrus mixed with sweet jam fills the air as I prepare to whip up a batch of Nilla Holiday Cake Bites. These no-bake wonders are a holiday treat that not only transforms humble Nilla wafers into festive bites but does so in a way that’s incredibly easy and fun. With minimal prep time, they are perfect for busy parents and grandmas looking to involve the kids in the kitchen. Plus, the customizing possibilities are endless—each family member can add their favorite toppings, making these bites a crowd-pleaser at any holiday gathering. Ready to indulge in a sweet tradition that you can make in a jiffy? Let’s dive into this charming recipe!
Why Are These Bites So Irresistible?
Simplicity reigns supreme with this no-bake recipe, allowing even novice bakers to create something delightful. Festive flavors of citrus and jam come together for a taste that’s perfect for the season. Customization is key; whether it’s a drizzle of chocolate or a sprinkle of colorful toppings, everyone can make them their own. Kid-friendly and easy to prep, these bites are a fun way to get the little ones involved—perfect for family time. Serve them at your next gathering for an instant hit, just like you would with Creative Snowman Table decorations!
Nilla Holiday Cake Bites Ingredients
For the Cake Bites
- NILLA Wafers – The star of these bites, they soften beautifully when layered with jam and juice for a cake-like texture.
- Orange Juice – Adds moisture and a citrusy brightness, enhancing the festive flavor profile.
- Raspberry Jam – This brings sweetness and moisture; you can easily swap it with any fruit-flavored jam you love.
For the Coating
- Vanilla Candy Wafers – These provide a sweet shell for the bites; feel free to substitute with white baking chocolate if desired.
- Vegetable Oil – Helps achieve a smooth blend when melting the candy wafers; you can omit it if using chocolate.
For the Decorations
- Assorted Decorations – Get creative with sprinkles, chocolate drizzle, or crushed candies to add your personal touch and make these treats eye-catching for the holidays!
Transform your holiday gatherings with these delightful Nilla Holiday Cake Bites, perfect for making sweet memories with loved ones.
Step‑by‑Step Instructions for Nilla Holiday “Cake” Bites
Step 1: Prepare the Wafer Layers
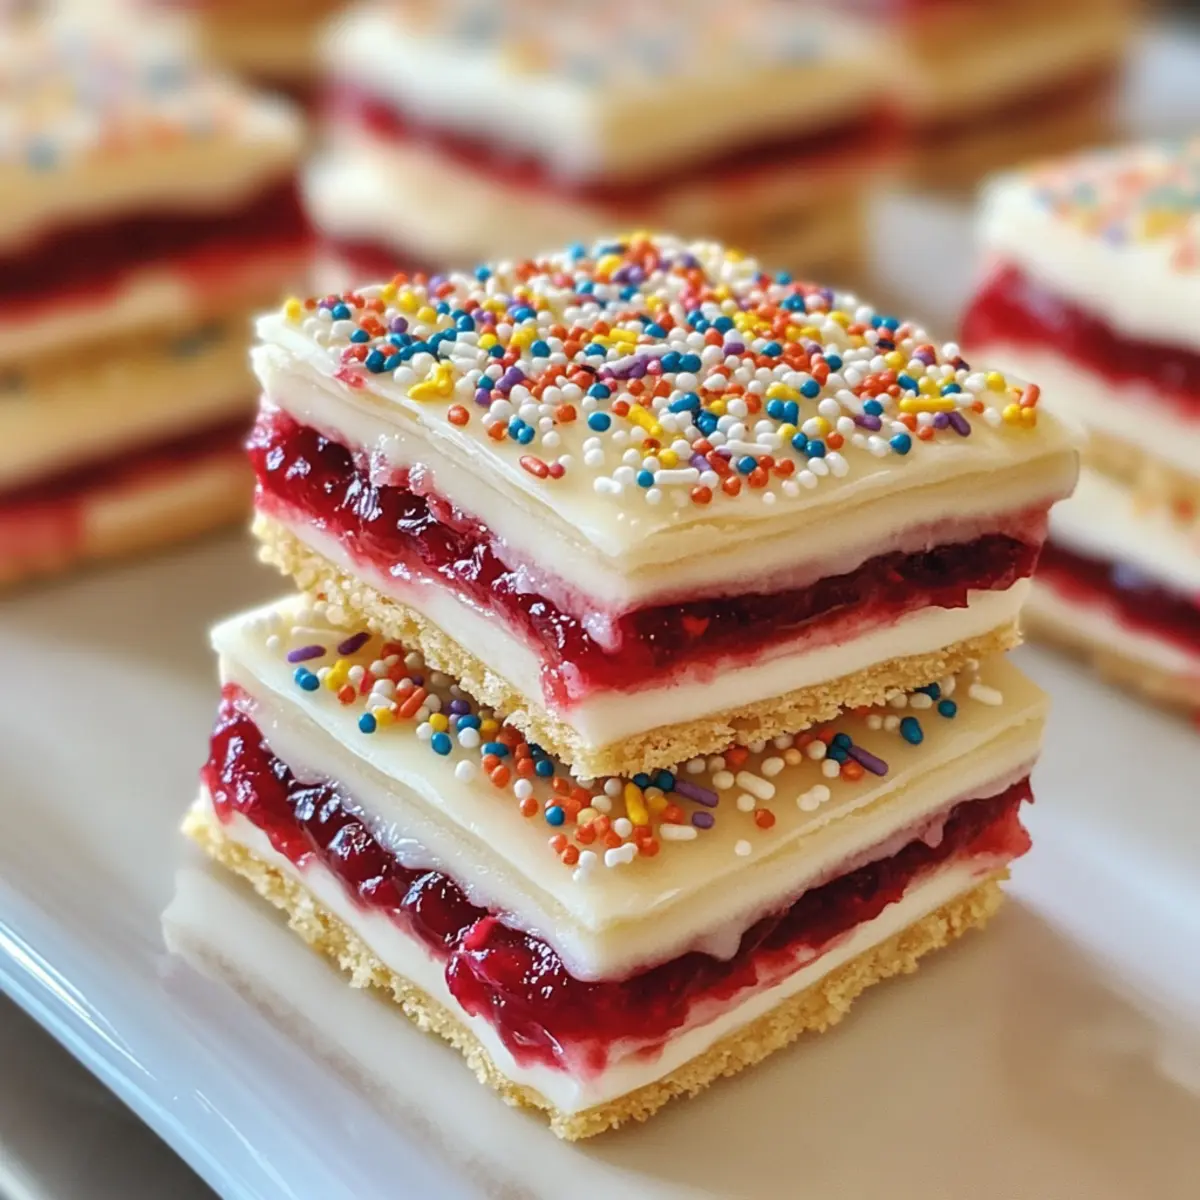
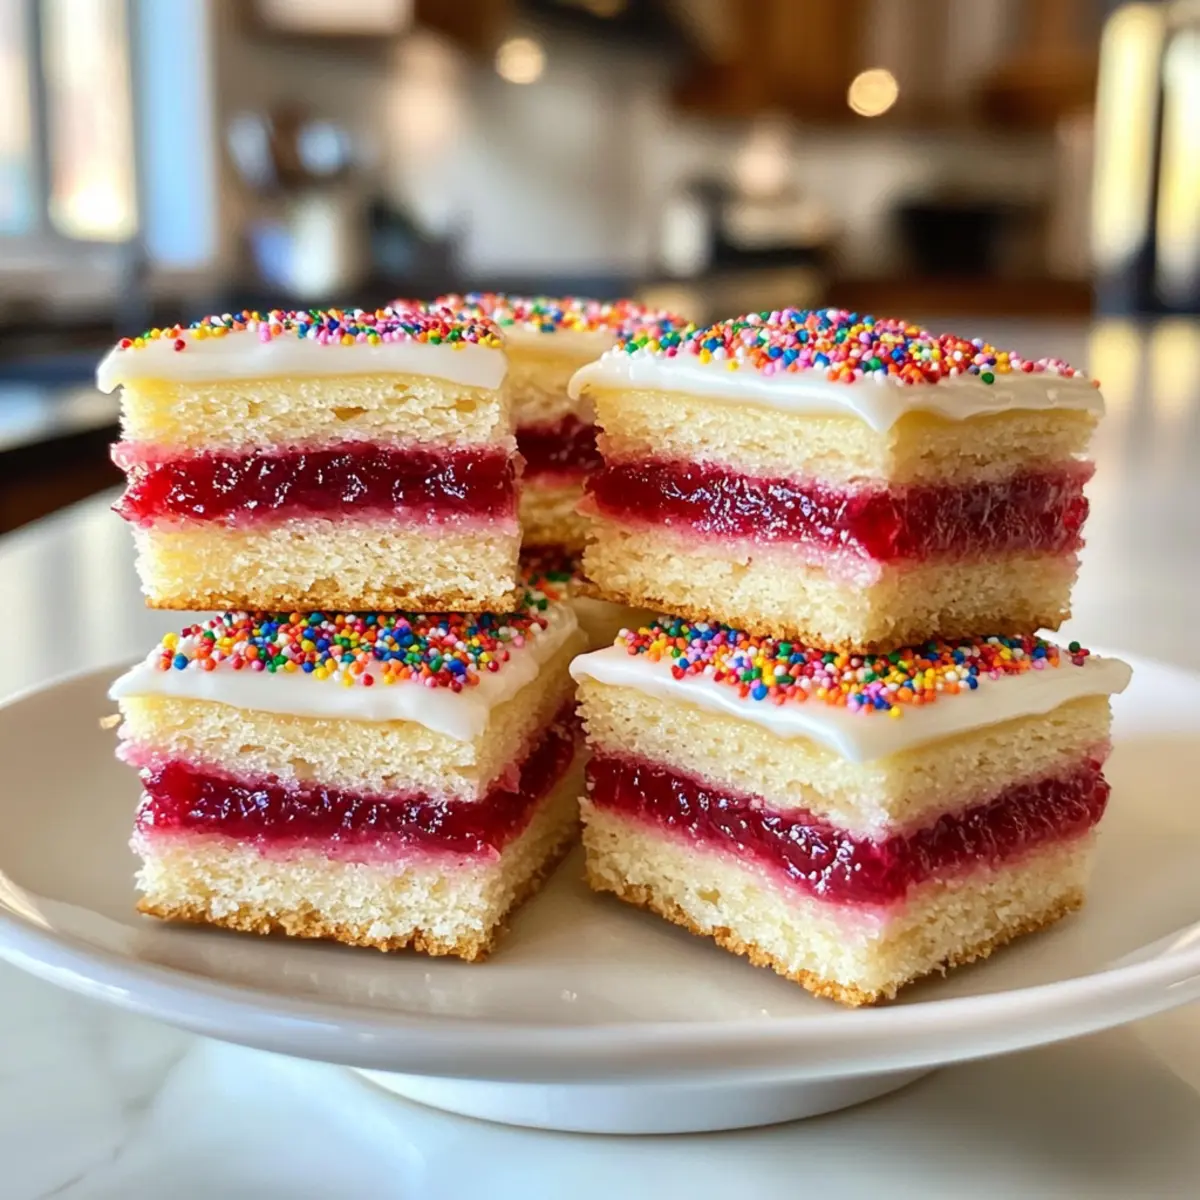
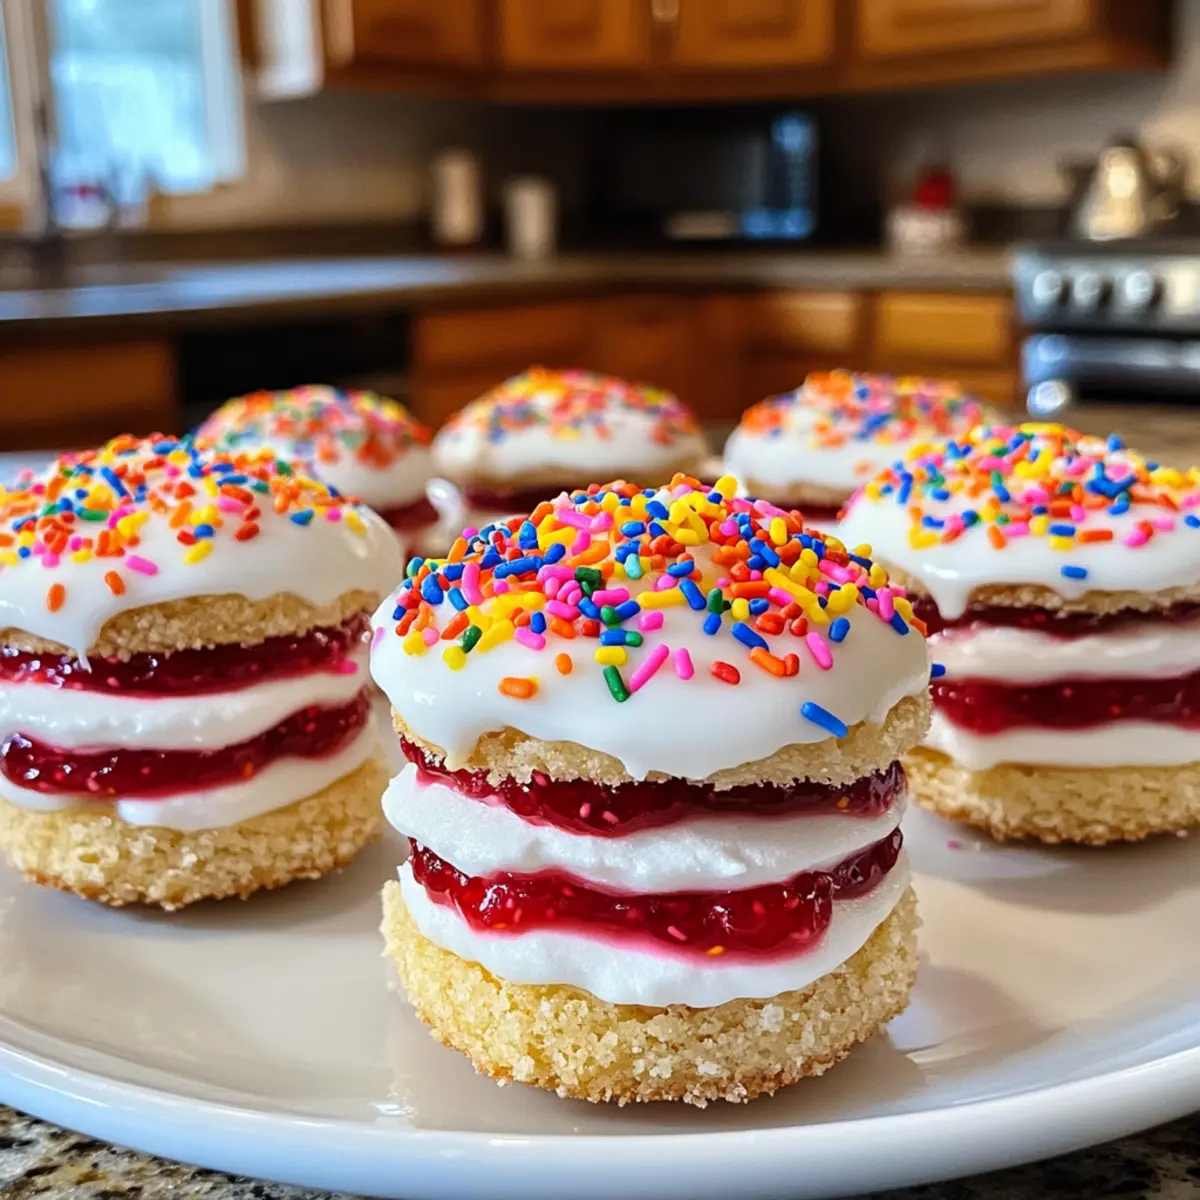
Begin by brushing the flat sides of 24 Nilla Wafers with fresh orange juice. Then, spread raspberry jam evenly over the juice-coated wafers, allowing the sweetness to soak in. Stack another wafer on top of each, with the rounded sides facing up. Place the stacked wafers on a plate and refrigerate for at least 6 hours, or overnight if possible, to achieve the perfect cake-like consistency.
Step 2: Melt the Candy Coating
After the wafers have chilled and set, it’s time to melt your vanilla candy wafers. Follow the package instructions for melting, typically using a microwave in 30-second intervals, stirring in between until smooth. If desired, mix in a teaspoon of vegetable oil to ensure a silky consistency that will coat the Nilla Holiday “Cake” Bites evenly.
Step 3: Dip the Layered Bites
Once your melted coating is ready, carefully dip each stacked wafer into the warm mixture, ensuring it’s fully submerged for a smooth coating. Gently shake off any excess coating before transferring them to a lined baking sheet. This step is crucial for achieving that glossy finish on your Nilla Holiday “Cake” Bites.
Step 4: Add Decorations
Immediately after dipping, sprinkle your choice of decorations—like colorful sprinkles or a drizzle of chocolate—onto the wet coating. This gives each bite a festive touch and makes them visually appealing for the holiday season. Be swift; the candy coating begins to set quickly!
Step 5: Chill Until Firm
Finally, place the decorated Nilla Holiday “Cake” Bites back in the refrigerator for about 30 minutes, allowing the coating to harden completely. This step is essential to achieve a firm outer shell that contrasts beautifully with the soft, moist layers inside. Once set, they’re ready to be enjoyed or served at your holiday gatherings!
Make Ahead Options
These Nilla Holiday Cake Bites are ideal for busy home cooks looking to save time during the festive season! You can prepare the layered wafers by stacking them with orange juice and raspberry jam up to 24 hours in advance. Simply refrigerate them overnight for the best flavor and consistency. When you’re ready to impress your guests, melt the candy coating and dip the bites; this final step should only take around 30 minutes. To maintain their delightful texture, keep the bites refrigerated after assembling. With these make ahead tips, you can enjoy sweet, stress-free holiday gatherings!
How to Store and Freeze Nilla Holiday Cake Bites
-
Room Temperature: For best flavor and texture, keep Nilla Holiday Cake Bites in the refrigerator, as they can soften quickly at room temperature.
-
Fridge: Store in an airtight container for up to 1 week. This will help maintain their delightful cake-like texture and freshness.
-
Freezer: If you want to enjoy them later, freeze the bites in a single layer on a baking sheet, then transfer to an airtight freezer-safe container. They can last up to 3 months.
-
Reheating: Simply let frozen Nilla Holiday Cake Bites thaw in the fridge overnight before serving. Enjoy the way they were meant to be—fresh and festive!
Nilla Holiday Cake Bites Variations
Feel free to get creative with these delightful bites—each variation brings a new level of joy and flavor!
-
Fruit Jam Twist: Substitute raspberry jam with strawberry, apricot, or peach jam for a fruity spin. The sweet flavors will complement the citrus beautifully!
-
Creamy Delight: Use cream cheese frosting in place of jam for a rich, luscious filling. The creaminess contrasts wonderfully with the textural crunch of the wafers.
-
Chocolate Indulgence: Swap out the vanilla candy wafers for milk or dark chocolate melting wafers. It adds a decadent layer to your bites that chocolate lovers will adore!
-
Nutty Crunch: Incorporate finely chopped nuts, like walnuts or pecans, into the coating for an added crunch. The nutty flavor enhances the bites with a delightful texture.
-
Coconut Bliss: Roll the outer layer in shredded coconut before placing them in the refrigerator. This adds an irresistible tropical flair that’s perfect for holiday gatherings.
-
Spicy Notes: Add a pinch of cinnamon or nutmeg to the cream cheese filling for a warm, spiced version. It brings a cozy holiday vibe, perfect for chilly days.
-
Decorative Fun: Use vibrant holiday-themed sprinkles or edible glitter for decoration to make these bites visually appealing! They’ll be a hit on any cookie platter, similar to charming Creative Snowman Table decorations.
Explore these variations to create a platter that includes all the flavors your family loves.
Expert Tips for Nilla Holiday Cake Bites
-
Chill for Success: Keep the stacked wafers in the refrigerator until you’re ready to dip them. This ensures they hold their shape and make for easier handling.
-
Layer Wisely: Avoid overfilling the layers with jam. Too much can cause spillage when you dip the Nilla Holiday “Cake” Bites in the melted coating.
-
Experiment with Flavors: Don’t hesitate to try different jam flavors, like strawberry or apricot. This simple switch can create a delightful new twist on your cake bites.
-
Smooth Coating: If you’re using candy melts, mixing in a bit of vegetable oil helps achieve a smoother, more even coating. Feel free to omit this if you prefer using chocolate.
-
Decorate Quickly: Remember to add your decorations right after dipping, as the coating sets quickly. This ensures the toppings adhere well to your festive bites.
-
Storage Matters: Store leftover Nilla Holiday “Cake” Bites in an airtight container in the fridge for up to a week to keep them fresh and firm.
What to Serve with Nilla Holiday Cake Bites
Indulging in these sweet delights is just the beginning; let’s explore what can complete your holiday spread.
-
Creamy Mashed Potatoes: Their velvety texture provides a comforting contrast to the sweetness of the cake bites. Perfect for a festive meal!
-
Savory Green Bean Almondine: The crunch of almonds paired with tender, buttery green beans adds a delightful freshness to the table and balances the richness.
-
Citrus Salad: A bright mix of orange, grapefruit, and mint will refresh the palate and mirror the citrus notes of your cake bites.
-
Eggnog or Hot Chocolate: Cozy drinks like these add warmth and nostalgia, making your dessert experience feel even more festive.
-
Chocolate-Dipped Fruit: Choose strawberries or bananas for a decadent touch that pairs beautifully with the creamy layers of the cake bites. Their sweetness complements the flavors riding high.
-
Gingerbread Cookies: Bring in that quintessential holiday spice! Their crunch and comforting taste are perfect for dipping alongside the creamy cake bites.
-
Fruit Tart: A colorful fruit tart adds a touch of elegance and a tangy contrast that will make your holiday gathering truly memorable.
These pairings ensure your Nilla Holiday Cake Bites shine brightly on your holiday table, creating a feast that everyone will love!
Nilla Holiday Cake Bites Recipe FAQs
How do I choose ripe and flavorful oranges for the orange juice?
Look for oranges that feel heavy for their size, indicating juiciness. The skin should be bright and smooth, avoiding any with dark spots or blemishes. Choosing ripe oranges not only enhances the flavor of your Nilla Holiday Cake Bites but also adds a refreshing zest to the overall taste!
What’s the best way to store leftovers of Nilla Holiday Cake Bites?
Absolutely! Store your Nilla Holiday Cake Bites in an airtight container in the refrigerator. They can stay fresh for up to one week. To maintain their cake-like texture and flavor, it’s best not to keep them at room temperature for too long, as they may soften.
Advertisement
Can I freeze the Nilla Holiday Cake Bites? How do I do it?
Yes, you can freeze these delightful bites! First, lay them out in a single layer on a baking sheet and put them in the freezer until firm. Once frozen, transfer them to an airtight freezer-safe container. They can last up to 3 months! When ready to enjoy, simply thaw them in the refrigerator overnight, ensuring they retain their soft, moist interior.
What should I do if the candy coating isn’t smooth when melting?
If your candy coating isn’t smooth, try adding a teaspoon of vegetable oil to the melted candy wafers. This will help thin it out and create a lustrous finish on your Nilla Holiday Cake Bites. Remember to melt in small increments, stirring as you go to achieve the perfect consistency.
Are there any dietary considerations I should keep in mind?
If you’re catering to those with specific allergies, be mindful that Nilla Wafers contain gluten and eggs. For a gluten-free version, consider using gluten-free wafers or cakes as a substitute. Also, keep in mind that while it’s safe for human consumption, these treats are not intended for pets due to potential harmful ingredients like chocolate. Always check your ingredients if you’re serving those with dietary restrictions.
Can I substitute the raspberry jam with other flavors?
Definitely! The beauty of Nilla Holiday Cake Bites lies in their versatility. Consider using strawberry, apricot, or even a mixed berry jam for a different spin. Each option will lend a distinct flavor to your bites, making it a fun way to cater to various tastes and preferences during your holiday gatherings.

Delightful Nilla Holiday Cake Bites You Need This Season
Ingredients
Equipment
Method
- Brush the flat sides of 24 Nilla Wafers with fresh orange juice. Spread raspberry jam evenly over the juice-coated wafers, stack with another wafer on top, and refrigerate for at least 6 hours.
- Melt vanilla candy wafers in the microwave in 30-second intervals until smooth. Mix in vegetable oil if desired.
- Dip each stacked wafer into the melted coating, ensuring they're fully submerged. Shake off excess and transfer to a lined baking sheet.
- Immediately add your choice of decorations onto the wet coating before it sets.
- Place the decorated bites back in the refrigerator for about 30 minutes until the coating hardens.