The cozy aroma of freshly baked bread mingles with bittersweet chocolate, instantly whisking me back to a sun-kissed café in Rome where my passion for Italian desserts began. Today, I’m excited to share my twist on a classic favorite: Italian Chocolate Maritozzi—soft, cream-filled buns that are as delightful as they are indulgent. What makes these little gems irresistible? Not only are they easy to whip up for breakfast or an afternoon treat, but they perfectly blend a tender chocolate dough with a light, fluffy whipped cream filling. Each bite is the perfect balance of rich flavor and airy texture, transforming your everyday routine into a sweet adventure. What’s not to love about that? Ready to embark on this delicious journey with me?

Why Are These Maritozzi So Irresistible?
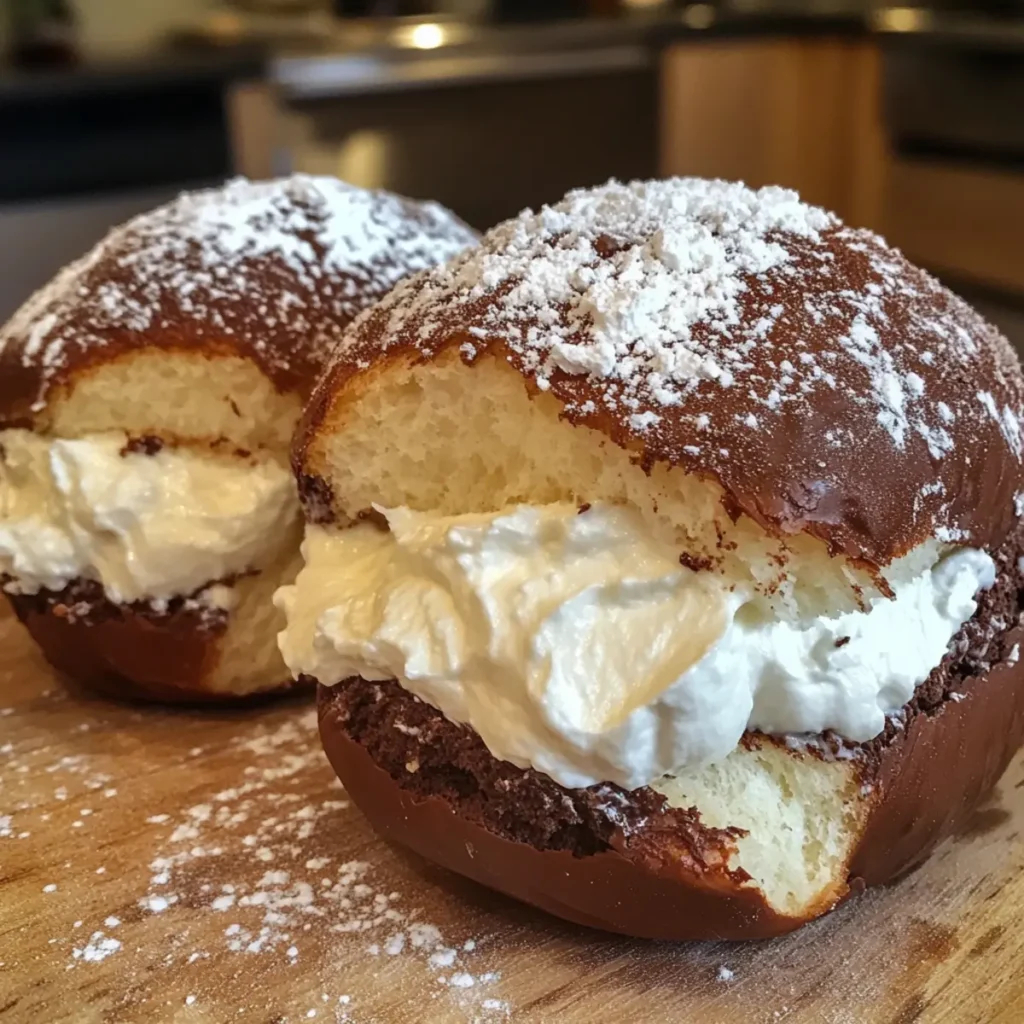
Indulgent Chocolate Twists: These Italian Chocolate Maritozzi take the classic bun to a whole new level, infusing rich chocolate flavor into each decadent bite.
Simple to Make: With minimal ingredients and straightforward steps, even novice bakers can effortlessly create these delights at home.
Perfectly Creamy Filling: The light, fluffy whipped cream contrasts beautifully with the dense, chocolatey bun, making them a delightful treat for any occasion.
Versatile Treat: Enjoy them for breakfast, dessert, or as a delightful snack with your favorite beverage. Pair them with a warm cup of espresso or Chewy Hot Chocolate Cookies for an even more indulgent experience!
Crowd-Pleasing Delight: Whether at a family gathering or a casual brunch with friends, these sweet buns are always a hit, sure to impress with their gorgeous presentation.
Italian Chocolate Maritozzi Ingredients
-
For the Tangzhong
• 3 tablespoons bread flour – Essential for moisture retention to keep the buns soft longer.
• ½ cup water – Hydrating and vital for creating the tangzhong paste, which aids in moisture. -
For the Dough
• 3 cups (390g) bread flour – Provides the structural base; higher protein ensures better gluten development. You can substitute with all-purpose flour, though the buns may be less chewy.
• ⅓ cup unsweetened cocoa powder – Enhances the chocolate flavor and color; Dutch-processed is ideal for a smoother taste.
• ⅓ cup granulated sugar – Adds sweetness and assists in fermentation.
• 2 ¼ teaspoons instant yeast – Acts as the leavening agent for a perfect rise.
• 1 teaspoon fine sea salt – Boosts flavor and balances the sweetness.
• ¾ cup whole milk, warmed to 110°F – Hydrates the dough and helps activate the yeast.
• 2 large eggs, room temperature – Enrich the dough and provide binding.
• 6 tablespoons unsalted butter, softened – Contributes to tenderness and flavor. -
For the Egg Wash
• 1 large egg – Provides a glossy finish to the buns.
• 1 teaspoon milk – Mixed with the egg for an enhanced sheen. -
For the Cream Filling
• 1 ¾ cups cold heavy cream – Whips up light and airy, perfect for filling the buns.
• ⅓ cup powdered sugar – Sweetens the whipped cream; sprinkle extra for dusting before serving.
These delightful Italian Chocolate Maritozzi are a sweet way to elevate your cooking game—prepare to savor every bite!
Step‑by‑Step Instructions for Italian Chocolate Maritozzi
Step 1: Prepare Tangzhong
In a small saucepan, combine 3 tablespoons of bread flour with ½ cup of water. Whisk continuously over medium heat until the mixture thickens into a paste, about 3-5 minutes. Remove from heat and allow it to cool completely before incorporating it into the dough, ensuring a softer bun that’s perfect for your Italian Chocolate Maritozzi.
Step 2: Mix Dough Ingredients
In a stand mixer, mix together 3 cups of bread flour, ⅓ cup of cocoa powder, ⅓ cup of granulated sugar, 2 ¼ teaspoons of instant yeast, and 1 teaspoon of fine sea salt. Add the warmed whole milk (at 110°F), 2 room temperature eggs, and the cooled tangzhong. Mix on low speed until ingredients are combined, setting the foundation for a rich chocolate dough.
Step 3: Incorporate Butter
Once the dough is formed, gradually add 6 tablespoons of softened unsalted butter into the mixer. Increase the speed to medium and knead the dough for 8-10 minutes until it becomes smooth and slightly tacky, pulling cleanly from the bowl. This step is essential for achieving the perfect texture in your Italian Chocolate Maritozzi.
Step 4: First Rise
Transfer the kneaded dough to a lightly oiled bowl, covering it with a damp cloth or plastic wrap. Allow it to rise in a warm area until it doubles in size, which should take about 60 to 90 minutes. Watch for the dough to swell; this activation of the yeast is crucial for light and fluffy buns.
Step 5: Shape Buns
Once risen, gently punch down the dough to release air. Turn the dough onto a floured surface, then divide it into 12 equal pieces. Shape each piece into an oval and place them on a parchment-lined baking sheet. The visual cue here is a smooth surface—this will help create beautifully shaped Italian Chocolate Maritozzi.
Step 6: Second Rise
Cover the shaped buns loosely with plastic wrap and let them rise again until puffy, which will take about 45-60 minutes. During this time, preheat your oven to 350°F (175°C). You want to see the buns swell to at least double their size, ensuring a soft interior.
Step 7: Bake Buns
Brush each bun with a mixture of 1 beaten egg and 1 teaspoon of milk to give them a glossy finish. Bake in the preheated oven for 18-22 minutes until they are firm to touch and glossy on top. Once baked, transfer the buns to a wire rack to cool completely, as this will help maintain the desired texture before filling.
Step 8: Whip Cream Filling
In a mixing bowl, pour 1 ¾ cups of cold heavy cream and add ⅓ cup of powdered sugar. Whip the mixture on high speed until stiff peaks form, creating a light and fluffy filling for your Italian Chocolate Maritozzi. This step is key to achieving a creamy contrast to the chocolate dense bun.
Step 9: Fill Buns
Once the buns have cooled completely, use a serrated knife to carefully slice each bun open. Generously fill the inside with the whipped cream, creating that luxurious experience. Before serving, dust the tops with additional powdered sugar for an elegant touch, completing your delightful Italian Chocolate Maritozzi.

What to Serve with Italian Chocolate Maritozzi
Indulge your senses by creating a dreamy culinary experience that beautifully complements these delightful, cream-filled treats.
- Espresso: The rich, bold flavor contrasts perfectly with the sweet cream and chocolate, creating a match made in heaven.
- Fruity Jam: A dollop of citrus or berry jam adds a bright, tart counterpoint, elevating each bite into a fresh celebration of flavors.
- Vanilla Ice Cream: A scoop of creamy vanilla ice cream brings added sweetness and a lovely temperature contrast to your chocolatey goodness.
- Mixed Berry Salad: Fresh berries offer a juicy burst and refreshing balance against the dense chocolate buns, making for an enticing serving suggestion.
- Hot Chocolate: A warm cup of hot chocolate enhances the chocolate experience while providing a cozy, comforting atmosphere.
- Whipped Cream Topping: Top with an extra dollop of whipped cream sprinkled with cocoa powder for an extravagant touch that feels indulgent and homemade.
- Candied Orange Peel: The zesty notes of candied peel can invigorate the flavors and add a touch of elegance to your serving.
- Hazelnut Milk: For a nutty twist, enjoy these maritozzi with a glass of hazelnut milk—its unique flavor complements the chocolate beautifully.
- Almond Biscotti: Crispy almond biscotti offer a perfect crunchy texture contrast, making them an excellent snack alongside your maritozzi.
Storage Tips for Italian Chocolate Maritozzi
Room Temperature: Keep unfilled buns at room temperature in an airtight container for up to 3 days to maintain softness and freshness.
Fridge: If filled, store the Italian Chocolate Maritozzi in the fridge for up to 2 days. Use a covered container to keep the cream from absorbing odors.
Freezer: Freeze unfilled buns wrapped tightly in plastic wrap and then aluminum foil for up to 3 months. Thaw at room temperature before filling.
Reheating: If you prefer warm buns, gently reheat unfilled chocolate maritozzi in a microwave for about 10-15 seconds before filling, ensuring you don’t overheat.
Expert Tips for Italian Chocolate Maritozzi
-
Temperature Matters: Ensure that your milk and eggs are at room temperature for more effective yeast activation, leading to a better rise.
-
Knead Thoroughly: Knead the dough until it’s smooth and slightly tacky; this avoids dense buns. Don’t skimp on this step!
-
Cool Before Filling: Allow the baked buns to cool completely before adding whipped cream. Warm buns can cause the whipped cream to lose its structure.
-
Control the Sweetness: Adjust the amount of powdered sugar in the cream filling to suit your taste, keeping it balanced with the rich chocolate flavor.
-
Perfect Shape: When shaping the buns, ensure they’re smooth and oval-shaped for an attractive presentation of your Italian Chocolate Maritozzi.
Make Ahead Options
These delightful Italian Chocolate Maritozzi are perfect for meal prep, allowing you to enjoy fresh-baked goodness even on your busiest days! You can prepare the dough and shape the buns up to 24 hours in advance; simply let them rise in the refrigerator. When ready to bake, allow them to come to room temperature for about 30 minutes before proceeding with the second rise and baking. Additionally, the unfilled buns can be stored at room temperature in an airtight container for up to 3 days. Just remember, for the best taste and texture, fill them with whipped cream shortly before serving. This way, you’ll experience these rich, fluffy treats just as delightful as if they were made fresh that day!
Variations & Substitutions for Italian Chocolate Maritozzi
Feel free to make these delightful buns your own with these fun variations and substitutions!
-
Dairy-Free: Substitute whole milk with almond or oat milk, and use a dairy-free butter alternative for a creamy filling without the dairy.
This can create a lighter version while still keeping the deliciousness intact! -
Gluten-Free: Use a gluten-free all-purpose flour blend instead of traditional bread flour.
Adjust the liquid slightly as gluten-free flours may absorb moisture differently, ensuring a delightful texture. -
Maple Sweetened: Replace granulated sugar with maple syrup for a hint of natural sweetness.
Just remember to reduce the liquid slightly to maintain the right dough consistency while enjoying a subtle flavor twist! -
Zesty Twist: Add 1 tablespoon of fresh orange zest into the dough for a bright citrusy note alongside the chocolate.
This variation enhances the flavor and adds a refreshing twist to your Italian Chocolate Maritozzi. -
Nutty Delight: Mix in ½ cup of chopped hazelnuts or walnuts into the dough before the first rise for added crunch.
The nuts provide a lovely textural contrast and elevate these buns to a new level of scrumptiousness. -
Chocolate Filling: For an even more indulgent experience, mix melted chocolate into the whipped cream filling.
This decadent addition transforms your Italian Chocolate Maritozzi into a chocolate lover’s paradise! -
Fruit Flavor: Incorporate your favorite fruit jam in the filling, like raspberry or strawberry, for a fruity burst alongside chocolate.
This combination creates a delightful balance, ensuring each bun is bursting with flavor in every bite. -
Serving Ideas: Pair with a warm cup of espresso or enhance your coffee experience by enjoying them alongside Elegant White Chocolate for a sweet afternoon snack.
Each combination brings a new excitement to the table, making your treat more enjoyable!
Get creative—each of these variations adds a personal touch and keeps your baking adventures delightful. Enjoy your journey of baking and sharing these irresistible Italian Chocolate Maritozzi!

Advertisement
Italian Chocolate Maritozzi Recipe FAQs
What type of cocoa powder should I use for the Italian Chocolate Maritozzi?
I recommend using Dutch-processed cocoa powder for a smoother flavor profile and deeper color. Natural cocoa powder can also be used, but it may yield a slightly different taste and texture, so choose based on your preference.
How should I store my filled Italian Chocolate Maritozzi?
Store filled Italian Chocolate Maritozzi in the refrigerator for up to 2 days, placing them in a covered container to keep the cream from absorbing any odors. If unfilled, keep them at room temperature in an airtight container for up to 3 days for the best texture.
Can I freeze the buns, and what’s the best method?
Absolutely! You can freeze the unfilled buns by wrapping them tightly in plastic wrap and then in aluminum foil. They will maintain their quality for up to 3 months. When ready to enjoy, simply thaw the buns at room temperature before filling them with whipped cream.
What should I do if my dough doesn’t rise properly?
If your dough isn’t rising, it could be due to the temperature of your ingredients or the yeast. Make sure your milk is warmed to about 110°F, as this helps activate the yeast. Also, be sure your yeast isn’t expired; a simple test is to mix it with warm water and sugar—if it bubbles after a few minutes, it’s active and ready to go!
Can I alter the filling for dietary restrictions, like dairy allergies?
Yes! For dairy-free options, try substituting the heavy cream with coconut cream or a dairy-free whipped topping. If you use coconut cream, chill it overnight in the fridge to help it whip up nicely. Always check for any other dietary concerns, like gluten, when substituting ingredients to ensure a safe and delicious treat!

Irresistible Italian Chocolate Maritozzi You’ll Love
Ingredients
Equipment
Method
- In a small saucepan, combine 3 tablespoons of bread flour with ½ cup of water. Whisk continuously over medium heat until the mixture thickens into a paste, about 3-5 minutes.
- In a stand mixer, mix together 3 cups of bread flour, ⅓ cup of cocoa powder, ⅓ cup of granulated sugar, 2 ¼ teaspoons of instant yeast, and 1 teaspoon of fine sea salt. Add the warmed whole milk, 2 room temperature eggs, and the cooled tangzhong. Mix on low speed until ingredients are combined.
- Once the dough is formed, gradually add 6 tablespoons of softened unsalted butter into the mixer. Increase the speed to medium and knead the dough for 8-10 minutes until smooth and slightly tacky.
- Transfer the kneaded dough to a lightly oiled bowl, covering it with a damp cloth or plastic wrap. Allow it to rise in a warm area until it doubles in size, about 60 to 90 minutes.
- Once risen, gently punch down the dough to release air. Turn the dough onto a floured surface, divide into 12 equal pieces, and shape each piece into an oval.
- Cover the shaped buns loosely with plastic wrap and let them rise again until puffy, about 45-60 minutes. Preheat your oven to 350°F (175°C).
- Brush each bun with a mixture of 1 beaten egg and 1 teaspoon of milk. Bake for 18-22 minutes until firm to touch and glossy on top.
- In a mixing bowl, pour 1 ¾ cups of cold heavy cream and add ⅓ cup of powdered sugar. Whip until stiff peaks form.
- Carefully slice each cooled bun open and generously fill with the whipped cream. Dust with additional powdered sugar before serving.