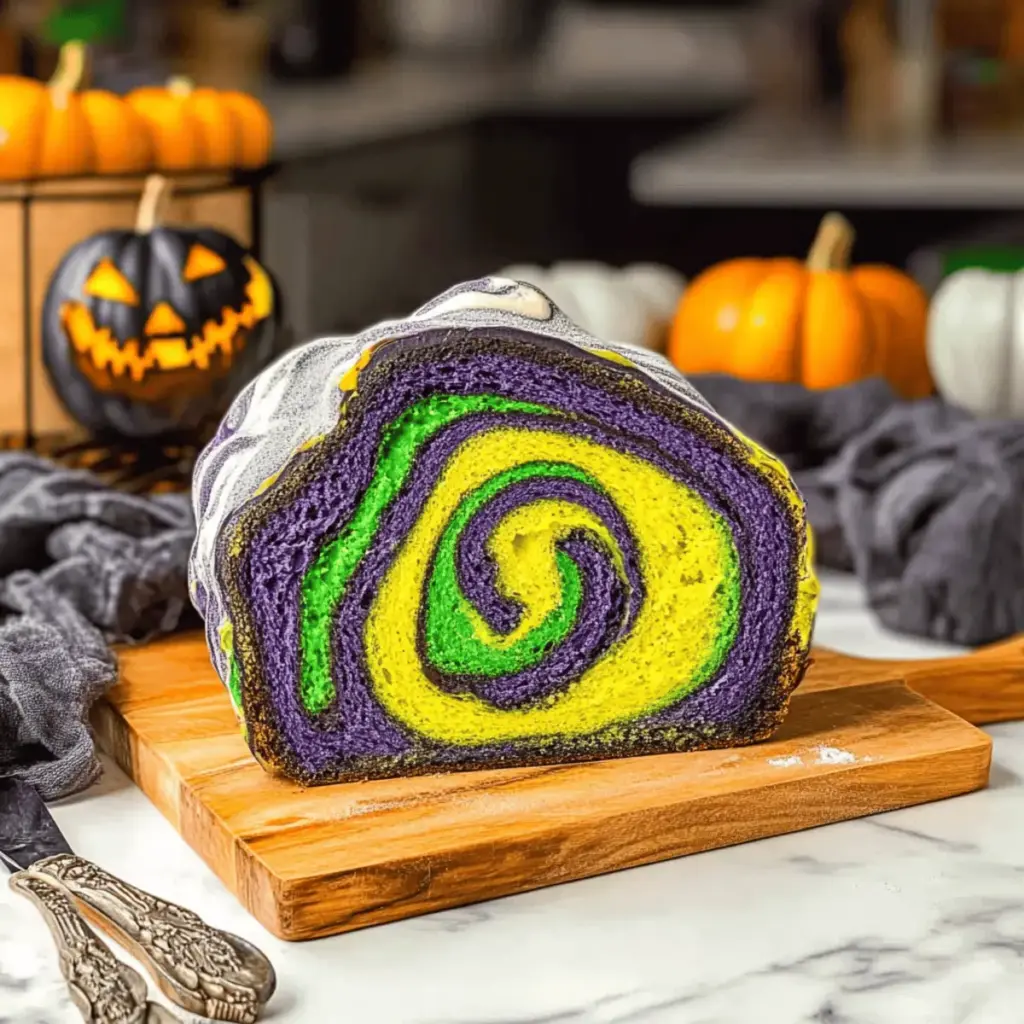
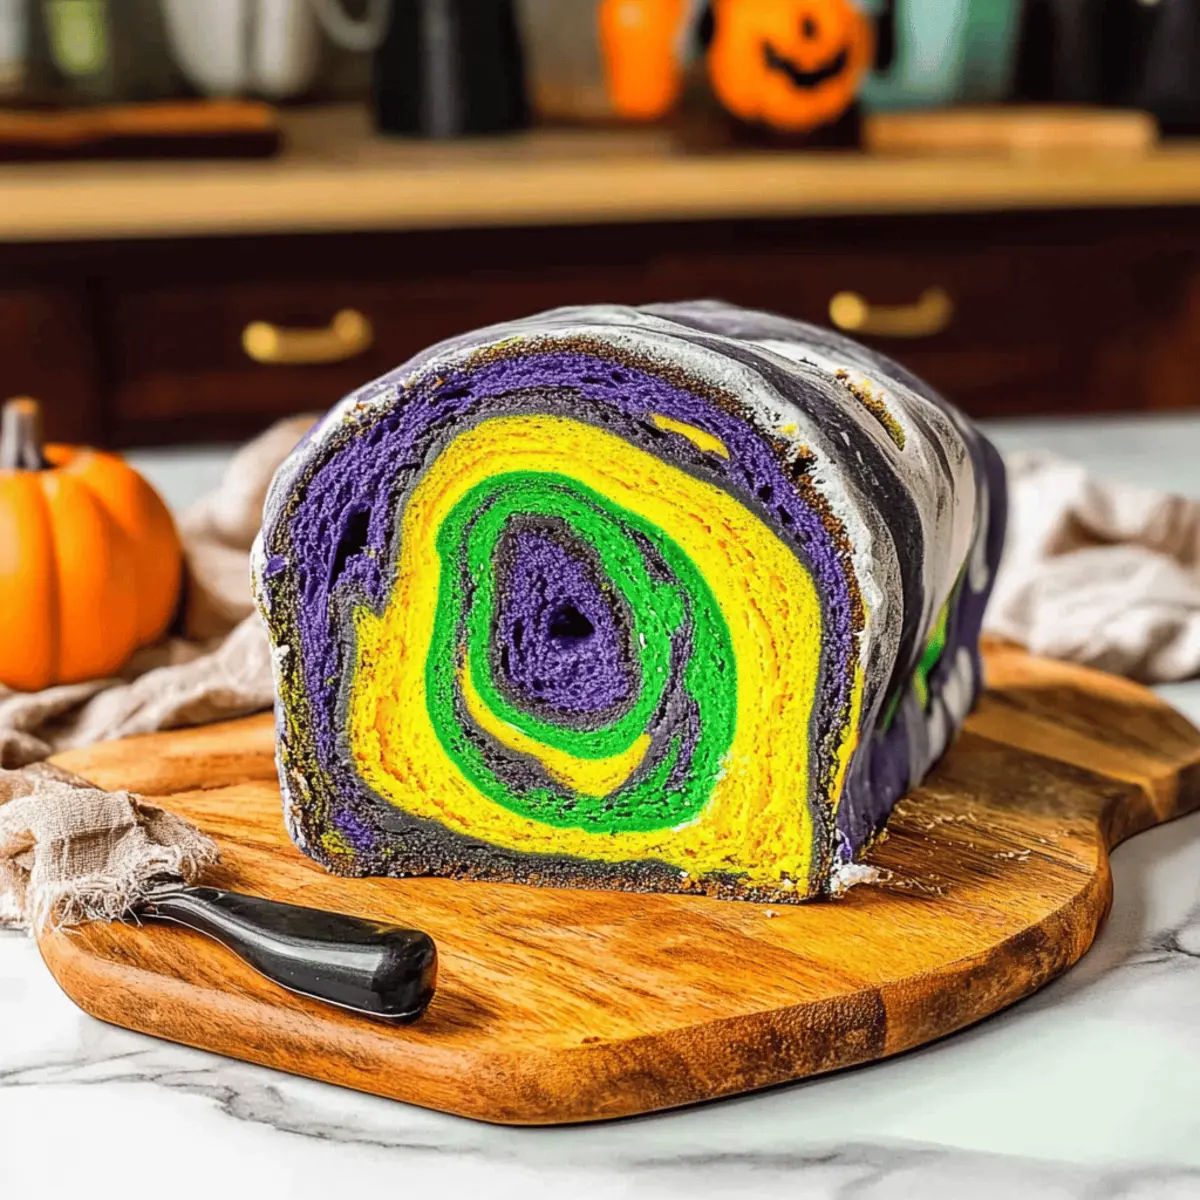
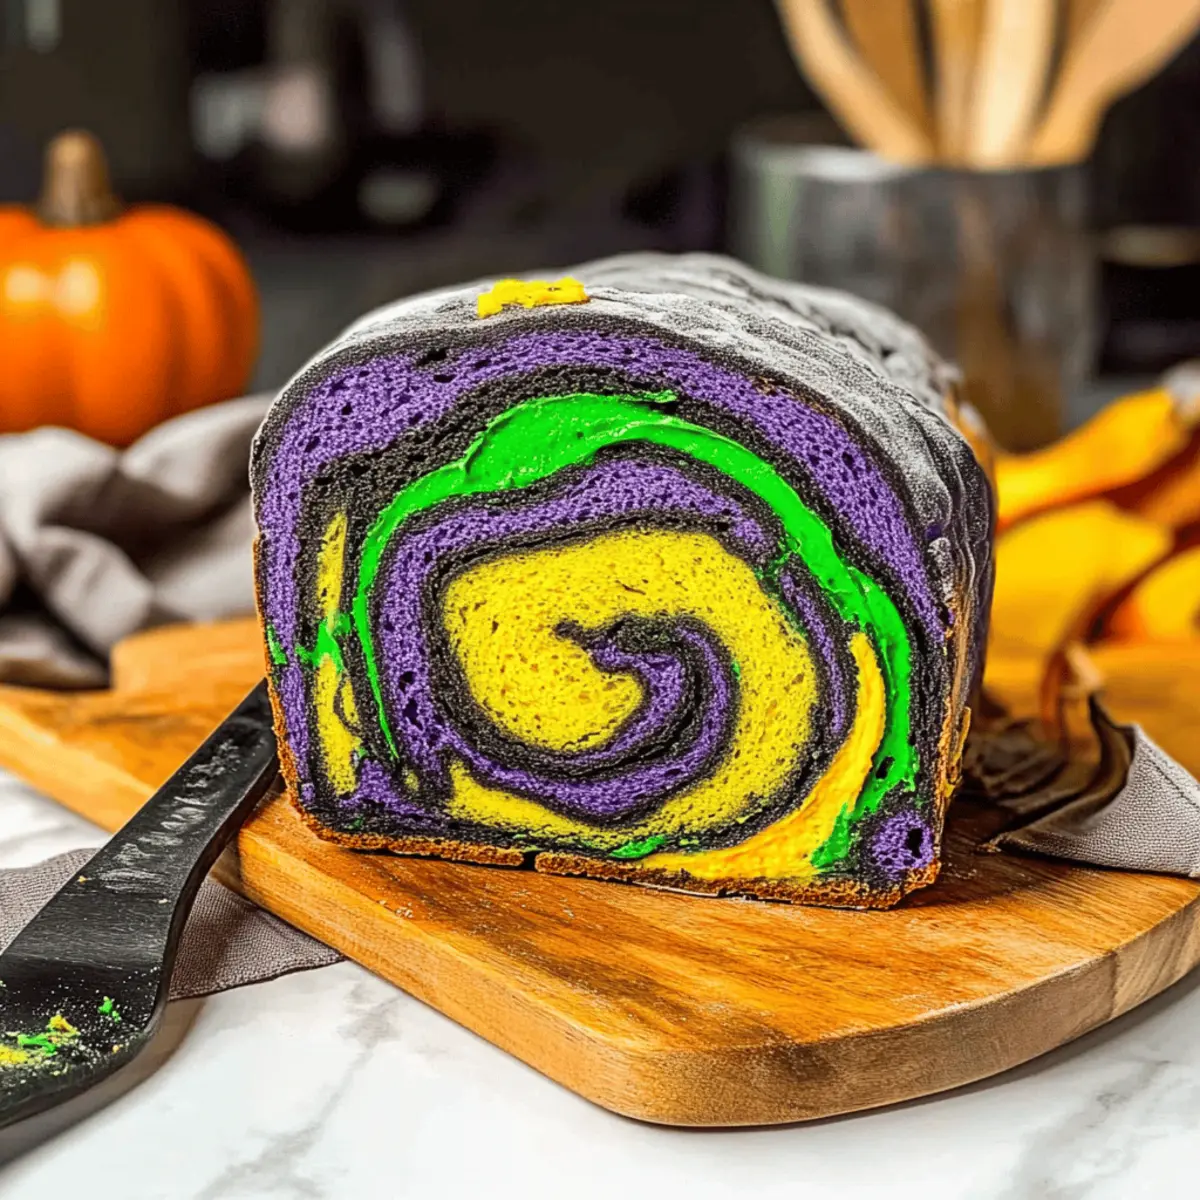
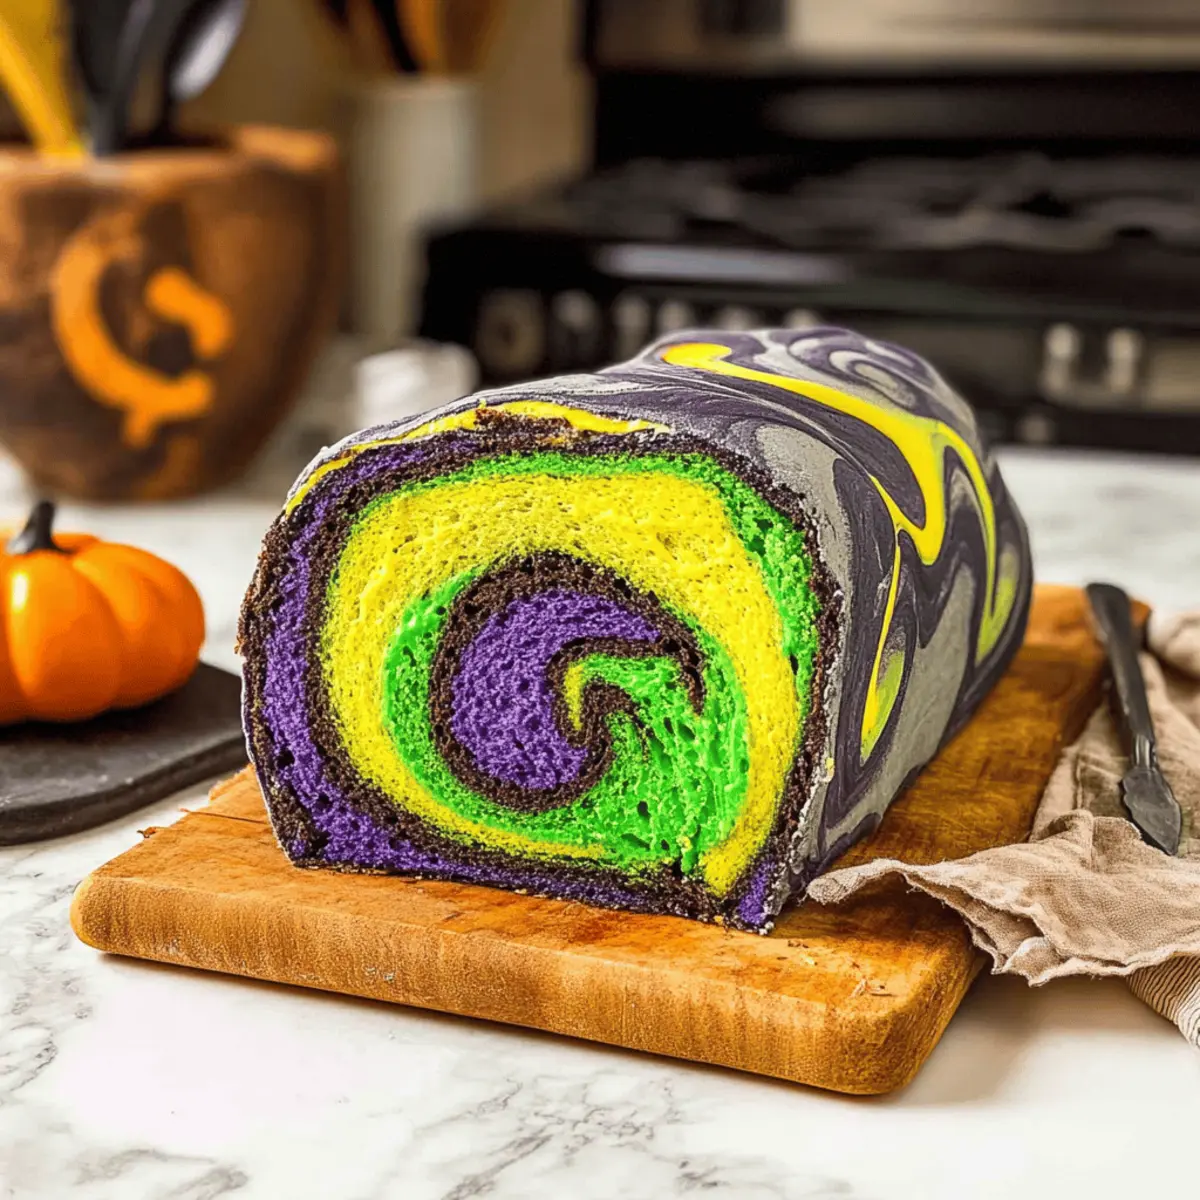
As I kneaded the soft, fragrant dough, swirling vibrant colors together, I couldn’t help but feel that Halloween had crept into my kitchen. This Colorful Swirled Halloween Bread isn’t just about its eye-catching hues; it’s about bringing a joyful twist to the table during this festive season. With just 8 simple ingredients, this easy recipe is both fun to make and a delightful treat that will enchant the whole family. Whether you slice it for breakfast or pack it into lunchboxes for a spooky surprise, this bread adds a festive charm to any meal. Curious about how to transform ordinary ingredients into a magical centerpiece for your Halloween celebrations? Let’s dive into the fun!
Why Is Halloween Bread So Special?
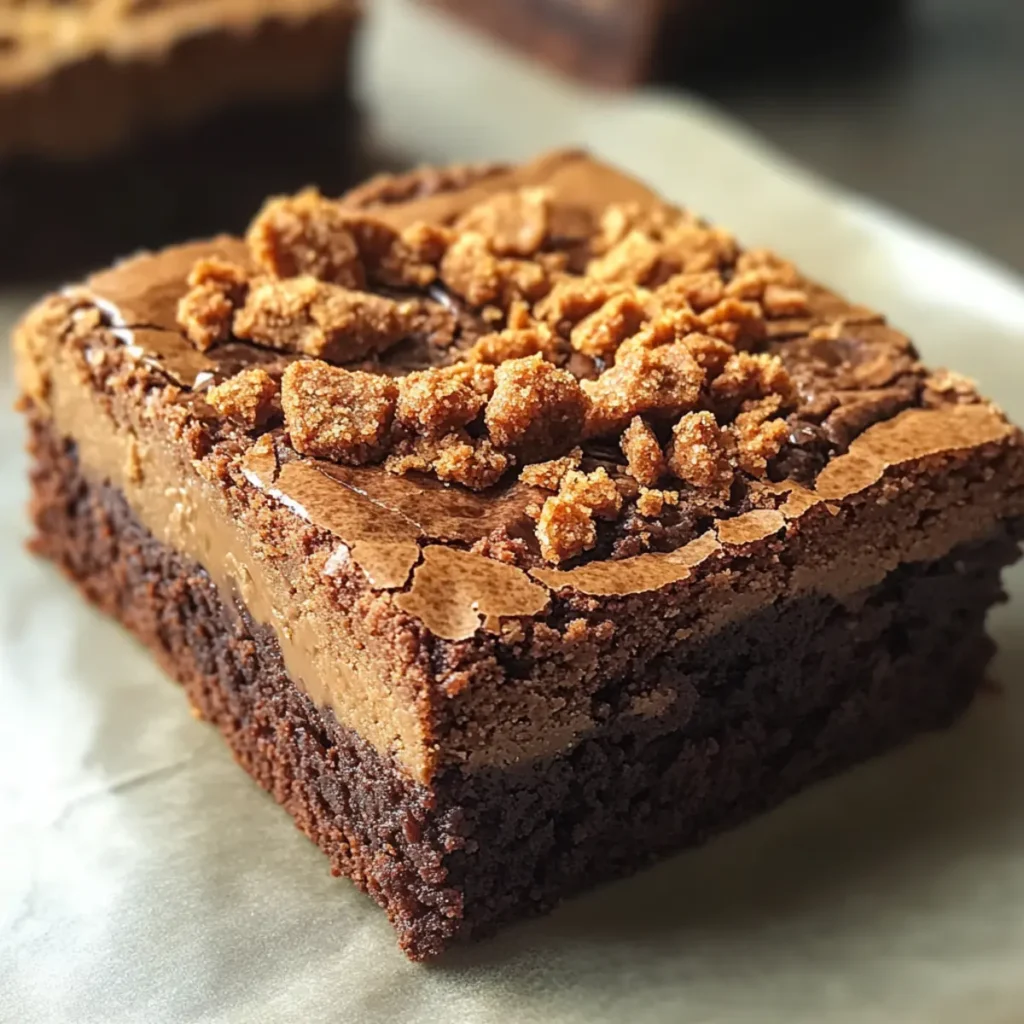
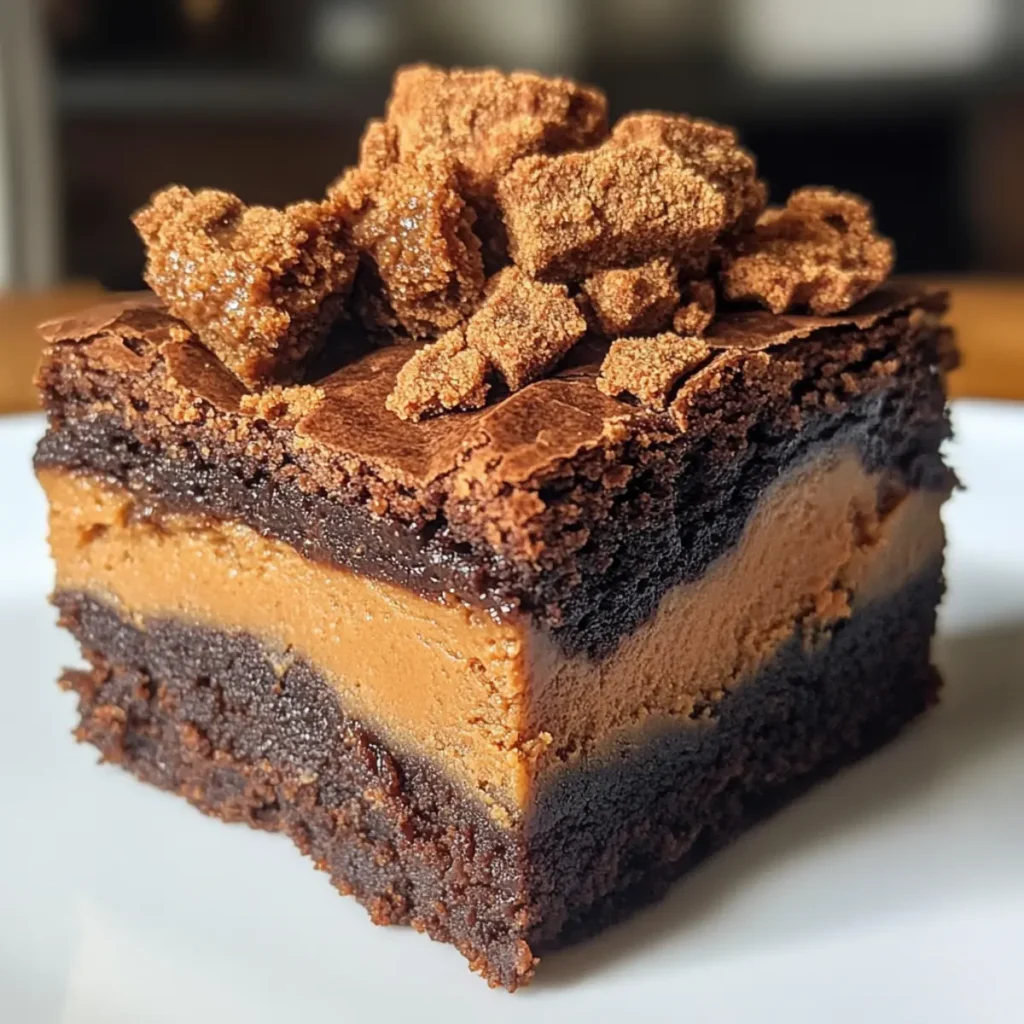
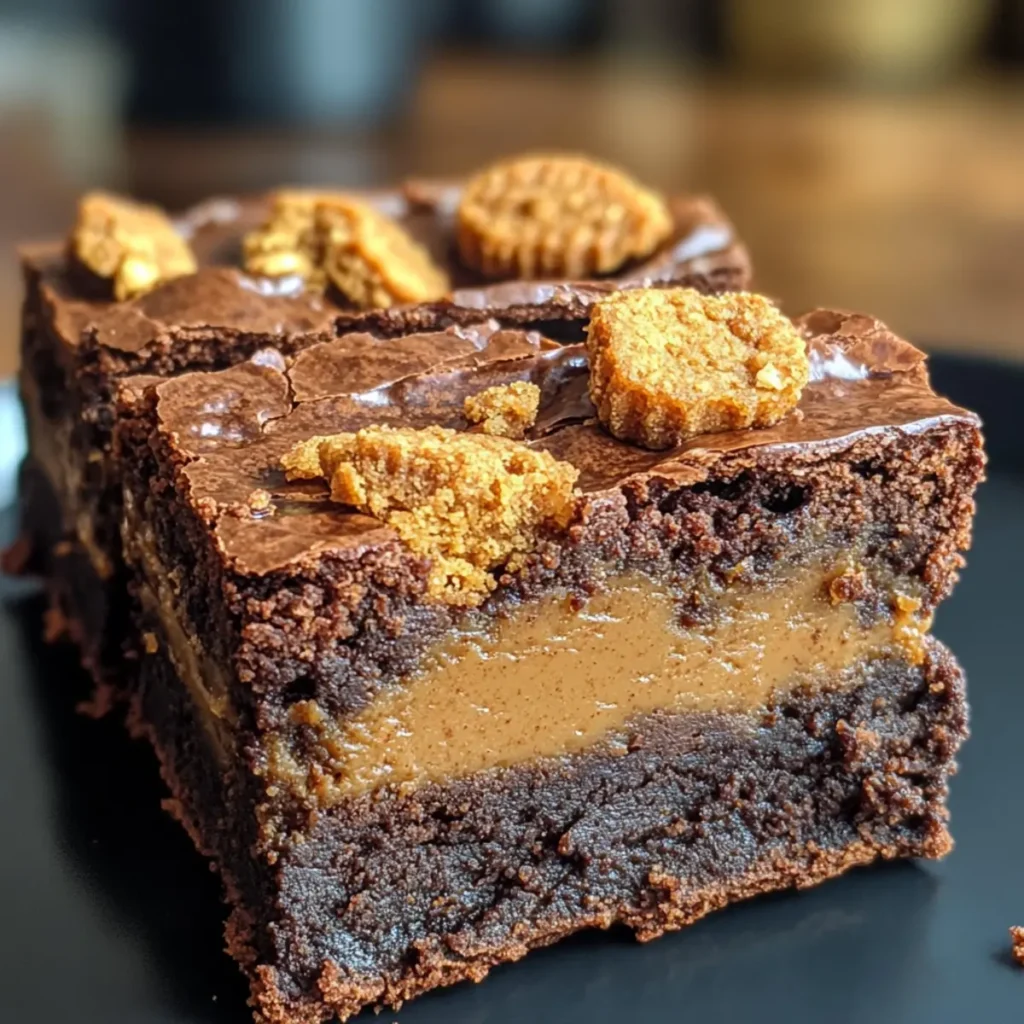
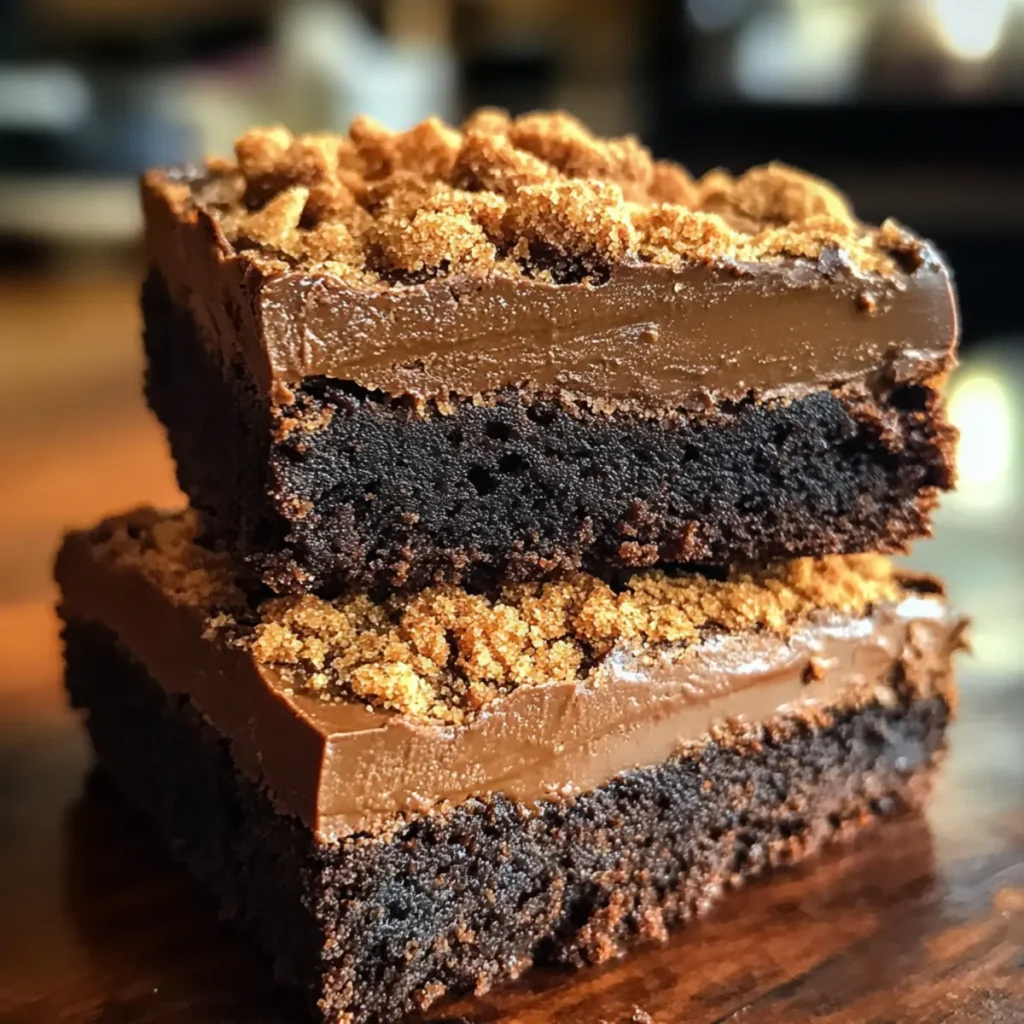
Visual Appeal: This Halloween Bread is an eye-catching centerpiece, with swirls of vibrant color that make it as delightful to look at as it is to eat.
Simple Joy: With just 8 easy ingredients, you can create a fun and festive treat without fussing over complicated steps.
Child-Friendly Fun: Involve the kids in the process, letting them knead and color the dough for memorable family moments.
Perfect for Any Meal: Slice it up for breakfast, serve it as a spooky snack, or pack it in lunchboxes for a sweet surprise on Halloween.
Versatile Treat: Feel free to personalize the colors and flavors—this bread isn’t just limited to Halloween! It can be customized for birthdays or other celebrations as well.
So, if you enjoyed making this festive bread, check out my Gingerbread Spice Cheesecake or Soft Gingerbread Cupcakes for more delicious ideas to bring joy to your table!
Halloween Bread Ingredients
For the Dough
• Milk – Provides moisture and richness; use lukewarm (around 110°F) for optimal yeast activation.
• Granulated Sugar – Sweetens the bread and aids yeast activation; brown sugar can add a deeper flavor.
• Instant Yeast – Leavening agent for rising; active dry yeast is a suitable alternative but may require longer proofing.
• All-Purpose Flour – Gives structure to the bread; whole wheat can be used but may alter texture.
• Kosher Salt – Enhances flavor and regulates yeast activity; sea salt is a good substitute.
• Unsalted Butter – Adds richness and flavor; margarine works as an alternative.
For the Flavor
• Unsulphured Molasses – Provides depth of flavor and sweetness; honey can be substituted but changes the flavor profile.
For the Colors
• Food Coloring (Yellow, Green, Purple, Black) – Creates a festive Halloween appearance; gel food coloring is recommended for vibrant results.
This Halloween Bread recipe brings a delightful twist to holiday baking with its visually appealing hues and irresistible taste.
Step-by-Step Instructions for Halloween Bread
Step 1: Bloom Yeast
In a small bowl, whisk together 1 cup of lukewarm milk (around 110°F), 2 tablespoons of granulated sugar, and 2 teaspoons of instant yeast. Allow this mixture to sit for about 5 minutes until it becomes frothy, indicating that the yeast is active. This step is crucial for creating the perfect rise in your Halloween Bread.
Step 2: Mix Dough
In a large mixing bowl, combine 4 cups of all-purpose flour and 1 teaspoon of kosher salt. Create a well in the center and pour in the bloomed yeast mixture, along with 4 tablespoons of melted unsalted butter and 1/4 cup of unsulphured molasses. Mix until a dough forms, then knead on a floured surface for about 8-10 minutes until it’s smooth and elastic.
Step 3: Color Dough
Divide the kneaded dough into 4 equal-sized balls. Take each ball and add different food coloring (yellow, green, purple, and black) to them. Knead each colored ball thoroughly until the colors are vibrant and fully incorporated, creating a fun and festive look for your Halloween Bread.
Step 4: Proof Dough
Place the colored dough balls on a lightly greased baking sheet. Cover them with a damp kitchen towel and let them rise in a warm area for 30-45 minutes, or until they have doubled in size. You’ll know they’re ready when you poke a ball and the indent remains.
Step 5: Roll Dough
Once risen, roll each colored ball out into squares on a lightly floured surface, ensuring even thickness. Stack the squares, flipping the stack so that the yellow dough is on top and the black dough is on the bottom. Roll the entire stack into a large rectangle, creating layers of color for your Halloween Bread.
Step 6: Form Log
Starting from one of the short sides, carefully roll the rectangle into a tight log. Once rolled, place the log seam-side down in a greased loaf pan. Cover it again with a towel and allow it to rise for another 30-45 minutes, until it looks puffy and has grown.
Step 7: Bake
Preheat your oven to 350°F. Once at temperature, place the loaf pan in the oven and bake for approximately 35 minutes. The Halloween Bread is done when it sounds hollow when tapped and a toothpick inserted in the center comes out clean. Let it cool on a rack before slicing.
How to Store and Freeze Halloween Bread
Room Temperature: Store your Halloween Bread in an airtight container at room temperature for up to 3 days to keep it fresh and soft.
Fridge: If you want to extend its life, you can refrigerate the bread for up to a week, but this may alter the texture slightly.
Freezer: Freeze slices of Halloween Bread in a single layer, then transfer them to a freezer bag for up to 3 months. Thaw at room temperature or toast directly from frozen.
Reheating: To enjoy it warm, reheat slices in a toaster or oven for a few minutes until heated through, preserving that delightful softness.
Halloween Bread Variations & Substitutions
Feel free to unleash your creativity with this delightful Halloween Bread recipe—there are so many ways to make it your own!
-
Flavored Sweeteners: Swap out molasses for maple syrup or agave nectar for a unique twist on sweetness. The flavor changes beautifully with each option.
-
Color Variations: Change the food coloring to create seasonal breads for other holidays like Christmas or Easter. Think red and green for Santa’s visit or pastel shades for spring!
-
Spookier Touch: Add spooky sprinkles or edible glitter to the dough before rolling it up for an extra festive flair that your kids will adore.
-
Nutty Delight: Toss in some chopped nuts or seeds for added crunch and nutrition. Walnuts or pumpkin seeds would complement the flavors very nicely.
-
Dairy-Free Option: Replace milk with almond or oat milk and use coconut oil instead of butter for a dairy-free variety that still tastes wonderful.
-
Herbal Infusion: Consider adding a teaspoon of ground cinnamon or nutmeg to the dough, which can heighten the flavor profile and create a warm, cozy aroma.
-
Extra Color Swirls: Instead of a static color scheme, create a tie-dye effect by swirling different colors together before rolling—it will be both visually interesting and fun to eat!
-
Savory Spin: Transform this sweet treat into a savory bread by adding cheese or herbs like rosemary or thyme. This might make it a delightful addition to your fall dinners!
So, if this colorful recipe has inspired you, check out my Gingerbread Spice Cheesecake or Soft Gingerbread Cupcakes for more festive recipes to brighten your kitchen this season!
Expert Tips for the Best Halloween Bread
-
Frothy Yeast: Ensure the yeast mixture is frothy after blooming; if it’s flat, you may need fresh yeast for your Halloween bread.
-
Colorful Kneading: Use gel food coloring for the brightest hues; it may take a bit of kneading to fully incorporate the colors throughout the dough.
-
Perfect Proofing: Test for readiness using the poke test—if the indent from your finger remains, the dough is ready to roll!
-
Avoid Overbaking: Keep an eye on your bread during baking; overbaking can lead to dryness. The ideal internal temperature should be 190°F.
-
Custom Flavor: Feel free to experiment with flavored sweeteners in place of molasses for fun variations of your Halloween bread!
Make Ahead Options
These Colorful Swirled Halloween Bread creations are perfect for meal prep enthusiasts! You can prepare the dough up to 24 hours in advance. After kneading the dough and dividing it into colored balls, wrap each ball tightly in plastic wrap and refrigerate them to prevent drying out. When you’re ready to serve, simply remove the dough from the fridge and let it come to room temperature for about 30 minutes before continuing with the proofing steps. This allows the yeast to activate again. Once done baking, the bread will remain just as delightful and visually appealing, ready to enchant anyone who lays eyes on it!
What to Serve with Colorful Swirled Halloween Bread?
Delight your family with a delightful feast that complements the vibrant spirit of Halloween.
-
Creamy Pumpkin Soup: The rich, velvety texture pairs beautifully with the sweet bread, creating the perfect cozy meal for chilly nights.
-
Apple Butter: Spread this sweet and spiced delight onto slices for a festive touch; the flavors meld wonderfully for a seasonal treat.
-
Cinnamon Sugar Butter: This indulgent topping adds a touch of sweetness and warm spices, enhancing the overall experience of enjoying your bread.
-
Hot Chocolate: A warm cup of creamy hot chocolate not only warms the soul but provides a perfect sweet-and-salty balance with your Halloween bread.
-
Roasted Fall Veggies: Serve a side of caramelized carrots and squashes. Their earthy sweetness beautifully contrasts the flavors of the bread.
-
Spooky Fruit Skewers: Assemble colorful fruit skewers with melons, grapes, and strawberries for a refreshing, vibrant side that adds a touch of Halloween fun.
-
Vanilla Ice Cream: For a decadent dessert twist, top warm slices with a scoop of vanilla ice cream. The creaminess enhances the bread’s sweetness and makes for an indulgent treat.
Halloween Bread Recipe FAQs
How can I select the best milk for making Halloween Bread?
Absolutely! Use lukewarm whole milk for the best results, as it provides moisture and richness. Make sure the milk temperature is around 110°F to activate your yeast effectively. If you don’t have whole milk, you can also use 2% milk, though it might result in a slightly lighter flavor.
Advertisement
What is the best way to store Halloween Bread?
For optimal freshness, store your Halloween Bread in an airtight container at room temperature for up to 3 days. If you’d like to extend its shelf life, refrigerate it for up to a week; keep in mind that this may slightly alter the texture, making it a bit denser.
Can I freeze Halloween Bread, and if so, how?
Yes, you can freeze your Halloween Bread! First, slice the bread and place the slices in a single layer on a baking sheet and freeze them until solid. Then, transfer the slices into a freezer bag or airtight container, where they will keep for up to 3 months. To thaw, simply leave them at room temperature or toast them straight from frozen for a warm treat.
What if my dough isn’t rising properly during proofing?
Very! If your dough isn’t rising as expected, check the yeast first. Make sure the mixture was frothy when you bloomed it; if not, your yeast might be expired, and you should try again with fresh yeast. Ensure that your dough is in a warm, draft-free area to encourage rising. If the room is too cold, consider placing the dough in a slightly warmed oven (turned off) to help it along.
Are there any dietary considerations I should be aware of when making Halloween Bread?
Absolutely! If you’re accommodating allergies or dietary preferences, be sure to substitute ingredients thoughtfully. For a dairy-free option, use almond milk or oat milk in place of regular milk, and consider using a dairy-free butter substitute. For those with gluten sensitivities, gluten-free all-purpose flour can typically be used, but watch for texture differences! Always confirm that the food coloring is free from allergens if you’re serving this to children or individuals with sensitivities.
Can I customize the food coloring used in Halloween Bread?
Of course! Feel free to get creative with the colors you use. While yellow, green, purple, and black make for a classic Halloween theme, you can also use other colors to fit different holidays or themes. Just remember to use gel food coloring for the most vibrant results!

Colorful Halloween Bread That'll Enchant Your Taste Buds
Ingredients
Equipment
Method
- In a small bowl, whisk together milk, granulated sugar, and instant yeast. Allow this mixture to sit for about 5 minutes until frothy.
- Combine all-purpose flour and kosher salt in a large mixing bowl. Create a well in the center and pour in the bloomed yeast mixture, melted butter, and molasses. Mix until a dough forms and knead on a floured surface until smooth and elastic.
- Divide the dough into 4 equal balls and add different food coloring to each. Knead until the colors are vibrant and fully incorporated.
- Place the colored dough balls on a greased baking sheet, cover with a damp towel, and let rise in a warm area for 30-45 minutes until doubled in size.
- Roll out each colored ball into squares and stack them, flipping the stack so the yellow is on top and black is on the bottom. Roll into a large rectangle.
- Roll the rectangle into a tight log and place it seam-side down in a greased loaf pan. Cover with a towel and let rise for another 30-45 minutes until puffy.
- Preheat oven to 350°F. Bake the loaf for approximately 35 minutes until it sounds hollow when tapped and a toothpick comes out clean. Let cool before slicing.