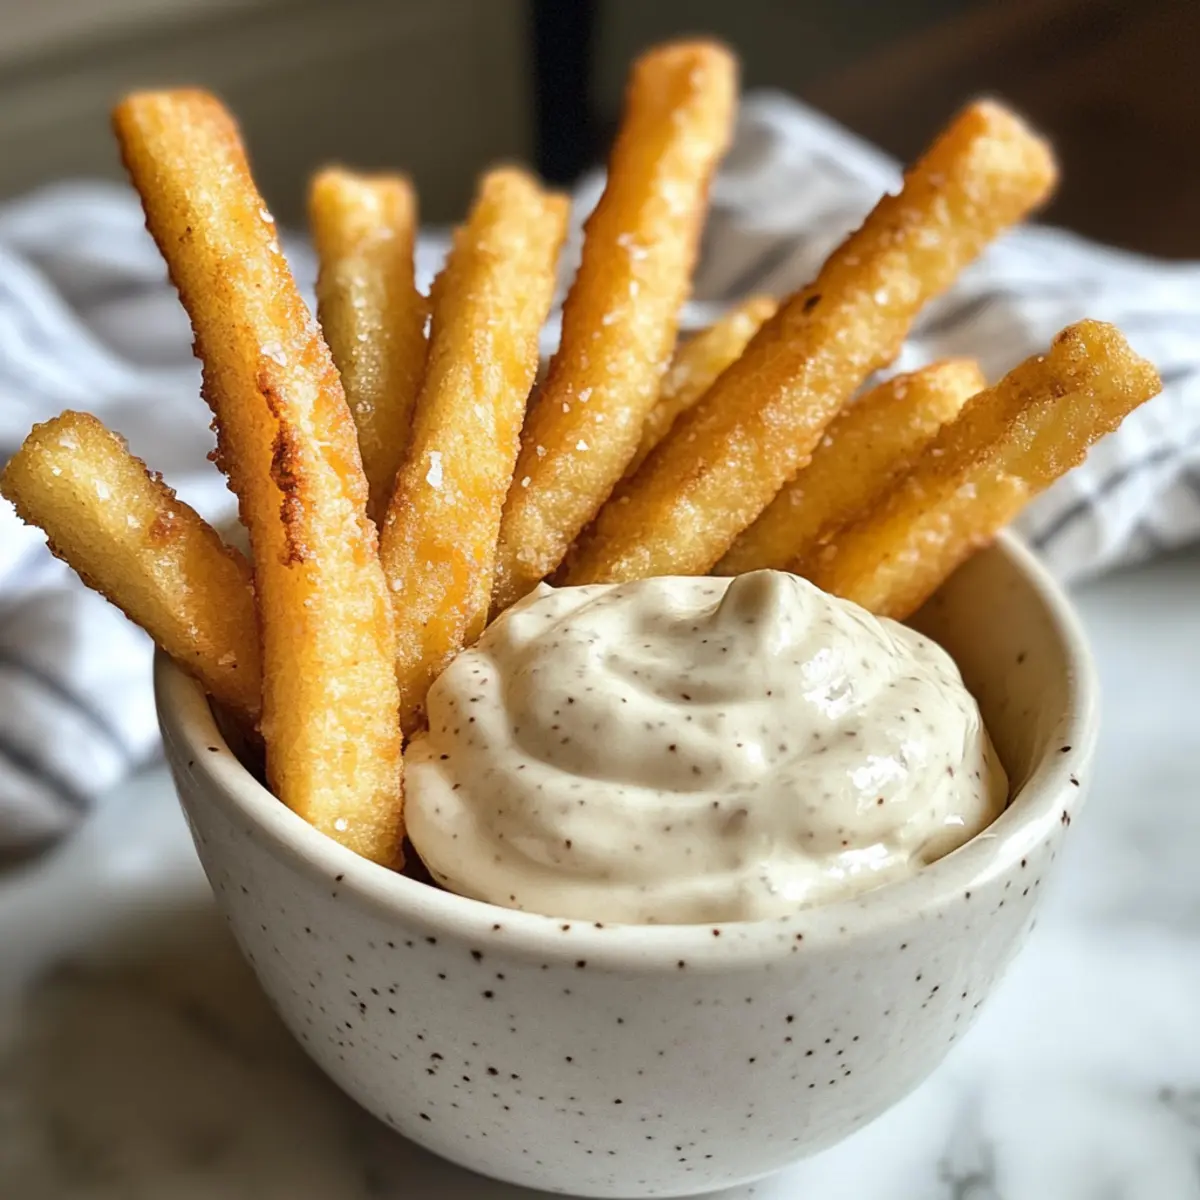
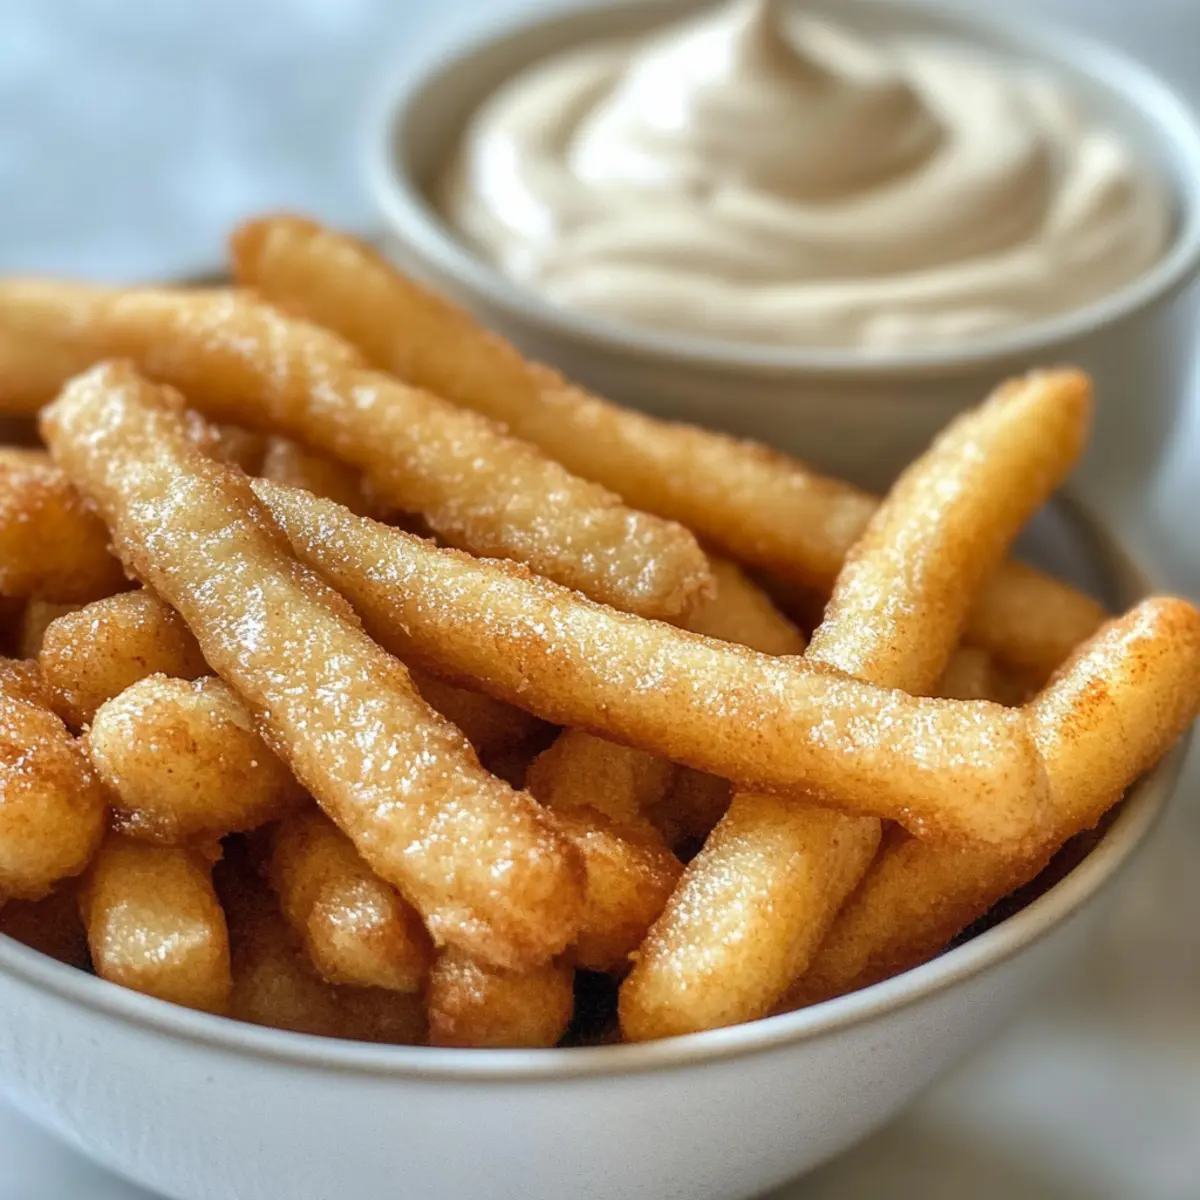
As I stood in my kitchen, the intoxicating aroma of freshly baked cookies began to waft through the air, pulling me back to carefree childhood days. It’s amazing how a simple batch of Cookie Fries with Frosting Dip can transform any ordinary afternoon into a joyous baking adventure. These delightful dippable cookies are not only fun to make, but they also come with the bonus of being freezer-friendly and a hit at every gathering. Each fry is golden, crisp on the outside, and soft in the middle, paired with a sweet, creamy frosting dip that invites you to indulge with every bite. Why settle for traditional desserts when you can elevate your sweet game? Ready to discover how to make this playful treat? Let’s dive in!
Why Are Cookie Fries a Must-Try?
Fun and Unique: These Cookie Fries with Frosting Dip bring an exciting twist to dessert. Forget the standard cookie routine; these dippable treats will have everyone cheering for a second round!
Flavor You’ll Crave: The buttery richness of the cookies perfectly complements the sweet creaminess of the frosting dip, creating a delightful flavor combination that’s hard to resist.
Crowd-Pleasing Dessert: Whether it’s a birthday party or a casual gathering, these cookie fries are sure to be a hit. Pair them with some Cheesecake Cookies Salted for an added dessert table experience that guests will rave about.
Quick and Easy: With straightforward steps and freezer-friendly dough, you can whip up a batch in no time. Plus, the quick chilling and baking process ensures you won’t be stuck in the kitchen for long.
Interactive Delight: Serving them warm with a frosting dip turns eating into an engaging experience! Enjoy dipping and sharing this playful dessert with loved ones.
Cookie Fries with Frosting Dip Ingredients
For the Cookie Fries
- All-Purpose Flour – Provides structure to the cookies; substitute with gluten-free flour blend for a gluten-free version.
- Cornstarch – Helps create a tender texture; no substitution needed.
- Kosher Salt – Enhances sweetness; regular salt can be used in the same quantity.
- Baking Powder – Acts as a leavening agent for a light cookie; do not substitute with baking soda.
- Unsalted Butter – Adds richness and flavor; can be substituted with vegan butter for a dairy-free option.
- Brown Sugar – Contributes sweetness and moisture; can replace with white sugar, but the texture will be different.
- Large Egg – Binds ingredients for structure; a flax egg (1 tablespoon flaxseed meal + 2.5 tablespoons water) can be used for vegan option.
- Pure Vanilla Extract – Gives depth of flavor; almond extract or vanilla bean paste can be substituted.
- Colorful Edible Confetti/Sprinkles – Adds visual appeal; optional, can be omitted for a simpler cookie.
For the Frosting Dip
- Heavy Cream – Provides richness for the dip; can be replaced with half-and-half or coconut cream for a non-dairy version.
- Cream Cheese – Creates a creamy dip texture; vegan cream cheese can be used for a dairy-free alternative.
- Powdered Sugar – Sweetens and thickens the dip; regular sugar can be ground for a quick DIY powdered sugar.
Step‑by‑Step Instructions for Cookie Fries with Frosting Dip
Step 1: Prepare Baking Sheets
Start by lining two large baking sheets with parchment paper. This will prevent your cookie fries from sticking and ensuring they bake evenly. Prepping the sheets ahead of time allows for a smooth transition from baking to cooling, creating an enjoyable baking experience from the outset.
Step 2: Make Dry Mix
In a medium bowl, whisk together the all-purpose flour, cornstarch, kosher salt, and baking powder. This dry mixture forms the foundation of your Cookie Fries, providing the perfect structure. Keep whisking until there are no lumps, and all ingredients are incorporated, which will help achieve a tender cookie texture.
Step 3: Cream Butter and Sugar
In a large mixing bowl, beat the unsalted butter and brown sugar together using a hand mixer until the mixture is light and fluffy, typically about 2 minutes. The lightness of the mixture indicates the air has been incorporated well, laying the groundwork for deliciously soft cookie fries.
Step 4: Combine Wet Ingredients
Next, add the large egg and pure vanilla extract to the butter-sugar mixture. Mix until fully combined. The egg will bind all the ingredients together for your Cookie Fries, while the vanilla adds a lovely depth of flavor as it blends seamlessly into the mixture.
Step 5: Combine Dry and Wet Mixtures
Gradually add the dry ingredients to the wet mixture, mixing on low speed until just combined. Take care not to overmix, as this will help maintain the softness of the Cookie Fries. Gently fold in any colorful edible confetti or sprinkles for an extra festive touch.
Step 6: Chill Dough
Cover the dough with plastic wrap and refrigerate it for 30 minutes. Chilling the dough firms it up, making it easier to roll out and cut into the fry shapes. This short waiting period enhances the overall texture of the Cookie Fries, ensuring a delightful treat.
Step 7: Roll and Cut
After chilling, roll out the dough on a floured surface to a thickness of about 3/8 inch. Use a sharp knife or a pizza cutter to slice the dough into fry shapes, each roughly ½ inch by 4 inches. This fun shape not only adds to the playful aspect of the cookies but also makes them easy to dip.
Step 8: Freeze Shapes
Lay the cut cookie fries on a baking sheet and freeze them for 20 minutes. This step is crucial, as freezing will help the cookie fries retain their shape while they bake, resulting in perfectly dippable treats that stay true to their fry form.
Step 9: Preheat Oven
While the cookie fries are chilling, preheat your oven to 350°F (175°C). A well-preheated oven ensures that the Cookie Fries bake evenly and develop that lovely golden-brown color on the outside while keeping them soft on the inside.
Step 10: Bake
Once frozen, place the baking sheet in the oven and bake for 10-12 minutes. Keep a close eye on them; they should be light in color and just firm to the touch. Removing them when they are still soft will allow them to set beautifully as they cool, creating that perfect chewy texture.
Step 11: Mix Dip
While the Cookie Fries cool, prepare the frosting dip by mixing the heavy cream, cream cheese, and powdered sugar in a medium bowl. Use a hand mixer to whip it until smooth and creamy. This frosting dip is the ultimate companion for the fries, creating a delightful contrast in textures and flavors.

How to Store and Freeze Cookie Fries
Room Temperature: Store leftover Cookie Fries in an airtight container at room temperature for up to 2 days for optimal freshness.
Fridge: If you need to keep them longer, refrigerate the cookie fries for up to 5 days in an airtight container. They can lose some crispness but will still be delicious.
Freezer: For longer storage, freeze the cookie fries by placing them in a single layer on a baking sheet until solid. Then, transfer to a freezer-safe bag and store for up to 2 months.
Reheating: To enjoy your frozen Cookie Fries, bake them straight from the freezer at 350°F (175°C) for about 5-7 minutes to restore their delightful texture.
What to Serve with Cookie Fries with Frosting Dip
Indulging in these delightful cookie fries opens the door to a world of complementary flavors and textures that can transform your dessert into a full meal experience.
-
Vanilla Ice Cream: A scoop of creamy vanilla ice cream provides a cool contrast to warm cookie fries, balancing flavors perfectly.
-
Fresh Berries: Bright, juicy strawberries or raspberries add a tart bite that complements the sweetness of cookie fries and frosting dip.
-
Chocolate Sauce: Drizzling rich chocolate sauce over the cookie fries elevates the dessert, bringing extra decadence and indulgence.
-
Nutty Candied Pecans: The crunch and caramel sweetness of candied pecans contrast wonderfully with the soft cookie fries, adding an unexpected twist.
-
Caramel Sauce: A drizzle of warm caramel sauce introduces an irresistible buttery flavor that enhances the sweetness of the frosting.
-
Whipped Cream: Light and airy whipped cream serves as a delightful topping, adding a dreamy texture that pairs beautifully with the dippable fries.
Sharing these treats with loved ones makes for a fun and engaging dessert experience, as each dip can bring out different flavors and textures. Enjoy experimenting with these pairings to create a complete and satisfying sweet adventure!
Make Ahead Options
These Cookie Fries with Frosting Dip are perfect for meal prep enthusiasts! You can prepare the cookie dough up to 24 hours in advance by covering it tightly with plastic wrap and refrigerating. When you’re ready to bake, simply roll and cut the cookie fries, then freeze them for 20 minutes before baking. The frosting dip can also be made ahead of time and stored in the refrigerator for up to 3 days; just give it a quick stir before serving to bring it back to its creamy texture. This approach allows you to enjoy fresh, delicious cookie fries with minimal effort on busy weeknights!
Cookie Fries with Frosting Dip Variations
Get creative and make these delightful Cookie Fries your own with a few fun twists that elevate every bite!
-
Gluten-Free: Swap the all-purpose flour for a gluten-free flour blend to make this dessert accessible for everyone.
-
Nutty Crunch: Add chopped nuts like walnuts or pecans to the dough to introduce a yummy crunch that complements the soft cookie texture.
-
Chocolate Lovers: Mix in chocolate chips for a rich, melty surprise that contrasts beautifully with the sweet frosting dip.
-
Spicy Kick: For a surprising twist, sprinkle some cinnamon or nutmeg into the dough for a warm, cozy flavor that enhances the sweetness.
-
Fruit Fusion: Fold in dried fruits like cranberries or raisins into the dough for a chewy, fruity pop that brightens each fry.
-
Variations on the Dip: Experiment with different frosting dips such as chocolate ganache or peppermint frosting—ideal for celebrating the seasons!
-
Vegan Delight: Use flax eggs and vegan cream cheese to create a fully plant-based version of these fun Cookie Fries. They’ll be a hit even if you’re not vegan!
These cookies are perfect alongside other treats, like Hot Chocolate Cookies or a platter of Christmas Cookie Exchange delights, making for an unforgettable dessert experience!
Expert Tips for Cookie Fries
-
Dough Consistency: Ensure your dough is not too sticky or dry; if it feels soft, chill it a bit longer to make cutting easier for your Cookie Fries with Frosting Dip.
-
Watch the Bake: Keep an eye on the cookies as they bake; pulling them out while soft will prevent them from hardening too much once cooled.
-
Chill for Shape: Freezing the shaped cookie fries before baking is essential for keeping their fry form; don’t skip this step for perfect dippable treats!
-
Mix Gradually: When combining wet and dry ingredients, mix just until combined to avoid tough cookies; this preserves their delightful softness and tenderness.
-
Dipping Fun: For an extra twist, consider using a variety of dipping sauces, like chocolate or caramel, to enhance your Cookie Fries experience!
Advertisement
Cookie Fries with Frosting Dip Recipe FAQs
How do I select the right ripeness for ingredients?
Absolutely! For the best Cookie Fries with Frosting Dip, use fresh ingredients. Make sure your butter is at room temperature but not melted; this allows for the perfect creaming with the sugar. If you’re using eggs, they should be fresh too. Check your egg by placing it in water; if it sinks, it’s fresh!
What is the best way to store leftover cookie fries?
To keep your leftover Cookie Fries fresh, store them in an airtight container at room temperature for up to 2 days. If refrigerated, they’ll last for up to 5 days—but keep in mind that they might lose some of their crispness. Always seal them tightly to prevent drying out!
Can I freeze cookie fries, and if so, how?
Yes, you can! To freeze your Cookie Fries, place them in a single layer on a baking sheet until solid. Then, transfer them to a freezer-safe bag, ensuring you’ve pushed out as much air as possible to prevent freezer burn. They’ll stay good for about 2 months. When you’re ready to enjoy them, bake straight from the freezer at 350°F (175°C) for 5-7 minutes to restore their delightful texture.
What should I do if my cookie dough is too sticky?
Very good question! If your dough feels too sticky to handle, you can chill it in the refrigerator for an additional 15-20 minutes. This will help firm it up and make cutting into fry shapes easier, ensuring that your Cookie Fries come out perfectly dippable!
Are there any dietary considerations for this recipe?
Absolutely! If you need to accommodate dietary restrictions, you can make several easy swaps. Use a gluten-free flour blend instead of all-purpose for gluten-free Cookie Fries. For a dairy-free option, swap the unsalted butter with vegan butter and use vegan cream cheese in the frosting dip. Remember, always check the labels for hidden allergens, especially if you’re serving guests with allergies!

Cookie Fries with Frosting Dip for the Perfect Sweet Snack
Ingredients
Equipment
Method
- Prepare Baking Sheets: Start by lining two large baking sheets with parchment paper.
- Make Dry Mix: In a medium bowl, whisk together the all-purpose flour, cornstarch, kosher salt, and baking powder.
- Cream Butter and Sugar: In a large mixing bowl, beat the unsalted butter and brown sugar together until light and fluffy.
- Combine Wet Ingredients: Add the large egg and pure vanilla extract to the butter-sugar mixture and mix until fully combined.
- Combine Dry and Wet Mixtures: Gradually add the dry ingredients to the wet mixture and mix on low speed until just combined.
- Chill Dough: Cover the dough with plastic wrap and refrigerate for 30 minutes.
- Roll and Cut: Roll out the chilled dough on a floured surface and cut into fry shapes.
- Freeze Shapes: Lay the cut cookie fries on a baking sheet and freeze for 20 minutes.
- Preheat Oven: Preheat your oven to 350°F (175°C).
- Bake: Bake the frozen cookie fries for 10-12 minutes, watching closely.
- Mix Dip: Prepare the frosting dip by mixing the heavy cream, cream cheese, and powdered sugar until smooth and creamy.