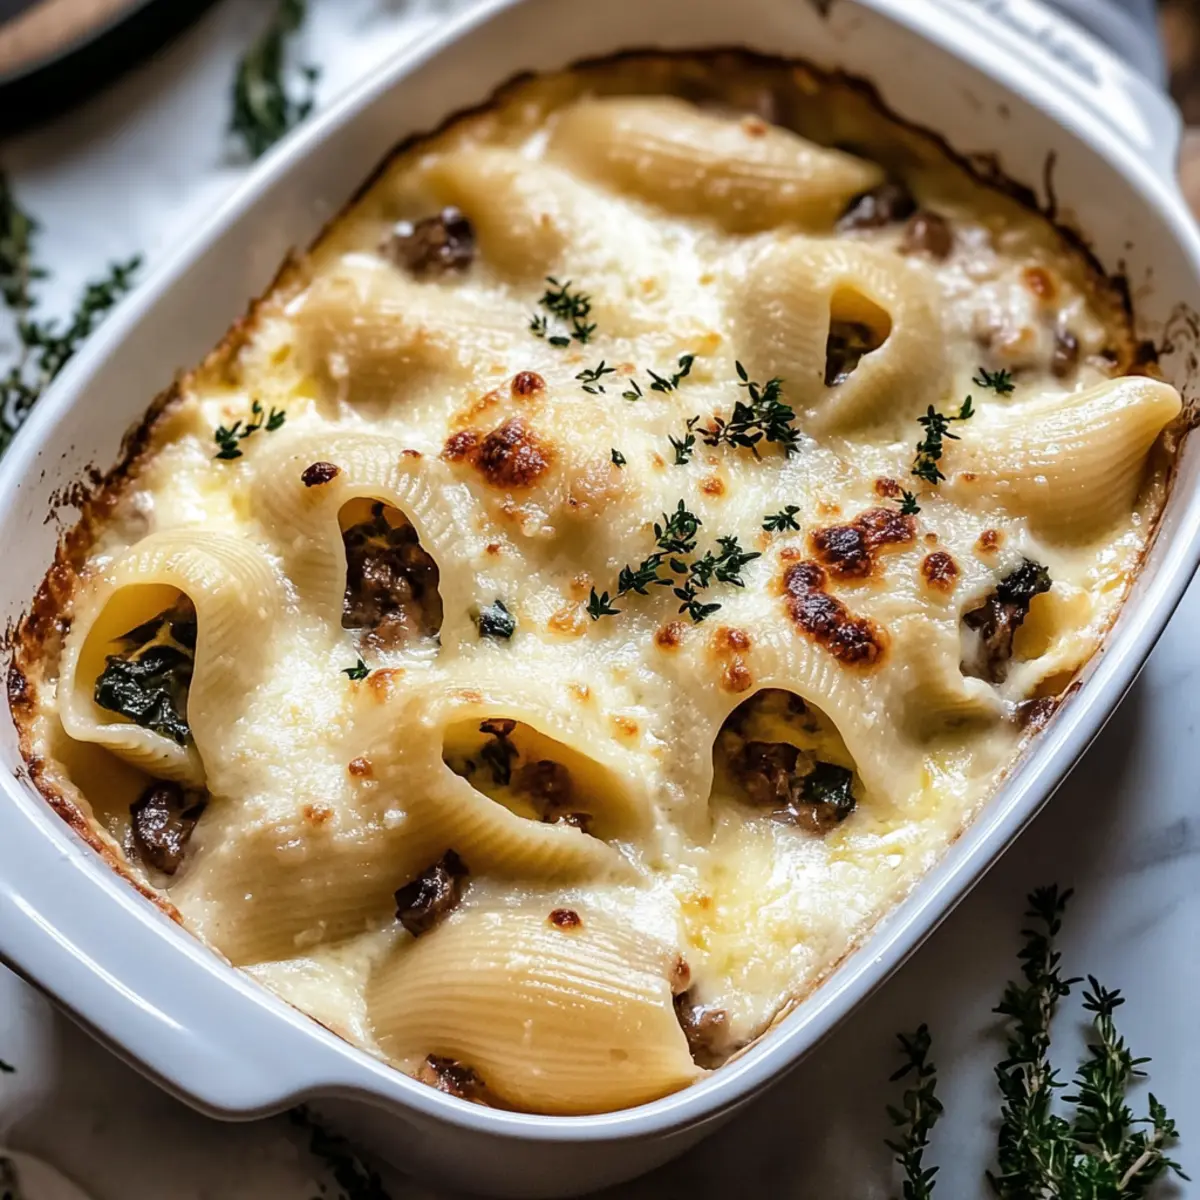
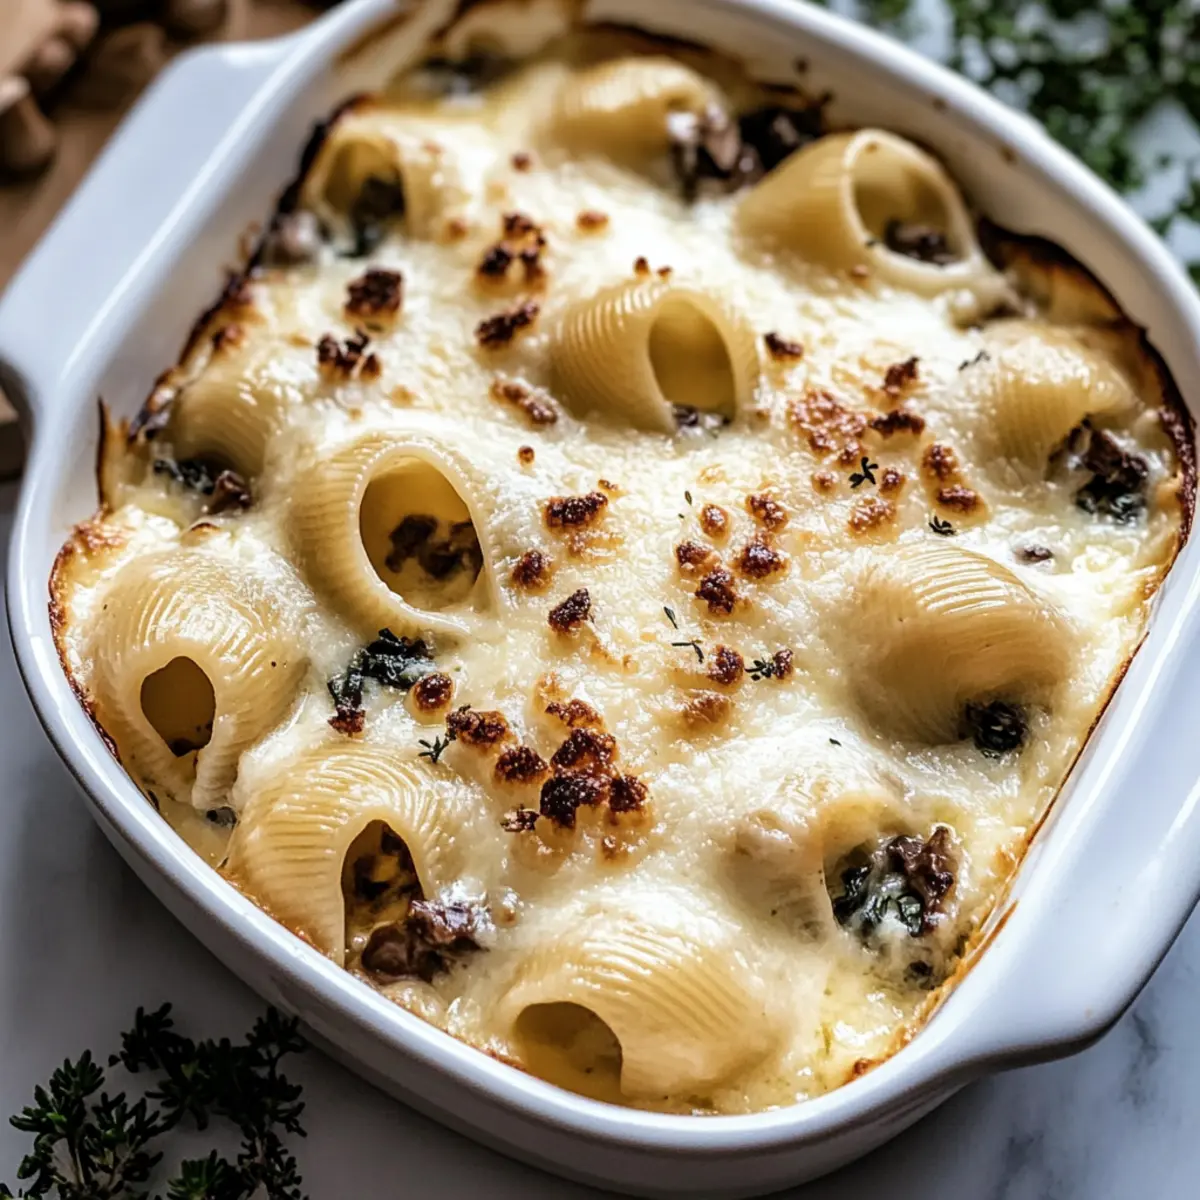
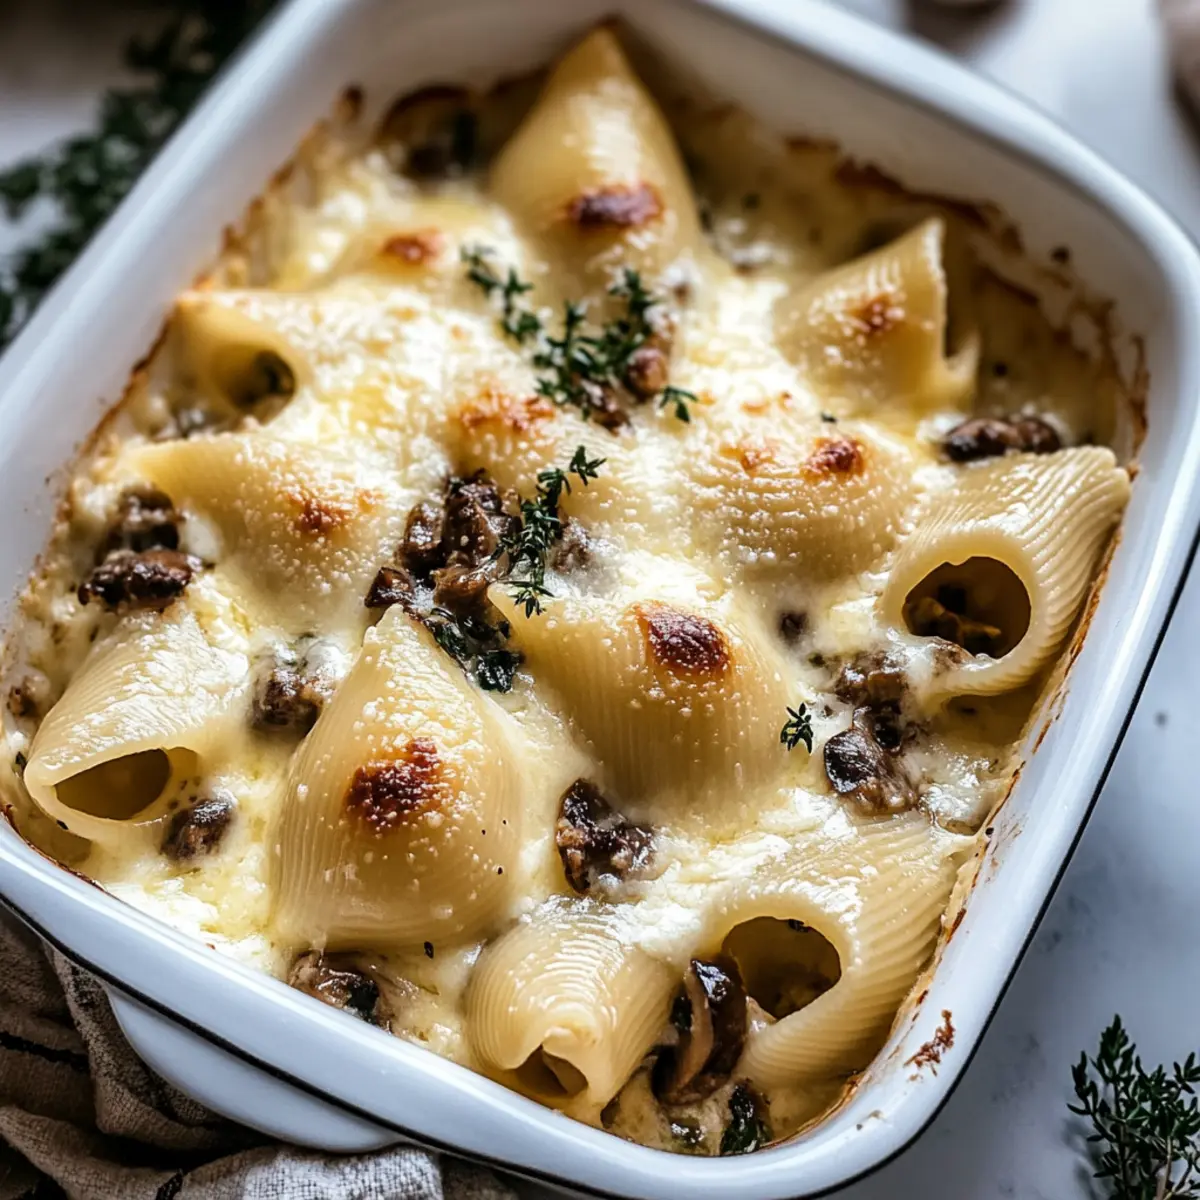
As I unwrapped the last ornament for our holiday tree, a comforting aroma wafted from the kitchen, signaling the start of a festive gathering. Easy Christmas Stuffed Pasta Shells have quickly become a cherished tradition in our home, effortlessly bringing warmth and cheer to the table. This delightful dish is packed with creamy ricotta, savory provolone, and earthy mushrooms, all slathered in a luscious cheese sauce that will have your guests begging for more. One of the best parts? It’s perfect for stress-free entertaining, allowing you to savor precious moments with loved ones instead of being glued to the stove. Plus, with vegan and gluten-free options, everyone can indulge in this comforting holiday feast. Are you ready to transform your holiday menu? Let’s dive in!
Why Are These Pasta Shells a Must-Try?
Impressive Presentation: The golden-brown cheesy crust and overflowing stuffed shells are a showstopper on any holiday table.
Versatile Options: With vegan and gluten-free variations, these Christmas Stuffed Pasta Shells cater to all your guests’ dietary needs, ensuring everyone feels included during the festivities.
Time-Saving Delight: Prep the filling and sauce in advance, allowing you to enjoy the company of friends and family without the hassle of last-minute cooking.
Savory Comfort: Combining creamy cheeses, sautéed mushrooms, and flavorful herbs creates a dish that embodies holiday warmth—perfect for cozy gatherings.
Perfect Pairings: Serve alongside a crisp salad or finish off with festive desserts to create an unforgettable meal experience, just like my Christmas Cookie Exchange ideas that leave your guests delighted!
Christmas Stuffed Pasta Shells Ingredients
• • Get ready to create a festive feast!
For the Pasta
- Large Pasta Shells – Holds the filling securely; this size is perfect for a generous stuffing.
- Frozen Spinach – Packed with nutrients; be sure to thaw and drain before use.
For the Cheese Filling
- Ricotta Cheese – Provides creaminess and richness; substitute with cashew cream for a vegan option.
- Provolone Cheese – Adds a delightful melting texture; mozzarella is a great alternative.
For the Sauce
- Salted Butter – For sautéing and rich flavor; olive oil is a dairy-free option.
- Sliced Mushrooms – Contributes earthy depth; cook until golden for the best flavor.
- Chopped Garlic – Infuses the sauce with aroma; fresh garlic is preferred, but minced can work.
- Flour – Helps thicken the cheese sauce for creaminess; gluten-free flour can be used instead.
- Milk – Balances richness in the sauce; non-dairy milk is a good substitute for a vegan choice.
- White Wine – Adds gourmet flair; vegetable broth can replace it for a non-alcoholic version.
For the Seasoning
- Dried Oregano/Basil/Thyme – Enhances flavor; fresh herbs can give a vibrant touch.
- Black Pepper & Kosher Salt – Essential for flavor enhancement; adjust to your taste.
For Toppings
- Shredded Mozzarella & Grated Parmesan – For that gooey, melty topping; these create a delicious crust on your Christmas Stuffed Pasta Shells.
Now that we have everything laid out, let’s get started on creating this festive dish that will surely wow your guests!
Step‑by‑Step Instructions for Christmas Stuffed Pasta Shells
Step 1: Preheat and Prepare
Begin by preheating your oven to 350°F (175°C) and greasing a 9×13 inch baking dish with butter or non-stick spray. This will ensure your Christmas Stuffed Pasta Shells bake evenly and won’t stick to the pan. As the oven heats, take a moment to gather all your ingredients and equipment, setting the stage for the delightful cooking adventure ahead.
Step 2: Sauté the Mushrooms
In a large skillet, melt 2 tablespoons of salted butter over medium heat. Add 8 ounces of sliced mushrooms and sauté them until they are golden brown, about 5-7 minutes. Sprinkle in dried oregano, basil, salt, and pepper to taste. Once aromatic, remove the mixture from the heat and set it aside, allowing those savory flavors to shine in your cheese sauce.
Step 3: Prepare the Cheese Sauce
In the same skillet, melt the remaining butter and add 2 minced garlic cloves. Cook for 1-2 minutes until fragrant, then whisk in ¼ cup of flour, stirring to create a roux. Gradually add 1 cup of white wine and 1 cup of milk, continually whisking until the mixture reaches a boil and thickens, around 3-5 minutes. Stir in 1 cup of shredded mozzarella and ½ cup of grated Parmesan until fully melted and creamy.
Step 4: Cook the Pasta Shells
Bring a large pot of salted water to a boil, then gently add the large pasta shells. Cook them until al dente, usually about 9-11 minutes, then drain and let them cool slightly. It’s important not to overcook here, as the shells will finish cooking in the oven while safely enveloping your delicious filling.
Step 5: Make the Filling
In a mixing bowl, combine 1 cup of ricotta cheese, ½ cup of provolone cheese, and 1 cup of thawed, drained frozen spinach. Mix these ingredients until well-combined and creamy. This rich filling will star in your Christmas Stuffed Pasta Shells, ensuring each bite is flavorful and satisfying.
Step 6: Stuff the Shells
Using a spoon, generously fill each cooked pasta shell with the cheese and spinach mixture, placing them seam side up in the greased baking dish. This step is crucial to ensure the filling stays within the shells while baking. As you fill, arrange them snugly together for an impressive presentation.
Step 7: Top and Bake
Once all shells are filled, sprinkle any remaining cheese mixture over the top. Then, pour the luscious cheese sauce evenly over the stuffed pasta shells, ensuring they are well-coated. Add the sautéed mushrooms and a touch more Parmesan on top for an extra cheesy crust. Bake in the preheated oven for 15-20 minutes, or until the sauce is bubbly and the top is golden.
Step 8: Serve and Enjoy
Remove your Christmas Stuffed Pasta Shells from the oven and let them sit for about 5 minutes before serving. This brief cooling period allows the flavors to settle and the sauce to thicken slightly. Serve warm, garnished with fresh herbs if desired, and get ready to impress your family and friends with this festive dish!
Christmas Stuffed Pasta Shells Variations
Feel free to let your imagination run wild while customizing these delicious pasta shells for your gatherings!
-
Vegan: Use cashew cream instead of ricotta and sprinkle some nutritional yeast for that cheesy flavor without the dairy. Your plant-based guests will love the transformation.
-
Gluten-Free: Swap regular pasta shells for gluten-free alternatives to ensure everyone can enjoy this tasty dish without worry. Many brands offer great options, and they can taste just as delicious!
-
Protein Additions: Stir in cooked ground sausage or turkey into the cheese filling for a heartier meal. This extra protein gives a satisfying boost everyone will love, making it a true crowd-pleaser.
-
Extra Veggies: Add finely chopped bell peppers or zucchini to the filling for vibrant colors and nutritional extras. Just remember to keep the veggies finely diced for a lovely balance of flavor and texture.
-
Spicy Version: Boost the heat by mixing in crushed red pepper flakes into the cheese filling. For those who love a bit of spice, this twist will make them smile!
-
Herb-Infused: Experiment with fresh herbs like basil or thyme in both the filling and sauce. The fresh aromatic flavors create a beautiful association with the holiday season, brightening your stuffed shells.
-
Cheese Lovers: Consider mixing in some goat cheese or feta alongside the ricotta for a tangy surprise in each bite. This additional layer of flavor unites beautifully with the existing ingredients.
-
Creamy Tomato: For a different sauce twist, add some marinara or creamy tomato sauce alongside the cheese sauce. This can provide a rich, comforting base that enhances the overall dish.
For more delightful ideas, consider exploring festive pairings with your favorite dishes, such as Stuffed Salmon Spinach or a warm bowl of Baked Feta Pasta. Enjoy the creativity in your kitchen!
What to Serve with Easy Christmas Stuffed Pasta Shells
There’s a world of flavors that can beautifully accompany this festive delight, enhancing your holiday dining experience.
-
Crisp Garden Salad: A refreshing mix of greens and seasonal veggies complements the richness of the pasta, adding a crisp contrast to each bite. Toss in a light vinaigrette for an invigorating touch.
-
Garlic Bread: A crispy, golden loaf slathered in buttery goodness is the perfect sidekick, ideal for soaking up the luscious cheese sauce. Serve warm for an irresistible start to your meal.
-
Roasted Vegetables: Caramelized seasonal veggies like Brussels sprouts or root vegetables add a savory sweetness that pairs perfectly with the creamy pasta. Their earthy flavors bridge the dish brilliantly.
-
Sweet Potato Mash: This creamy, slightly sweet mash provides a delightful and unexpected contrast to the savory stuffed shells. Plus, the vibrant color enhances your holiday table.
-
Red Wine: A glass of bold red wine, such as Chianti or Merlot, elevates the meal, balancing the richness of the cheese and the earthy mushrooms beautifully.
-
Festive Dessert: Finish your feast with a seasonally inspired dessert, like peppermint chocolate mousse or gingerbread cookies, to leave your guests with warm memories of your delightful gathering.
Each of these pairings brings different textures and flavors that harmonize beautifully, ensuring your Easy Christmas Stuffed Pasta Shells shine on the table!
Expert Tips for Christmas Stuffed Pasta Shells
-
Prep Ahead: Prepare your cheese filling and sauce a day in advance to maximize flavors and save time on the day of the gathering.
-
Pasta Perfection: Make sure to cook your pasta shells al dente, which will prevent them from becoming mushy during baking and ensure a delightful texture.
-
Adjusting Sauce Thickness: If your cheese sauce turns out too thick, simply add more milk or broth, a tablespoon at a time, until you reach your desired consistency.
-
Quality Ingredients: Use a good-quality white wine for a richer flavor in your cheese sauce; if desired, vegetable broth works as a fantastic non-alcoholic substitute.
-
Watch the Liquids: Be cautious not to overload with additional liquid to avoid a soggy outcome in your Christmas Stuffed Pasta Shells; the right balance of filling and sauce is key!
Make Ahead Options
Preparing your Christmas Stuffed Pasta Shells in advance is a fantastic way to save time and enjoy stress-free holiday gatherings! You can prepare both the filling and the cheese sauce up to 24 hours ahead; simply refrigerate them separately. If you prefer to assemble the shells, stuff them and place them in the baking dish, then cover with plastic wrap and refrigerate for up to 3 days. To maintain quality, ensure the pasta is cooked al dente, and avoid overloading with sauce to prevent sogginess. When ready to bake, remove from the fridge, top with any remaining sauce and cheese, and bake as directed—your guests will still have the same delicious, comforting experience!
Storage Tips for Christmas Stuffed Pasta Shells
Fridge: Store leftover Christmas Stuffed Pasta Shells in an airtight container for up to 3 days to maintain their flavor and texture.
Freezer: You can freeze these stuffed pasta shells before or after baking. Wrap them tightly in plastic wrap and foil for up to 3 months for best results.
Reheating: To reheat, thaw in the fridge overnight, then bake at 350°F for about 20-25 minutes until hot and bubbly. If reheating straight from frozen, increase the baking time to 40-45 minutes.
Shelf Life: Always label your containers with the date to keep track of freshness. Enjoying them within the recommended time will ensure excellent flavor!
Advertisement
Christmas Stuffed Pasta Shells Recipe FAQs
What should I look for when selecting spinach?
When choosing spinach for your Christmas Stuffed Pasta Shells, I recommend using frozen spinach; it’s nutrient-packed and convenient. Make sure to thoroughly thaw and drain it to remove any excess moisture, which can lead to a soggy filling.
How long can I store leftovers of Christmas Stuffed Pasta Shells?
Leftover Christmas Stuffed Pasta Shells can be stored in an airtight container in the refrigerator for up to 3 days. To maintain its taste and texture, make sure the dish is cooled to room temperature before sealing it up.
Can I freeze my stuffed pasta shells? If so, how?
Absolutely! You can freeze your Christmas Stuffed Pasta Shells before or after baking. If freezing before baking, wrap them tightly in plastic wrap followed by foil to prevent freezer burn. They can be stored for up to 3 months. To bake from frozen, simply thaw in the fridge overnight, and then bake at 350°F for 20-25 minutes. If baking from frozen, increase the time to about 40-45 minutes.
What if my cheese sauce turns out too thick?
If you find your cheese sauce is thicker than desired while making your Christmas Stuffed Pasta Shells, no worries! Gradually add more milk or broth, one tablespoon at a time, while continuously whisking until it reaches your preferred creamy consistency. This will help enhance the texture and flavor of the dish.
Are there any dietary considerations for this recipe?
Yes, absolutely! For a vegan option, substitute ricotta cheese with cashew cream and use nutritional yeast for that cheesy flavor. For gluten-free needs, you can use gluten-free pasta shells and flour. It’s always best to check for allergies, particularly with dairy and wheat, to ensure everyone at your gathering can enjoy this delicious dish without worry.

Christmas Stuffed Pasta Shells That Will Wow Your Guests
Ingredients
Equipment
Method
- Preheat your oven to 350°F (175°C) and grease a baking dish.
- Melt 2 tablespoons of butter in a skillet and sauté the mushrooms until golden brown.
- Melt remaining butter and add minced garlic, cook for 1-2 minutes, then whisk in flour, add wine and milk, and cook until thickened.
- Boil salted water and cook pasta shells until al dente, then drain and cool.
- Mix ricotta, provolone, and spinach until creamy for the filling.
- Fill each shell with the cheese mixture and place in the baking dish.
- Pour the cheese sauce over the shells, sprinkle with sautéed mushrooms and cheese, then bake until bubbly and golden.
- Let them sit for 5 minutes before serving, garnished with herbs if desired.