A Sweet Childhood Memory in Every Bite
There’s something magical about desserts that transport you back to childhood. I still remember the first time I saw a “dirt cup” at a birthday party—layers of rich chocolate pudding, crumbled cookies that looked exactly like soil, and little gummy worms peeking through the top. It was messy, playful, and, most importantly, absolutely delicious. As a child, I was convinced I was eating real dirt, a delightfully rebellious act that somehow tasted like heaven.
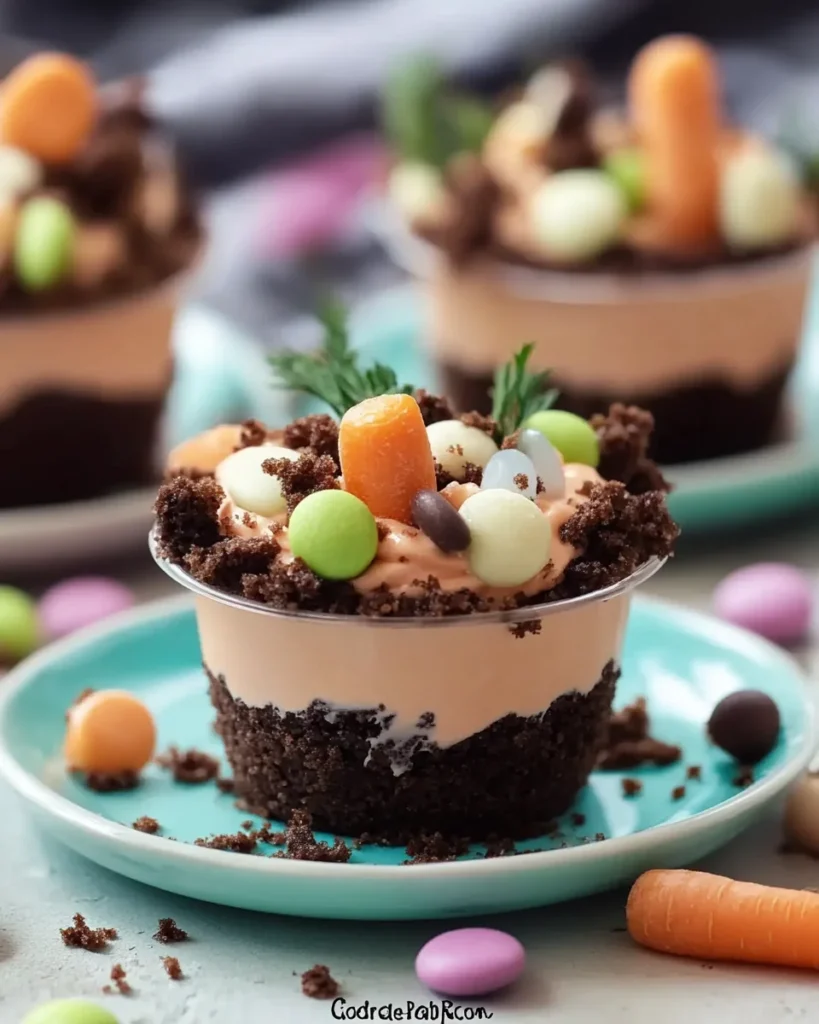
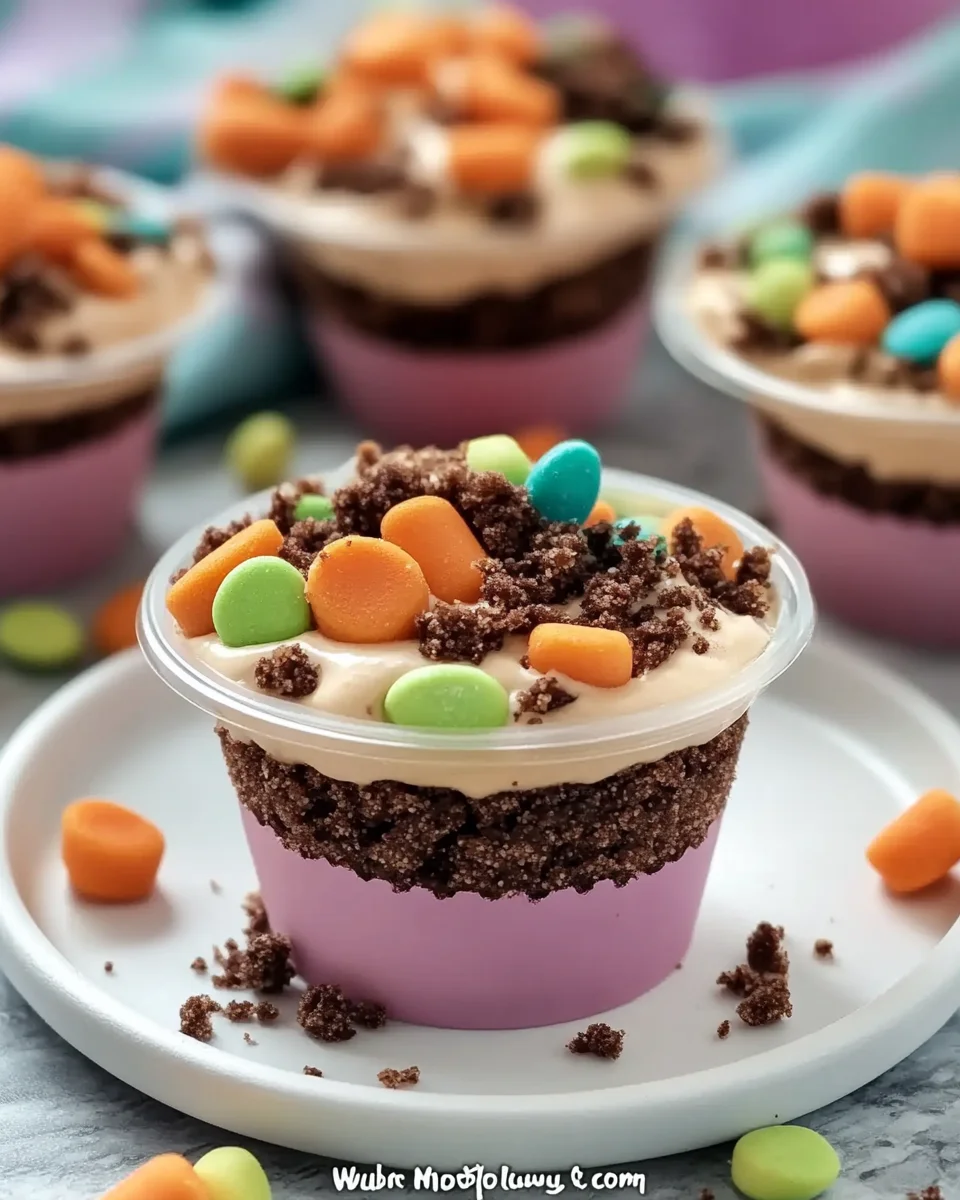
Years later, I found myself wanting to recreate that same nostalgic magic, but with a little twist—something perfect for springtime, Easter, and garden-themed parties. That’s how the Carrot Patch Dirt Cups were born. Instead of gummy worms, these cups are topped with adorable “carrots” made from white chocolate-dipped strawberries, tinted the perfect shade of orange. They look so real that every time I serve them, someone always does a double take.
This dessert isn’t just fun to eat; it’s fun to make. Whether you’re assembling them with kids, serving them at a gathering, or simply indulging in a little creativity in the kitchen, these dirt cups bring a touch of whimsy to any occasion. And the best part? They taste even better than they look.
Why You’ll Love Carrot Patch Dirt Cups
If you’re looking for a dessert that’s equal parts creative, delicious, and easy to make, this is it. Here’s why these dirt cups are a must-try:
1. A Perfect Balance of Flavors and Textures
The combination of silky chocolate pudding, crunchy Oreo “dirt,” and the slight tartness of fresh strawberries dipped in white chocolate creates a dessert that’s rich but not overpowering. Every spoonful offers a contrast of creamy, crunchy, and fruity goodness.
2. Fun and Interactive for All Ages
Kids love helping out with this recipe, from crushing the cookies to dipping the strawberries in their “carrot” disguise. It’s a hands-on dessert that turns the kitchen into a place of laughter and creativity.
3. A Stunning Presentation Without the Effort
These cups look impressive, as if they took hours to assemble, but in reality, they come together in under 30 minutes (not counting chill time). The bright orange “carrots” nestled in dark cookie crumbs make for an eye-catching centerpiece at any spring gathering.
4. Perfect for So Many Occasions
- Easter: The carrot theme fits perfectly with the holiday. You can even add mini chocolate eggs for an extra festive touch.
- Spring Parties: These cups fit right in at garden-themed or nature-inspired celebrations.
- Halloween Twist: Swap the “carrots” for gummy worms, call them “Graveyard Dirt Cups,” and suddenly you have a spooky treat.
- Kid’s Birthday Parties: They’re easy to serve, mess-free, and always a hit with young guests.
Gather Your Garden Tools: Ingredients
- 1 package (3.9 oz) chocolate instant pudding mix
- 2 cups cold milk
- 1 package (14.3 oz) Oreo cookies
- 1 tub (8 oz) whipped topping
- 12-15 strawberries
- Orange food coloring
- Green frosting or green candy melts
- Clear plastic cups
Dig In: Step-by-Step Directions
Step 1: Create the Chocolate Soil
- In a large bowl, whisk the chocolate pudding mix and cold milk for about 2 minutes until fully combined. Let it sit in the fridge for at least 5 minutes to thicken.
Step 2: Crush the “Dirt”
- Place Oreos in a zip-top bag, remove excess air, and seal. Crush them into fine crumbs using a rolling pin until they resemble dirt.
Step 3: Fluff the Pudding
- Remove the pudding from the fridge. Gently fold in about two-thirds of the whipped topping until evenly mixed and smooth.
Step 4: Craft the Carrot Patch
- Wash and completely dry the strawberries. Mix 8-10 drops of orange food coloring with 2 tablespoons of water in a small bowl. Dip each strawberry in the mixture, rolling to coat evenly. Let them dry on paper towels for 5 minutes.
Step 5: Assemble Your Garden
- In each clear cup, layer about 2 tablespoons of crushed Oreo “dirt” at the bottom. Add about 1/3 cup of pudding mixture, then top with another layer of crushed Oreos, leaving about 1/2 inch of space at the top.
Step 6: Plant the Carrots
- If using green frosting, pipe small leaves onto the strawberry stems. If using green candy melts, dip the stems into melted green candy and allow them to harden.
- Gently press 2-3 “carrots” into each cup, nestling them into the “dirt.” Sprinkle extra Oreo crumbs on top for a freshly planted look.
Step 7: Chill & Serve
- Refrigerate the cups for at least 2 hours to fully set. Serve within 24 hours for the best texture.
Nutrient Harvest: What’s Inside?
Estimated per serving (1 regular cup, about 8 oz)
- Calories: ~300-350
- Fat: ~12g
- Carbohydrates: ~50g
- Sugar: ~35g
- Protein: ~4g
For best results, serve chilled with a glass of cold milk or hot cocoa!
Frequently Asked Questions
1. Can I Make These Ahead of Time?
Absolutely! These dirt cups actually taste better after a few hours in the fridge, allowing the pudding to set properly. However, for the best presentation, wait until just before serving to add the “carrots” (the strawberries). If left too long, the strawberries may release moisture and affect the cookie crumbs.
2. Can I Use Homemade Pudding Instead of Instant?
Yes, if you have the time and prefer homemade pudding, go for it! A rich, homemade chocolate pudding will elevate the flavor. Just make sure to let it cool completely before assembling the cups.
3. What’s the Best Way to Crush the Oreos?
A food processor will get the finest crumbs in seconds, but if you don’t have one, a zip-top bag and a rolling pin work just as well. Just be sure to remove as much air from the bag as possible before sealing to avoid any cookie explosions.
4. Can I Use a Different Type of Cookie?
Definitely! While Oreos provide the perfect chocolate “dirt” look, you can experiment with other chocolate cookies like chocolate graham crackers or even brownie crisps for a richer taste.
5. What If I Don’t Have Orange Food Coloring?
If you don’t have orange food coloring, you can mix red and yellow food coloring until you achieve the desired shade. Alternatively, you can melt orange candy melts for dipping instead of coloring white chocolate.
6. How Do I Keep the Strawberries Looking Fresh?
The key is to make sure they are completely dry before dipping them. Any moisture on the strawberries can cause the chocolate or food coloring to slide off unevenly. Also, keep them refrigerated until ready to serve.
7. Can I Make These Vegan or Dairy-Free?
Yes! Use a dairy-free pudding mix with plant-based milk, swap in coconut whipped topping, and use dairy-free chocolate for the “carrots.” There are even gluten-free sandwich cookies available to accommodate dietary restrictions.
8. What’s the Best Way to Serve These?
These are best served chilled, straight from the fridge. If you’re making them for a party, consider mini versions in small shot glasses for easy grabbing.
9. Can I Freeze These Dirt Cups?
Freezing is not recommended, as pudding doesn’t thaw well and can develop an odd texture. If you need to store leftovers, keep them in the fridge and consume within 24 hours for the best taste and texture.
10. Can I Use a Different Fruit Instead of Strawberries?
Yes! Green grapes can be used as a substitute. Simply dip them in white chocolate and tint them orange just as you would with strawberries. They’ll look like baby carrots and add a different fruity element to the dessert.
Creative Variations to Try
Chocolate Lover’s Dream
For an extra indulgent version, layer in chocolate chips or drizzle melted chocolate between the layers.
Peanut Butter Twist
Mix in a spoonful of peanut butter with the pudding for a Reese’s-inspired dirt cup.
Cookies and Cream Garden
Instead of chocolate pudding, use vanilla pudding mixed with crushed Oreos for a cookies-and-cream version.
Berry Patch Delight
Layer in fresh raspberries or blueberries for a pop of tartness that balances out the chocolate.
Advertisement
Healthier Alternative
Swap out the pudding for Greek yogurt sweetened with honey or cocoa powder for a protein-packed version.
Conclusion: A Dessert That’s as Fun as It Is Delicious
Carrot Patch Dirt Cups are more than just a dessert; they’re an experience. They bring out the inner child in everyone, spark creativity, and offer a sweet way to celebrate the changing seasons. Whether you’re making them for an Easter brunch, a kids’ party, or just because you love a playful treat, they never fail to bring smiles.
Food has a way of connecting us to our past, our loved ones, and the simple joys of life. Every time I make these, I’m reminded of that childhood wonder—that feeling of eating something that looked like it belonged in a garden but tasted like the best chocolate treat ever. I hope that when you make these, they bring a little bit of that magic to your kitchen, too.
So go ahead, grab a spoon, and dig in!
Carrot Patch Dirt Cups: A Whimsical Treat for All Ages
Ingredients
Method
- In a large bowl, whisk the chocolate pudding mix and cold milk for about 2 minutes until fully combined.
- Let it sit in the fridge for at least 5 minutes to thicken.
- Place Oreos in a zip-top bag, remove excess air, and seal.
- Crush them into fine crumbs using a rolling pin until they resemble dirt.
- Remove the pudding from the fridge.
- Gently fold in about two-thirds of the whipped topping until evenly mixed and smooth.
- Wash and completely dry the strawberries.
- Mix 8-10 drops of orange food coloring with 2 tablespoons of water in a small bowl.
- Dip each strawberry in the mixture, rolling to coat evenly.
- Let them dry on paper towels for 5 minutes.
- In each clear cup, layer about 2 tablespoons of crushed Oreo “dirt” at the bottom.
- Add about 1/3 cup of pudding mixture, then top with another layer of crushed Oreos, leaving about 1/2 inch of space at the top.
- If using green frosting, pipe small leaves onto the strawberry stems.
- If using green candy melts, dip the stems into melted green candy and allow them to harden.
- Gently press 2-3 “carrots” into each cup, nestling them into the “dirt.”
- Sprinkle extra Oreo crumbs on top for a freshly planted look.
- Refrigerate the cups for at least 2 hours to fully set.
- Serve within 24 hours for the best texture.
Notes
- For extra flavor, mix a teaspoon of vanilla extract into the pudding.
- Use golden Oreos for a “sandy” effect instead of dark dirt.
- If you want a firmer “carrot” coating, let the strawberries dry longer before placing them in the cups.
- These dirt cups are best enjoyed fresh but can be stored in the fridge for up to 24 hours.