A Slice of Celebration: The Story Behind This Cake
Every year, as St. Patrick’s Day approaches, I find myself searching for the perfect dessert to celebrate. Growing up in a family that cherished festive traditions, we always had something green on the table, whether it was shamrock-shaped cookies, minty cupcakes, or a classic pistachio pudding. But as I got older and started baking on my own, I wanted something grand—something that wasn’t just a dessert but an experience.
That’s when I discovered the magic of cheesecake cakes. The idea of layering a rich, creamy cheesecake between two moist cake layers was like combining the best of both worlds. Inspired by the famous red velvet cake, I decided to give it a green twist, and just like that, the Green Velvet Cheesecake Cake was born.
The first time I made it, I watched as my family took their first bite—eyes widening, forks pausing mid-air in delight. The contrast between the tangy cheesecake and the soft, cocoa-kissed cake was irresistible. It wasn’t just another cake; it was a moment of joy, a sweet symbol of celebration.
Now, this cake has become a staple in my kitchen, especially in March. Whether it’s for a festive gathering, a birthday, or just an excuse to indulge, this dessert never fails to impress. And if you’ve never made a cheesecake cake before, don’t worry—I’ll walk you through everything you need to know about this showstopping treat.
What Makes This Cake Special?
The Green Velvet Cheesecake Cake isn’t just a regular cake dyed green—it’s an indulgent dessert with layers of flavor and texture that come together beautifully. Here’s what makes it stand out:
1. The Perfect Contrast
- The cheesecake layer is rich, creamy, and slightly tangy, which perfectly balances the sweetness of the cake.
- The green velvet cake layers are soft and buttery, with a hint of cocoa that adds depth.
2. A Festive Twist on a Classic
- Inspired by red velvet cake, this version swaps out red for green, making it ideal for St. Patrick’s Day, Christmas, or even a whimsical birthday celebration.
- Unlike traditional green desserts that rely on mint flavoring, this cake stays true to the beloved velvet cake taste.
3. A Frosting That Ties It All Together
- Instead of a standard buttercream, this cake is frosted with a marshmallow cream cheese frosting, which adds a light, fluffy texture with a touch of sweetness.
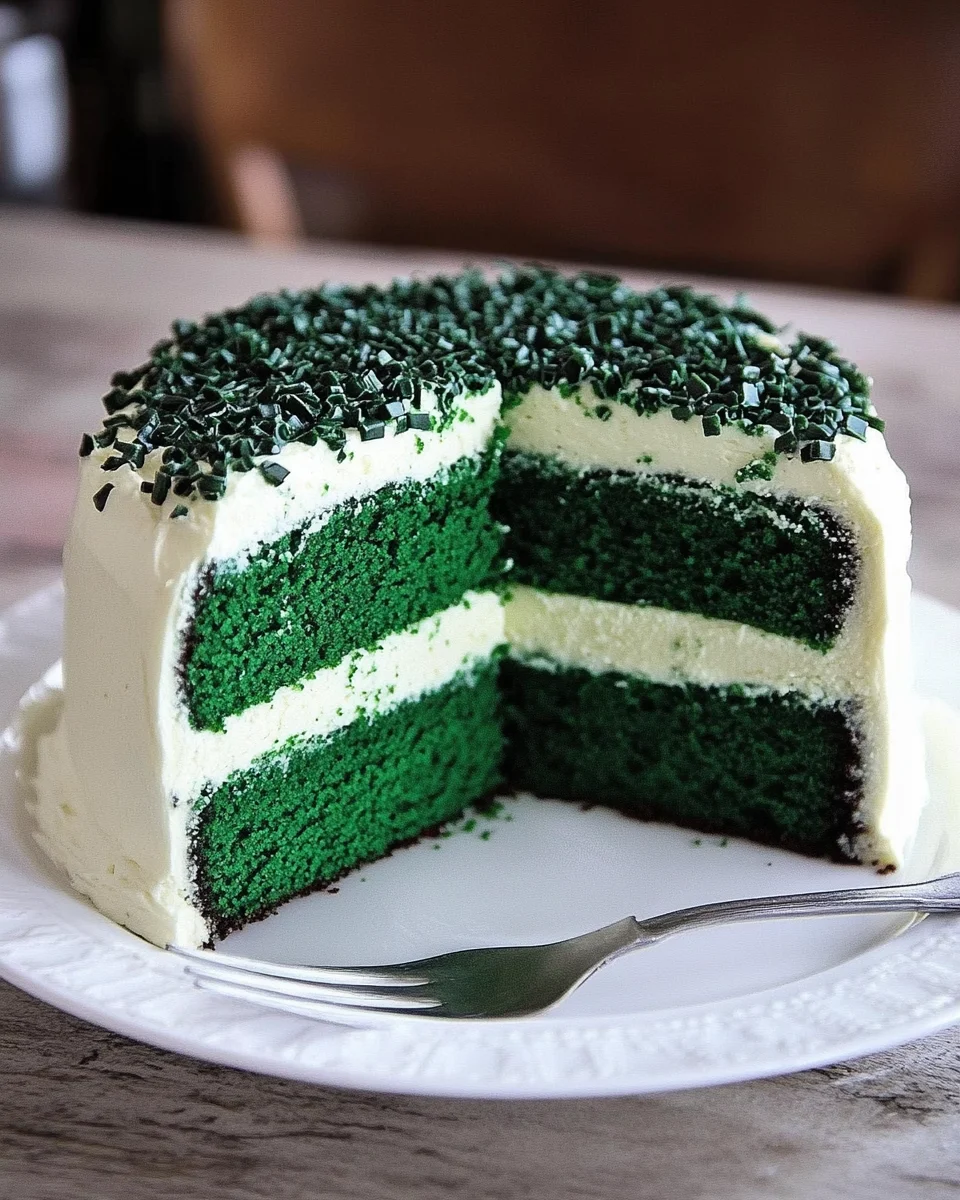
4. The Wow Factor
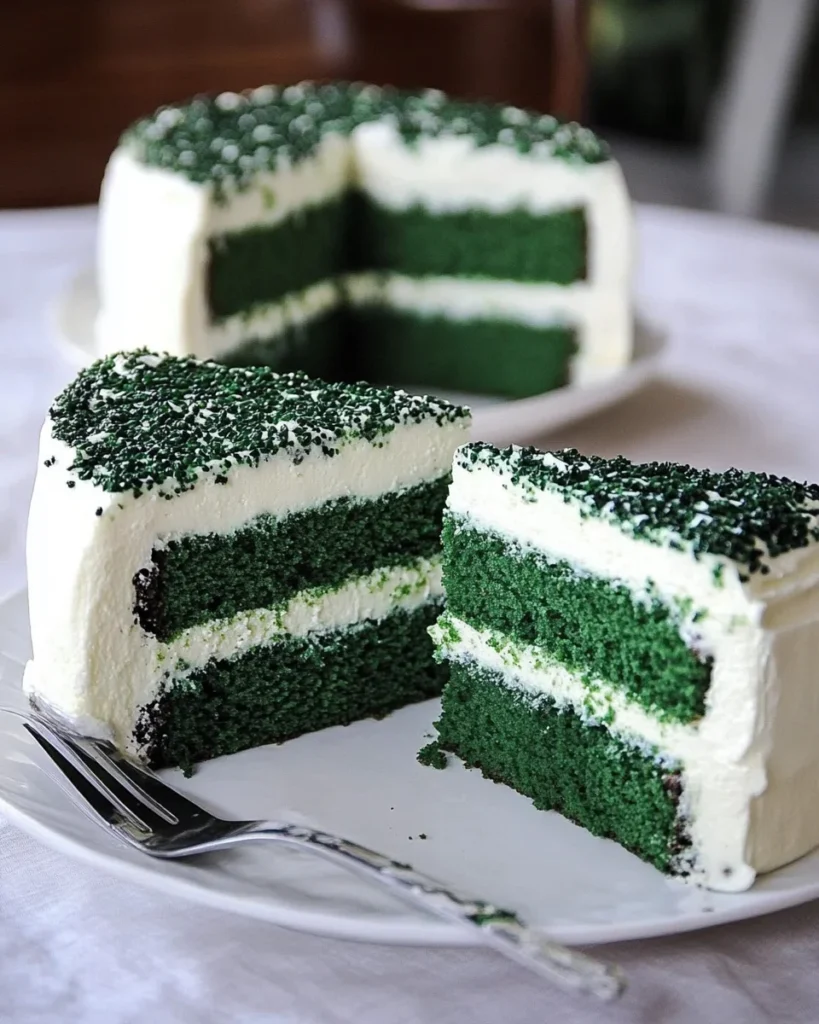
- When you slice into the cake, the beautiful layers of vibrant green and creamy white create a stunning presentation.
- It’s the kind of dessert that makes people pause to admire it before taking that first bite.
Ingredients
Velvety Cheesecake Core
- 16 oz cream cheese (room temperature)
- 2/3 cup granulated sugar
- Pinch of salt
- 2 large eggs
- 1/3 cup sour cream
- 1/3 cup heavy whipping cream
- 1 tsp vanilla extract
- A few drops of green food coloring (optional)
Green Velvet Cake Layers
- 2 ½ cups all-purpose flour
- 2 tbsp unsweetened cocoa powder
- ½ tsp salt
- 1 ½ cups canola or vegetable oil
- 1 ½ cups granulated sugar
- 2 large eggs
- 1 tsp vanilla extract
- 1 tsp white vinegar
- 1 tsp baking soda
- 1 cup buttermilk
- 2 tbsp (1 oz bottle) green food coloring (or gel paste)
Cloud-Like Marshmallow Frosting
- 16 oz cream cheese (room temperature)
- ½ cup unsalted butter (room temperature)
- 7 oz jar marshmallow creme
- 1 cup powdered sugar
- A few drops of green food coloring (optional)
Directions
Creating the Cheesecake Layer
- Preheat oven to 325°F. Place a large roasting pan on the lower rack. Boil water for a water bath.
- Line a 9-inch springform pan with parchment paper and wrap the bottom with heavy-duty foil.
- Beat cream cheese until smooth. Add sugar and salt, mixing until combined.
- Blend in eggs one at a time, then add sour cream, whipping cream, vanilla, and food coloring (if using).
- Pour batter into the prepared pan, place it in the roasting pan, and pour hot water around it (about 1 inch up the sides).
- Bake for 45 minutes until set. Let cool, then freeze for at least 4 hours.
Baking the Green Velvet Layers
- Preheat oven to 350°F. Grease and line two 9-inch round pans with parchment paper.
- Sift flour, cocoa powder, and salt in a bowl.
- In a separate bowl, beat oil and sugar for 2 minutes. Add eggs and vanilla, mixing well.
- Stir vinegar and baking soda together in a small bowl. Add to the batter along with buttermilk and food coloring.
- Gradually mix in the dry ingredients, beating for 2 minutes.
- Divide the batter evenly between the pans and bake for 30–35 minutes. Let cool completely.
Whipping Up the Frosting
- Beat cream cheese and butter until creamy.
- Mix in marshmallow creme and powdered sugar until smooth.
Assembling the Cake
- Place one cake layer on a serving plate.
- Remove the cheesecake from the freezer, trim if needed, and place on top of the cake.
- Top with the second cake layer.
Frosting & Finishing Touches
- Apply a thin crumb coat of frosting and refrigerate for 30 minutes.
- Spread the final layer of frosting evenly over the cake.
- Decorate as desired.
Nutritional Breakdown (per serving)
- Calories: 646 kcal
- Carbohydrates: 72g
- Protein: 9g
- Fat: 36g
- Saturated Fat: 19g
- Cholesterol: 161mg
- Sodium: 418mg
- Sugar: 51g
- Calcium: 108mg
- Iron: 1.7mg
This decadent Green Velvet Cheesecake Cake is a show-stopping treat, perfect for festive celebrations or when you simply crave a luxurious dessert.
FAQs: Everything You Need to Know
Can I Make This Cake Ahead of Time?
Yes! This cake is perfect for making in advance. Since the cheesecake needs time to set in the freezer, it’s actually recommended to prepare it a day before assembling. You can also bake the cake layers ahead of time and store them in an airtight container.
Do I Have to Use a Water Bath for the Cheesecake?
A water bath helps prevent cracks and ensures a smooth, creamy cheesecake. While you can bake the cheesecake without one, you may end up with a slightly cracked surface. If that happens, don’t worry—the frosting will cover any imperfections!
What’s the Best Way to Get Vibrant Green Color?
- Liquid food coloring: The most accessible option, but you’ll need a full 1-ounce bottle to achieve the right shade.
- Gel food coloring: A few drops are enough to get a bold green hue without affecting the batter’s consistency.
- Natural options: Spinach juice or matcha powder can work, but they may slightly alter the flavor.
Can I Use a Different Frosting?
Absolutely! While the marshmallow cream cheese frosting adds a unique sweetness, you can substitute it with:
- Classic cream cheese frosting for a tangier finish.
- White chocolate buttercream for a richer flavor.
- Whipped cream frosting for a lighter touch.
Can I Turn This Into Cupcakes?
Yes! If you love individual servings, you can make Green Velvet Cheesecake Cupcakes by baking mini cheesecakes separately and layering them with cupcakes.
How Do I Store This Cake?
- Refrigerator: Since it contains cheesecake, store the cake in an airtight container in the fridge for up to 5 days.
- Freezer: The cake freezes well! Wrap slices individually in plastic wrap and store them in a freezer-safe container for up to 3 months. Thaw in the fridge overnight before serving.
Can I Make This Without a Springform Pan?
A springform pan makes removing the cheesecake easier, but if you don’t have one, use a regular cake pan lined with parchment paper, leaving extra paper hanging over the sides. This way, you can carefully lift the cheesecake out once it’s frozen.
What Other Occasions Can I Make This Cake For?
- Christmas: Swap the green for red or keep it festive with holiday sprinkles.
- Halloween: Make a spooky green and black version with dark chocolate accents.
- Birthdays: A unique alternative to a traditional birthday cake.
Tips for the Best Green Velvet Cheesecake Cake
1. Chill the Cheesecake Completely
Freezing the cheesecake ensures it holds its shape when assembling the cake. If you try to stack it while it’s soft, it may break apart.
2. Trim the Cheesecake for a Perfect Fit
Sometimes, the cheesecake layer may be slightly larger than the cake layers. If that happens, simply trim the edges with a sharp knife before stacking.
3. Apply a Crumb Coat Before Frosting
A thin base layer of frosting helps trap any crumbs, making the final layer smooth and picture-perfect.
4. Let the Cake Rest Before Serving
Allowing the cake to sit at room temperature for 30 minutes before serving softens the cheesecake slightly, making it even creamier.
Why This Cake Is More Than Just Dessert
There’s something magical about a cake that brings people together. Maybe it’s the effort that goes into making it, or the excitement of slicing through those layers, but this cake isn’t just about taste—it’s about memories, celebrations, and the joy of sharing something special.
Advertisement
The first time I made this cake, I didn’t expect it to become a family tradition. But year after year, I find myself making it again, watching the smiles around the table as everyone takes a bite. It’s not just a dessert—it’s a reminder that food has the power to bring happiness, to turn an ordinary day into something unforgettable.
So whether you’re making this for St. Patrick’s Day, a birthday, or just because, know that you’re not just baking a cake. You’re creating a moment—a delicious, joy-filled moment that will be remembered long after the last slice is gone.
Now, grab your mixing bowl, turn on some Irish music, and let’s bake something beautiful.
The Emerald Delight Cheesecake Cake: A St. Patrick’s Day Showstopper
Ingredients
Method
- Preheat oven to 325°F (163°C). Line a 9-inch springform pan with parchment paper and lightly grease.
- Beat the cream cheese and sugar until smooth. Add eggs one at a time, mixing well. Stir in sour cream and vanilla extract.
- Pour the batter into the pan and bake for 40-45 minutes or until the center is set.
- Cool completely, then freeze for at least 4 hours (or overnight) for easy handling.
- Preheat oven to 350°F (177°C). Grease and flour two 9-inch cake pans.
- In a large bowl, whisk together flour, sugar, baking soda, salt, and cocoa powder.
- In another bowl, whisk oil, buttermilk, eggs, vanilla, and green food coloring.
- Mix the wet and dry ingredients until just combined. Stir in vinegar.
- Divide the batter evenly between the pans and bake for 30-35 minutes or until a toothpick inserted comes out clean.
- Cool completely before assembling.
- Beat the cream cheese and butter until smooth. Add marshmallow fluff and vanilla, mixing until combined.
- Gradually add powdered sugar, beating until fluffy.
- Place one green velvet cake layer on a serving plate.
- Remove the cheesecake from the freezer, trim edges if needed, and place it on top.
- Add the second cake layer on top.
- Frost the entire cake with marshmallow cream cheese frosting.
- Garnish with festive sprinkles, gold dust, or white chocolate shavings.
- Let the cake sit at room temperature for 30 minutes before slicing for the best texture.
Notes
- Make Ahead: Bake the cheesecake a day in advance for easy assembly.
- Storage: Keep refrigerated for up to 5 days or freeze individual slices for up to 3 months.
- Alternative Frosting: Swap marshmallow frosting for cream cheese or white chocolate buttercream.