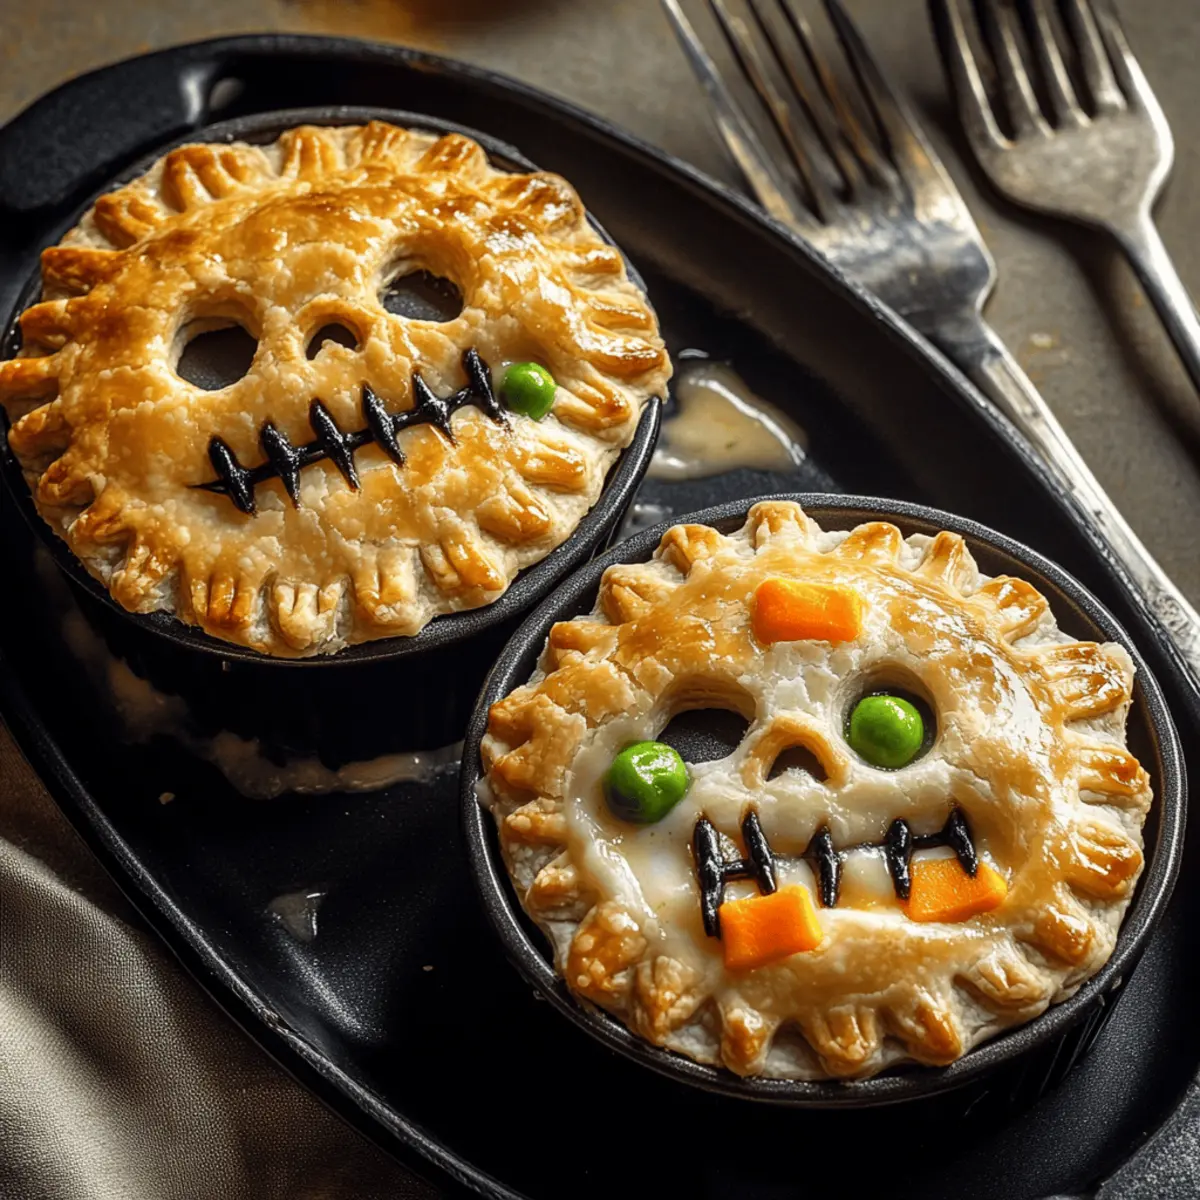
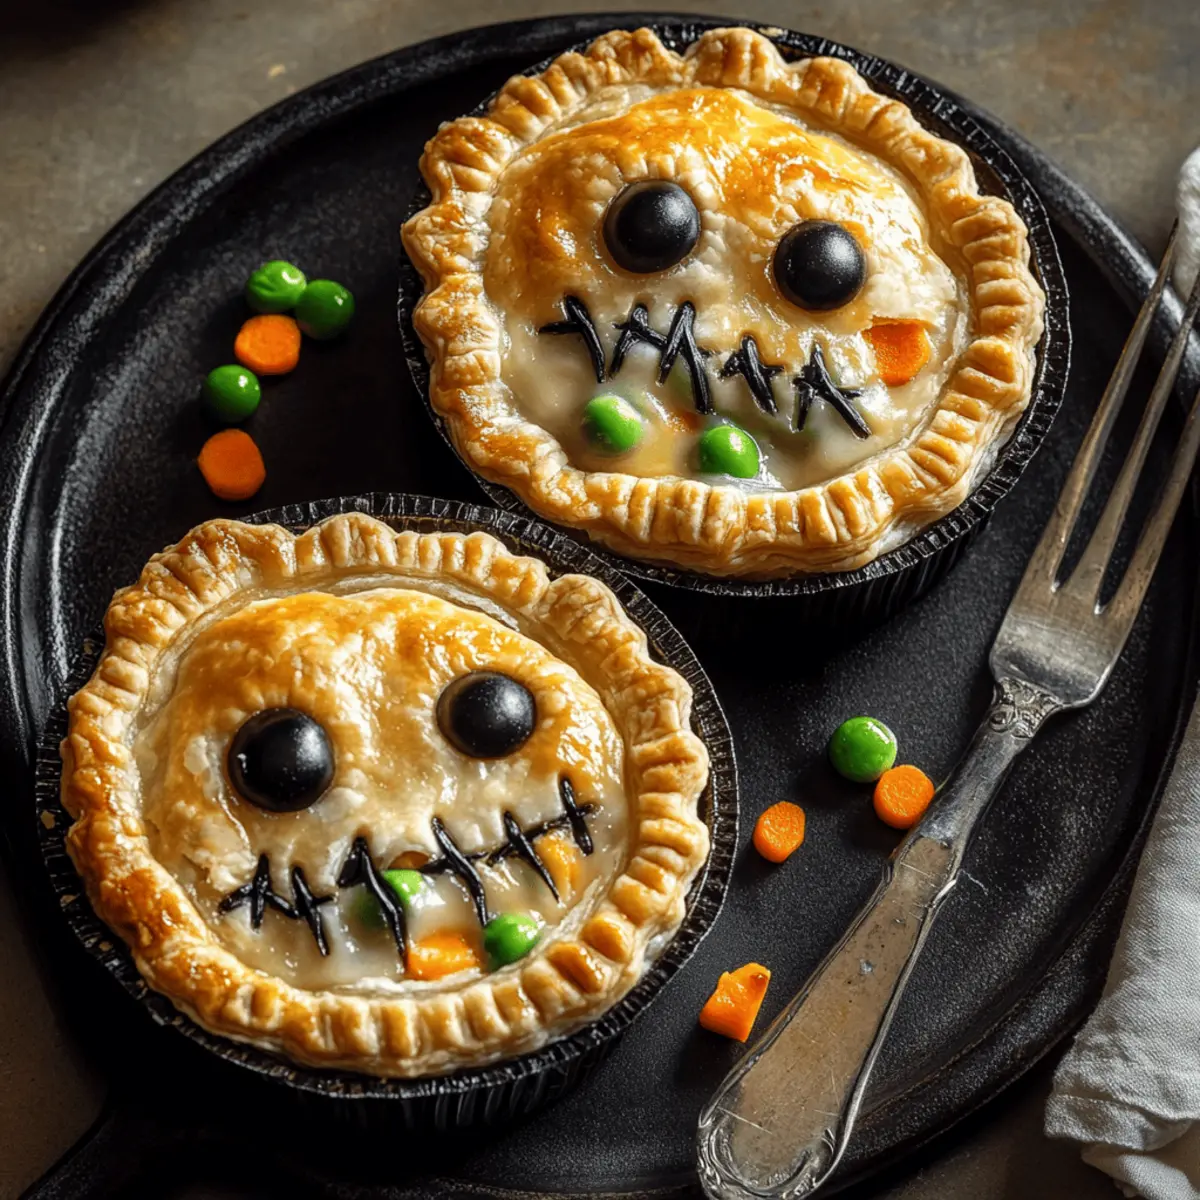
As the air turns crisp and the leaves swirl like ghosts at dusk, I find myself yearning for a meal that evokes both comfort and whimsy. Enter my Zombie Pot Pies, a spine-tingling twist on the classic that’s not only fun but also incredibly satisfying. Each pie features a creamy chicken filling nestled within flaky puff pastry, charmingly designed with eerie zombie faces that will delight kids and adults alike. Perfect for Halloween gatherings, these little wonders are quick to prepare and guaranteed to win over any crowd. So, why not add a touch of spookiness to your dinner table? Ready to uncover just how easy it is to whip up this festive feast?

Why Are Zombie Pot Pies So Irresistible?
Comfort and Creativity: Zombie Pot Pies transform a classic dish into a playful feast for the eyes and the stomach. Kid-Friendly Fun: Their spooky design is sure to captivate even the pickiest eaters, making dinner a thrilling experience. Quick and Easy: With convenient ingredients like rotisserie chicken and frozen veggies, you can whip these up in no time, making them a perfect weeknight meal. Deliciously Versatile: Feel free to swap out the filling with your favorite minced meat or additional veggies for a twist! Serve alongside a refreshing witches’ brew salad to enhance the festive spirit.
Zombie Pot Pie Ingredients
For the Filling
- Cooked, shredded chicken – Main protein for heartiness; substitute rotisserie chicken for convenience.
- Frozen peas and carrots – Adds color and sweetness; use mixed frozen vegetables if preferred.
- Corn (optional) – Enhances sweetness and texture; omit if unavailable or disliked.
- Butter – Base for the roux and adds richness; use margarine or oil as a substitute.
- Flour – Thickens the sauce; for gluten-free, substitute with cornstarch.
- Chicken broth – Provides flavor for the filling; vegetable broth works for a vegetarian version.
- Milk – Creates a creamy texture; substitute almond or oat milk for dairy-free options.
- Salt and pepper – Essential seasoning for taste; adjust according to preference.
- Garlic powder – Adds depth to flavor; fresh minced garlic can be used sparingly instead.
For the Crust
- Puff pastry – Forms the pie crust with its flaky texture; pie crust can be used, pre-baked first if preferred.
- Egg (for egg wash) – Gives a golden-brown finish; omit for vegan options and brush with milk instead.
These Zombie Pot Pie ingredients blend perfectly to create a meal that’s both spooky and satisfying for your Halloween festivities!
Step‑by‑Step Instructions for Zombie Pot Pies
Step 1: Preheat the Oven
Begin by preheating your oven to 400°F (200°C). This is crucial for achieving the perfect golden puff on your Zombie Pot Pies. While the oven warms up, gather your baking dish or ramekins where you’ll assemble the pies, ensuring they are ready for the delicious filling.
Step 2: Create the Roux
In a medium saucepan, melt 4 tablespoons of butter over medium heat until bubbly. Gradually whisk in 1/4 cup of flour, cooking for about 1 minute until it turns light golden. Slowly add 2 cups of chicken broth and 1 cup of milk to the mixture, stirring constantly. Continue cooking until the sauce thickens, approximately 3-5 minutes, then remove from heat.
Step 3: Combine the Filling
Add the shredded cooked chicken, 1 cup of frozen peas and carrots (and corn if desired) to your thickened roux. Sprinkle in salt, pepper, and 1 teaspoon of garlic powder to elevate the flavor. Stir everything together until well combined, ensuring each piece of chicken and vegetable is coated in the creamy goodness. Let this flavorful mixture cool slightly while you prepare the pastry.
Step 4: Prepare the Puff Pastry
On a lightly floured surface, roll out the puff pastry and use a sharp knife to cut out shapes that match your ramekins or baking dish. To create spooky zombie faces, carve eyes and mouth expressions into each piece. This step adds a fun touch to your Zombie Pot Pies and makes them more appealing for Halloween festivities.
Step 5: Assemble the Pies
Spoon the creamy filling into your prepared baking dish or ramekins, filling them just below the top. Carefully place the prepared puff pastry on top of the filling, sealing the edges with your fingers to prevent spills. Brush the edges with a beaten egg for that beautiful golden-brown finish.
Step 6: Bake to Perfection
Transfer your assembled Zombie Pot Pies to the preheated oven and bake for 20-25 minutes. Watch closely as they bake, looking for a puffed, golden exterior and bubbly filling peeking out. The enticing aroma will fill your kitchen, inviting everyone to gather around for your delicious Halloween treat!
Step 7: Rest Before Serving
Once the Zombie Pot Pies are beautifully baked, carefully remove them from the oven. Let them rest for 5-10 minutes to cool slightly; the filling will be extremely hot. This resting time ensures the pies hold their shape when served and allows flavors to meld beautifully before you dive into this fantastic, spooky meal!

Expert Tips for Zombie Pot Pies
Chill Your Pastry: Ensure the puff pastry is chilled before handling to maintain its flaky layers and achieve maximum puff.
Egg Wash Magic: Apply egg wash generously for a vibrant golden color; a milk wash will result in a paler texture on your Zombie Pot Pies.
Resting Time: Let the pies sit for 5-10 minutes after baking. This avoids scorching your mouth from the hot, creamy filling and helps them hold their shape.
Filling Consistency: If your filling seems too thick, add a splash more broth or milk before assembling—this ensures a delightful creamy texture in every bite.
Customize Creatively: Feel free to change up the fillings based on family preferences, while keeping the spooky design for Halloween fun!
Zombie Pot Pies: Customize with Flair
Feel free to explore your creativity and make these Zombie Pot Pies uniquely yours with some fun twists!
-
Protein Swap: Substitute chicken with turkey or ground beef for a different flavor experience. This allows you to use what you have on hand while keeping it delicious!
-
Veggie Boost: Add mushrooms, spinach, or bell peppers to the filling for added nutrition and flavor. These additions can elevate the pie and make it even more colorful.
-
Gluten-Free Option: For a gluten-free take, replace flour with cornstarch in the roux. This change keeps the creamy texture intact without gluten.
-
Dairy-Free: Use almond or oat milk instead of regular milk for a creamy filling that’s perfect for lactose-intolerant guests. They’ll appreciate the thoughtfulness!
-
Spicy Kick: Add a dash of hot sauce or cayenne pepper for those who crave a bit of heat! It transforms the dish, making it an intriguing meal for spice lovers.
-
Seasoned Bliss: Experiment with herbs like thyme or rosemary in the filling for a fragrant twist. Their aromatic profiles will enhance the overall taste of your pot pies.
-
Thematic Decor: Try different designs for the pastry, like skeletons or ghosts, to match other festive occasions beyond Halloween. It’s a simple way to keep the spirit alive all year round!
And don’t forget, if you want to complement your Zombie Pot Pies, consider pairing them with a refreshing witches’ brew salad or a side of Spicy Chipotle Ranch for added adventure on your plate!
Make Ahead Options
Zombie Pot Pies are a fantastic choice for meal prep, saving you time on busy weeknights! You can prepare the creamy filling up to 3 days in advance. Simply make the roux, combine with the cooked chicken and veggies, cool it, and store it in an airtight container in the refrigerator. To maintain quality and prevent sogginess in the crust, keep the puff pastry separate until you’re ready to assemble. When you’re set to enjoy your Zombie Pot Pies, fill your ramekins with the chilled filling, top with the pastry, brush with an egg wash, and bake as per the original instructions—resulting in deliciously spooky pies that are just as delightful as if made fresh!
How to Store and Freeze Zombie Pot Pies
Fridge: Store leftover Zombie Pot Pies in an airtight container for up to 3 days. Refrigerate completely cooled pies to maintain freshness and flavor.
Freezer: Freeze unbaked pot pies for up to 2 months. Wrap tightly in plastic wrap and foil to prevent freezer burn, then bake from frozen, adding extra time.
Reheating: Reheat baked Zombie Pot Pies in the oven at 350°F (175°C) for 15-20 minutes. Use a covering of foil to keep the crust from browning too quickly.
Make-Ahead Tip: Prepare the creamy filling 2 days in advance and store in the fridge. Assemble the pies just before baking for the best texture and taste.
What to Serve with Zombie Pot Pies
As the wonderful aroma of baked Zombie Pot Pies wafts through your kitchen, it’s tempting to envision an entire feast perfectly paired with these creepy comfort treats.
-
Witches’ Brew Salad: A refreshing blend of mixed greens, pomegranate seeds, and sliced almonds drizzled with a zesty vinaigrette provides a crisp counterbalance to the creamy pies.
-
Garlic Breadsticks: Soft, warm breadsticks with a hint of garlic are perfect for dipping into the pot pie filling, adding a delightful crunch to the meal.
-
Spooky Mashed Potatoes: Creamy, buttery mashed potatoes sprinkled with green onions echo the flavors of your Zombie Pot Pies while adding a comforting sidekick.
-
Pumpkin Soup: This velvety soup’s warm spices complement the savory filling, creating a seasonal harmony ideal for your Halloween table.
-
Roasted Veggies: A medley of carrots, cauliflower, and Brussels sprouts brings out the rich flavors of the pies while adding a touch of color and nutrition.
-
Apple Cider: Serve chilled or warmed, apple cider adds a festive flair. Its sweet and slightly tart notes create a wonderful contrast to the richness of the pot pies.
-
Chocolate Spider Cupcakes: Finish your meal with a spooky dessert. Moist chocolate cupcakes topped with playful spider decorations provide a fun and sweet ending to your Halloween dinner.
Zombie Pot Pies Recipe FAQs
How do I choose the best chicken for my Zombie Pot Pies?
Look for cooked, shredded chicken that’s juicy and tender. If using rotisserie chicken, select one that is freshly made, ensuring it’s still warm and flavorful. Avoid chicken with any dark spots or unpleasant odors, as they may indicate spoilage.
Advertisement
What’s the best way to store leftover Zombie Pot Pies?
Store your leftover Zombie Pot Pies in an airtight container in the fridge for up to 3 days. Make sure they’ve cooled completely before sealing them; this helps maintain their crispiness. If you’re planning to make them ahead, refrigerate the filling separately from the assembled pies to retain texture.
Can I freeze Zombie Pot Pies?
Absolutely! You can freeze unbaked Zombie Pot Pies for up to 2 months. To do this, wrap each pie tightly in plastic wrap and then in foil to prevent freezer burn. When you’re ready to enjoy them, bake directly from frozen, adding about 10-15 extra minutes to the baking time to ensure they’re heated through.
What should I do if my filling seems too thick?
If the filling appears too thick while mixing it with the roux, simply add a splash of chicken broth or milk to achieve your desired creaminess. This adjustment will ensure every bite of your Zombie Pot Pies remains delightfully creamy and satisfying.
Are there any dietary considerations I should keep in mind?
Yes! If you’re preparing these for someone with allergies or dietary restrictions, you can easily adapt the ingredients. For a gluten-free version, substitute flour with cornstarch when making the roux. Also, use dairy-free milk for lactose intolerance. Be sure to check all packaging for allergens as well!
Can my pets enjoy Zombie Pot Pies?
It’s best to keep these Zombie Pot Pies away from pets! Ingredients like garlic, onions, and certain seasoning can be harmful to pets. However, leftover plain shredded chicken or veggies can be shared in moderation as a treat—just consult your vet if you’re uncertain.
Zombie Pot Pies: Creepy Comfort Food for Halloween Fun
Ingredients
Equipment
Method
- Preheat your oven to 400°F (200°C).
- Melt butter in a medium saucepan over medium heat until bubbly, then whisk in flour.
- Slowly add chicken broth and milk, stirring constantly until the sauce thickens.
- Combine shredded chicken, frozen peas and carrots, corn, salt, pepper, and garlic powder in the roux.
- Roll out the puff pastry and cut shapes for the ramekins, carving spooky faces.
- Spoon filling into baking dish or ramekins, place pastry on top, sealing edges, and brush with egg wash.
- Bake for 20-25 minutes or until golden brown and bubbly.
- Let cool for 5-10 minutes before serving.