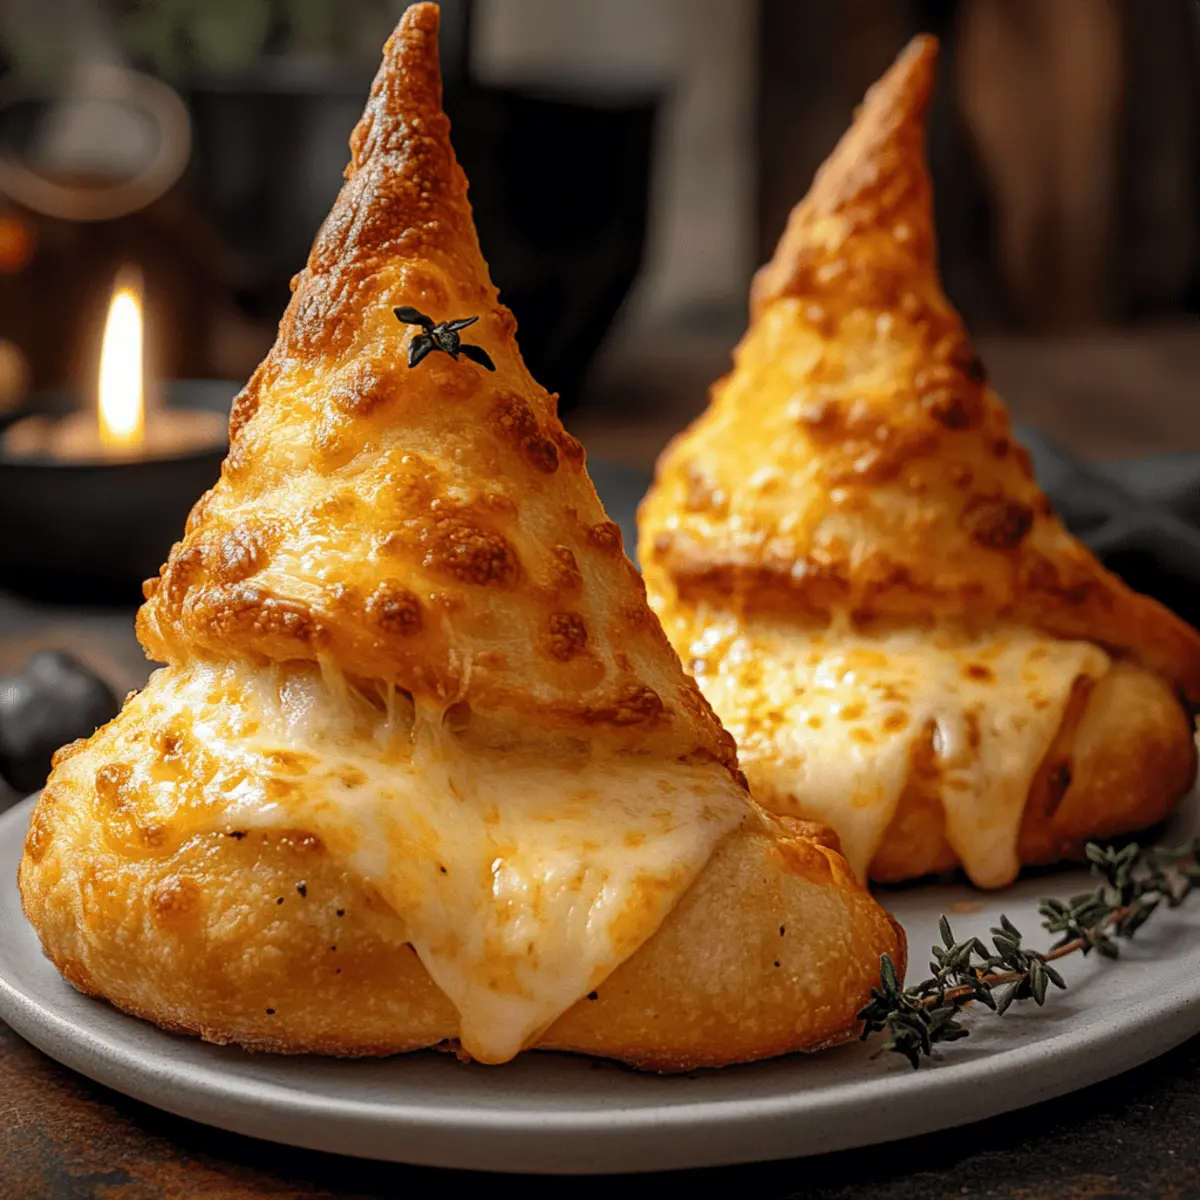
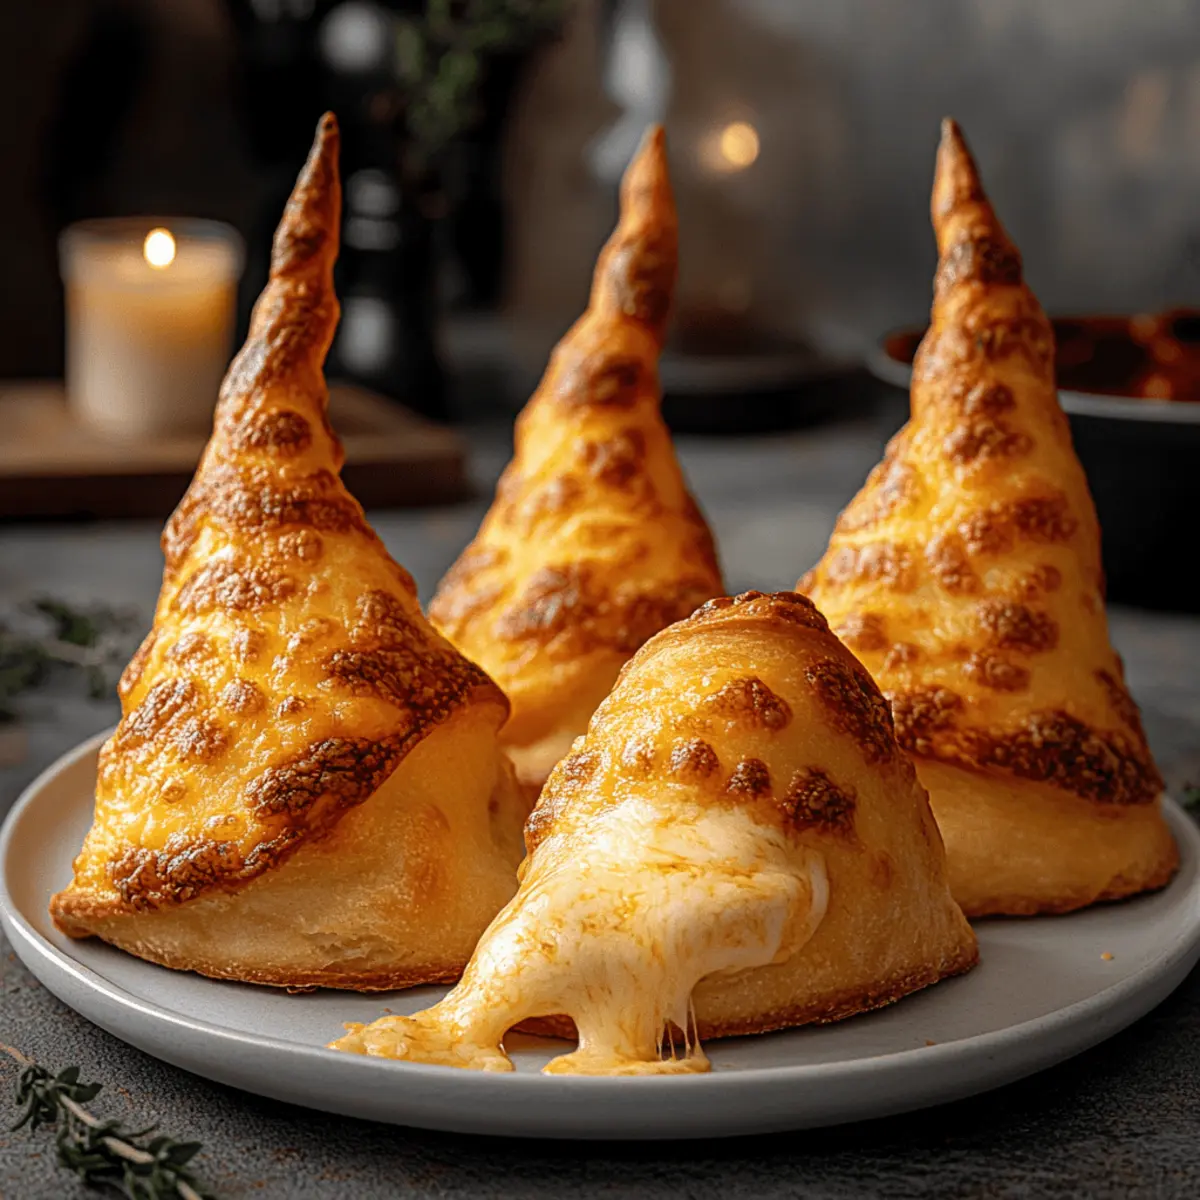
As the chill of fall wraps around us, nothing feels cozier than the scent of freshly baked dough wafting through the kitchen. Enter the Halloween Witches’ Hat Cheesy Bread—a whimsical treat that’s not only a delightful sight but also a warm hug for the taste buds. With its crispy exterior and ooey-gooey cheese center, this festive appetizer is a total crowd-pleaser, perfect for both kids and the young at heart. Plus, it comes together effortlessly with just a handful of ingredients, making it an easy addition to your spooky celebrations. What fun twist will you choose for your own Witches’ Hat creation?
Why is This Cheesy Bread a Must-Try?
Easy to make: With just a few ingredients and simple steps, this dish comes together in no time, making it perfect for busy Halloween preparations.
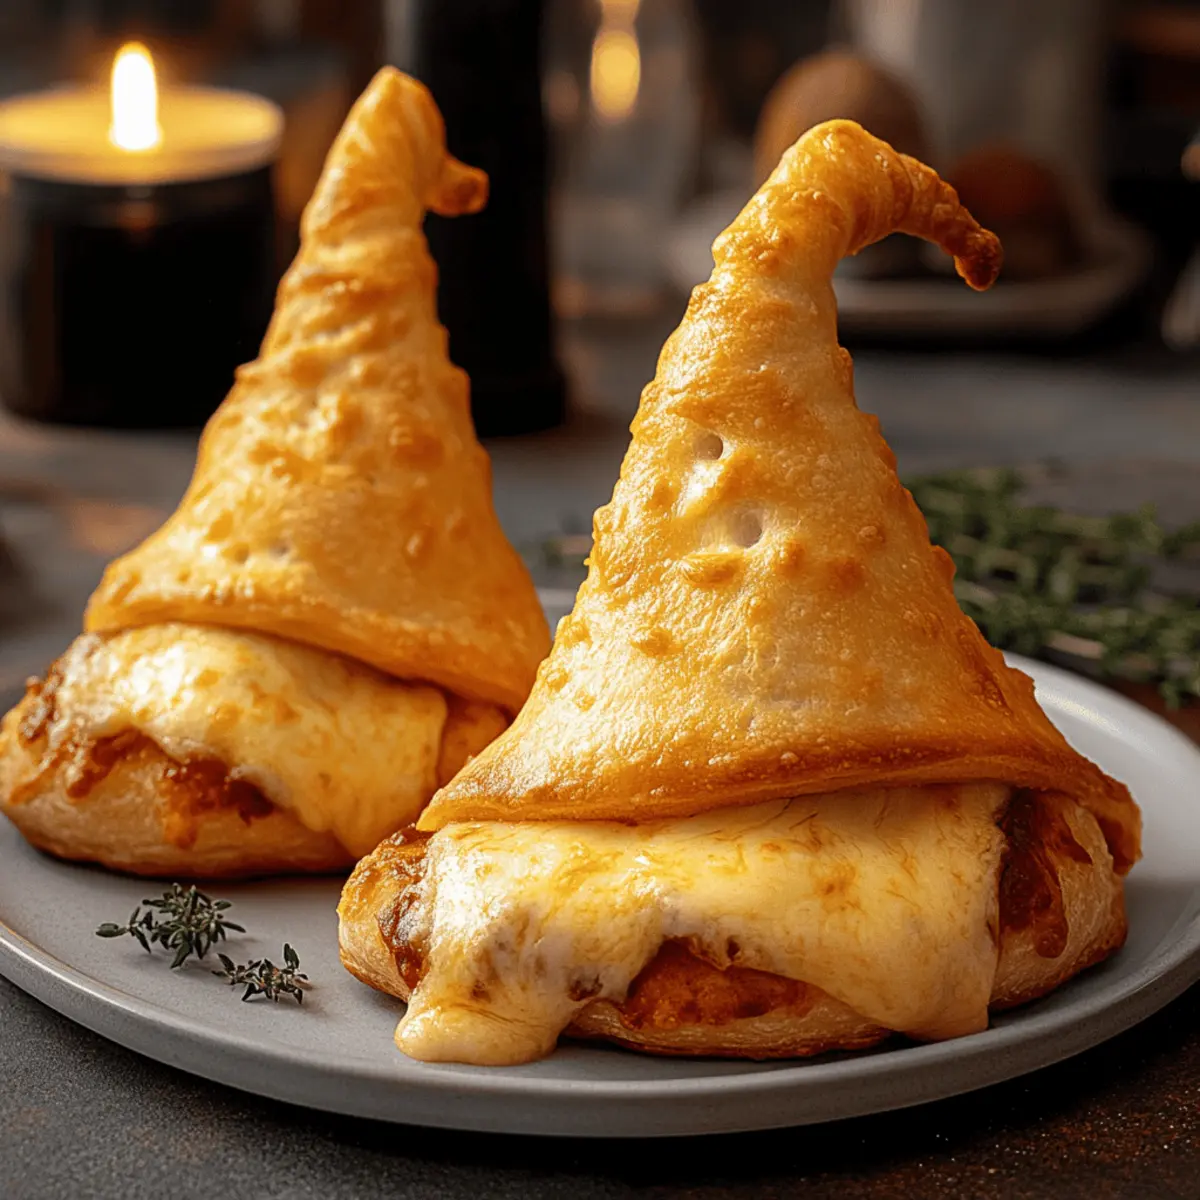
Fun presentation: Shaped like festive witches’ hats, this cheesy bread adds a playful touch to your Halloween spread that everyone will adore.
Crowd-pleaser: Whether kids or adults, everyone loves gooey cheese, and these delightful bites offer a burst of flavor that keeps guests coming back for more!
Versatile flavors: Customize with your favorite ingredients—swap mozzarella for pepper jack or add some crumbled bacon for an extra kick!
Perfect pairing: These cheesy hats are great alone but can also be served warm with marinara dip or a garlic herb sauce for added fun.
For more cheesy goodness, check out our delicious Cheesy Chicken Stuffed potatoes or indulge in a Cheesy Scalloped Potatoes recipe!
Witches’ Hat Cheesy Bread Ingredients
For the Bread
• Crescent roll dough – The flaky base for these adorable hats; pizza dough can be used for a heartier bite.
• Shredded mozzarella – The star of the cheesy filling; switch it with cheddar for a different flavor profile.
• Grated Parmesan – Adds an extra layer of richness; feel free to skip this if you’re looking for a lighter option.
For the Topping
• Melted butter – This gives the hats a delightful golden hue; consider using olive oil for a lighter brushing.
• Garlic powder – A dash of flavor that enhances the cheese; fresh minced garlic works wonders, too!
• Italian seasoning – Adds a savory herb taste; try oregano or your favorite herbs if desired.
• Salt & pepper – Essential seasonings that elevate the flavors; adjust to your personal preference.
Remember, these ingredients come together beautifully to create your very own Witches’ Hat Cheesy Bread, perfect for spooktacular festivities!
Step‑by‑Step Instructions for Witches’ Hat Cheesy Bread
Step 1: Preheat and Prepare
Begin by preheating your oven to 375°F (190°C). As it heats, prepare a baking sheet by lining it with parchment paper or giving it a light grease to prevent sticking. This step ensures that your Witches’ Hat Cheesy Bread will bake evenly and come out easily once they’re beautifully golden.
Step 2: Prepare the Dough
If using crescent roll dough, unroll it on a clean surface and separate into triangles along the perforations. For pizza dough, roll it out thinly and then cut it into triangle shapes. Aim for uniform triangles for consistent baking, ensuring each shape is ready to be transformed into a delicious cheesy hat.
Step 3: Add the Cheesy Filling
At the wide end of each triangle, place a small scoop of shredded mozzarella and, if desired, a sprinkle of grated Parmesan for added richness. Be careful not to overfill to avoid any messy overflow while baking. This cheesy filling will become the delightful heart of your Witches’ Hat Cheesy Bread.
Step 4: Form the Hats
Fold the dough slightly over the cheese, then roll the triangle from the wide base up to the tip to create a conical shape resembling a witch’s hat. Pinch the tip to secure it, and flatten the base slightly to form a brim. This will give your hats a charming and festive look, making them perfect for Halloween.
Step 5: Brush and Season
Brush the tops of your shaped hats generously with melted butter, ensuring each one gets a nice coating for a golden finish. Sprinkle garlic powder, Italian seasoning, salt, and pepper over the tops for extra flavor enhancement. These seasonings will elevate the cheesy goodness in your Witches’ Hat Cheesy Bread.
Step 6: Bake to Perfection
Arrange the shaped hats on the prepared baking sheet, ensuring they are spaced apart for even heating. Place them in the preheated oven and bake for 12–15 minutes, or until they turn golden brown and the cheese inside is wonderfully melted. Keep an eye on them to ensure they don’t overbake!
Step 7: Cool and Serve
After baking, remove the Witches’ Hat Cheesy Bread from the oven and let them cool for a few minutes on the baking sheet. This waiting period will help the cheese set slightly, making them easier to handle. Once cooled, serve them warm, perhaps alongside a delicious dip for an extra treat!
What to Serve with Halloween Witches’ Hat Cheesy Bread
Elevate your Halloween festivities by pairing these whimsical cheesy delights with a selection of tasty companions that will enchant your guests.
- Marinara Dip: This classic tomato-based sauce adds a vibrant touch and balances the richness of the melted cheese beautifully.
- Garlic Herb Sauce: A creamy dip with aromatic garlic and herbs enhances the flavors of the cheesy bread, making every bite irresistible.
- Crispy Apple Slices: The crunch of fresh apples brings a sweet contrast that complements the savory cheesy hats perfectly—add a sprinkle of cinnamon for extra warmth.
- Roasted Pumpkin Soup: Cozy up with a warm bowl of soup; its spicy notes harmonize with the cheesy bread, offering a heartwarming experience.
- Green Salad: A light salad with crisp greens, cherry tomatoes, and a tangy vinaigrette introduces fresh elements, balancing the richness of your cheesy treat.
- Sparkling Apple Cider: Delightful and gently sweet, this non-alcoholic beverage adds a festive flair while cleansing the palate between cheesy bites.
- Chocolate-Covered Pretzels: A sweet-salty option that pairs well for dessert, creating a wonderful contrast to your savory cheesy bread.
Make Ahead Options
These Witches’ Hat Cheesy Bread are perfect for meal prep enthusiasts! You can shape the dough into hats and refrigerate them for up to 24 hours before baking. Just prepare the dough, fill with cheese, and form the hats as directed, then place them on a baking sheet lined with parchment paper. Cover with plastic wrap to prevent drying out, maintaining that delightful texture. When you’re ready to serve, simply pop them in a preheated oven at 375°F (190°C) for 12-15 minutes, and they’ll come out just as gooey and delicious as if you had made them freshly. This prep-ahead method not only saves time but also ensures a fun and festive bite at your Halloween gathering!
Storage Tips for Witches’ Hat Cheesy Bread
Room Temperature: Store leftover Witches’ Hat Cheesy Bread at room temperature for up to 2 days in an airtight container to maintain freshness.
Fridge: For longer storage, keep the cheesy bread in the fridge for up to 5 days. Ensure it’s well-wrapped to prevent drying out.
Freezer: Freeze uncooked shaped hats for up to 2 months. Simply place them on a baking sheet to freeze first, then transfer to a freezer bag for easy baking later.
Reheating: To reheat, warm in a preheated oven at 350°F (175°C) for 10–15 minutes until heated through and crisp, preserving that delightful texture.
Expert Tips for Witches’ Hat Cheesy Bread
• Dough Thickness: Make sure the dough is rolled thin enough for a crispy texture, ensuring a delightful bite that complements the cheesy filling.
• Avoid Overfilling: Don’t pile too much cheese into each hat, as it may ooze out while baking. A moderate amount will keep your Witches’ Hat Cheesy Bread neatly filled.
• Chill for Shape: If you find the hats difficult to form, chill the shaped dough in the fridge for 10 minutes. This helps hold their shape while baking for a well-defined look.
• Watch Baking Time: Keep an eye on your cheesy bread as it bakes; ovens can vary. Look for a golden-brown exterior and bubbling cheese to gauge doneness.
• Flavor Variations: Experiment with fillings! Add cooked bacon, jalapeños, or different cheeses for your unique twist on the classic Witches’ Hat Cheesy Bread.
Witches’ Hat Cheesy Bread Variations
Feel free to unleash your culinary creativity and customize this delightful cheesy bread to suit your taste!
- Spicy Kick: Swap mozzarella with pepper jack cheese to add a spicy zing to your cheesy treats. Your taste buds will thank you!
- Bacon Bliss: Mix in cooked, crumbled bacon or diced jalapeños for that extra burst of flavor everyone loves. The combination of cheesy and savory creates a satisfying bite.
- Herb Infusion: Replace Italian seasoning with fresh rosemary or thyme for a delightful earthy twist that complements the cheesy goodness. Each bite will bring a touch of gourmet flair.
- Dairy-Free Option: Use dairy-free cheese alternatives to make these hats suitable for those who are lactose intolerant or vegan. Enjoy the same gooey texture with a compassionate twist.
- Sweet Surprise: For a unique dessert version, try filling the hats with chocolate chips and a sprinkle of cinnamon, creating a sweet treat that kids will adore!
- Mild Variation: Use mild cheddar instead of mozzarella for a different yet familiar cheesy flavor. It gives a comforting feeling, perfect for family gatherings.
- Taco Twist: Incorporate taco seasoning into the cheese mixture and serve with salsa for a fun Tex-Mex spin on your Halloween appetizer. These will fly off the platter!
With so many flavorful variations, your Witches’ Hat Cheesy Bread is sure to be the highlight of any Halloween gathering. And if you’re looking for more cheesy recipes to impress your guests, why not check out our delicious Cheesy Chicken Avocado Melt Sandwich or indulge in some Loaded Philly Cheesesteak pasta? There’s a world of cheesy goodness waiting for you!
Advertisement
Witches’ Hat Cheesy Bread Recipe FAQs
How do I choose the right ingredients for this recipe?
Absolutely! When selecting your crescent roll dough or pizza dough, look for fresh options without any dark spots or tears in the packaging. For cheese, fresh and high-quality mozzarella will yield the best melting results. If you’re using Parmesan, opt for freshly grated for a richer flavor. Always use your favorite ingredients to make the recipe your own!
What’s the best way to store leftover cheesy bread?
Very good question! Store leftover Witches’ Hat Cheesy Bread at room temperature for up to 2 days in an airtight container. If you want to keep them longer, pop them in the fridge where they can last for up to 5 days. Just make sure they’re tightly wrapped to maintain freshness; nobody likes dry bread!
Can I freeze the Witches’ Hat Cheesy Bread?
Absolutely! To freeze uncooked hats, prepare them according to the recipe, but don’t bake. Instead, arrange them on a baking sheet and freeze for about 1-2 hours. Once they’re firm, transfer them to a freezer bag. They can be stored for up to 2 months. When you’re ready to bake, there’s no need to thaw—simply bake straight from the freezer, adding a couple of extra minutes to the baking time.
What if my dough doesn’t hold its shape when baking?
No worries at all! If your dough is tricky to shape, try chilling the formed hats in the fridge for about 10 minutes before baking. This helps solidify the dough, allowing the shapes to remain intact and give that lovely witch’s hat appearance. Also, make sure you’re not overfilling with cheese, which can cause them to lose structure while baking.
Are there any dietary considerations for this recipe?
Very much so! If you’re cooking for someone with dairy allergies, feel free to swap the cheese with a dairy-free alternative that melts well. Additionally, for gluten-free guests, you can search for gluten-free crescent or pizza dough options. Just be sure to check labels for any other potential allergens, and you’ll have a spooktacular treat for everyone to enjoy!

Witches’ Hat Cheesy Bread: A Spooktacular Delight for Halloween
Ingredients
Equipment
Method
- Preheat your oven to 375°F (190°C) and prepare a baking sheet by lining it with parchment paper.
- Unroll the crescent roll dough on a clean surface and separate into triangles or roll out pizza dough and cut into triangles.
- Place a small scoop of shredded mozzarella at the wide end of each triangle and sprinkle with grated Parmesan if desired.
- Fold the dough slightly over the cheese and roll from the wide base up to the tip to create a conical shape, pinching the tip to secure it.
- Brush the tops with melted butter and sprinkle with garlic powder, Italian seasoning, salt, and pepper.
- Arrange on the prepared baking sheet and bake for 12-15 minutes or until golden brown and the cheese is melted.
- Allow to cool for a few minutes before serving warm, possibly with a delicious dip.


