Introduction to Sushi Wonton Cones
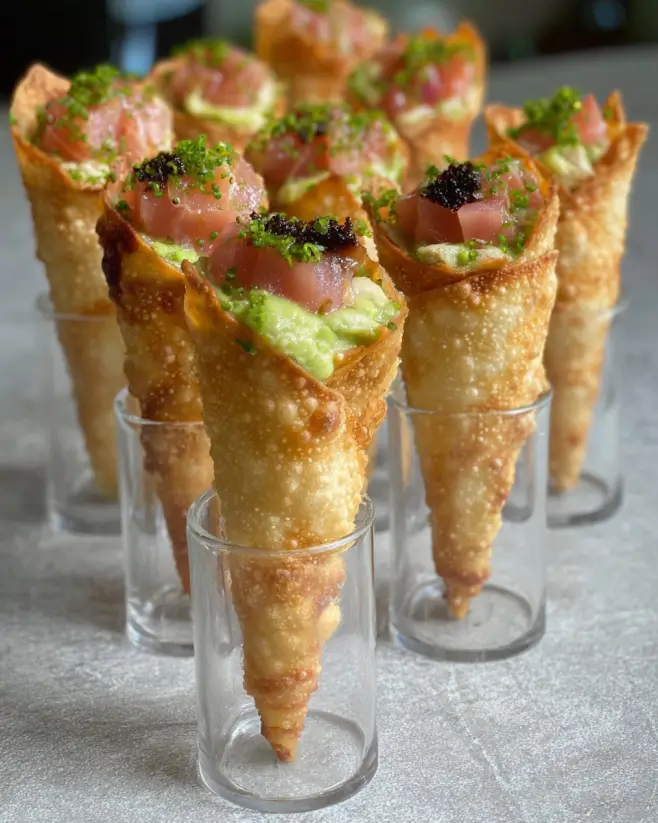
There’s something magical about combining two beloved cuisines into one delightful dish. Sushi Wonton Cones are just that—a fun twist on traditional sushi that’s perfect for any occasion. Whether you’re hosting a game night or simply looking for a quick solution for a busy day, these cones are sure to impress. They’re easy to make, bursting with flavor, and visually stunning. Plus, they offer a hands-on experience that’s perfect for sharing with friends or family. Let’s dive into this delicious fusion that will elevate your appetizer game!
Why You’ll Love This Sushi Wonton Cones
These Sushi Wonton Cones are a game-changer for anyone who loves sushi but craves something different. They’re quick to whip up, making them perfect for busy weeknights or last-minute gatherings. The crispy wonton wrappers provide a delightful crunch, while the fresh fillings burst with flavor. Plus, they’re customizable, so you can cater to everyone’s tastes. Trust me, once you try these, they’ll become a go-to appetizer!
Ingredients for Sushi Wonton Cones
Gathering the right ingredients is key to making these delightful Sushi Wonton Cones. Here’s what you’ll need:
- Sushi rice: This short-grain rice is sticky and perfect for holding everything together.
- Water: Essential for cooking the rice to the right texture.
- Rice vinegar: Adds a tangy flavor that complements the sushi rice beautifully.
- Sugar: Just a touch to balance the acidity of the vinegar.
- Salt: Enhances the overall flavor of the rice.
- Wonton wrappers: These crispy shells are the star of the show, providing a crunchy base.
- Avocado: Creamy and rich, it adds a luxurious texture to each cone.
- Cucumber: Fresh and crunchy, it brings a refreshing bite.
- Cooked shrimp: A classic sushi ingredient, it adds protein and flavor. You can use pre-cooked shrimp for convenience.
- Mayonnaise: Creamy and rich, it binds the shrimp mixture together.
- Sriracha (optional): For those who like a kick, this adds a spicy twist.
- Soy sauce: A must-have for dipping, enhancing the umami flavor.
- Sesame seeds: These tiny seeds add a nutty crunch and visual appeal.
- Chopped green onions: Fresh and vibrant, they provide a pop of color and flavor.
For those looking to mix things up, feel free to experiment with different fillings or sauces. You can find the exact quantities for each ingredient at the bottom of the article, ready for printing!
How to Make Sushi Wonton Cones
Creating these Sushi Wonton Cones is a straightforward process that will have you feeling like a culinary pro in no time. Follow these simple steps, and you’ll be on your way to serving up a delicious appetizer that’s sure to impress.
Step 1: Prepare the Sushi Rice
Start by rinsing the sushi rice under cold water. This removes excess starch and helps achieve that perfect sticky texture. Once the water runs clear, combine the rice and water in a medium saucepan. Bring it to a boil, then reduce the heat to low. Cover and let it simmer for 18-20 minutes. When the rice is tender and the water is absorbed, remove it from heat and let it sit, covered, for 10 minutes. This resting period is crucial for fluffy rice.
Step 2: Season the Rice
While the rice cools, mix rice vinegar, sugar, and salt in a small bowl until dissolved. This mixture adds a tangy flavor that’s essential for sushi. Once the rice has cooled to room temperature, gently fold in the vinegar mixture. Be careful not to mash the rice; you want to keep those grains intact. This step is what transforms plain rice into sushi rice!
Step 3: Bake the Wonton Cones
Preheat your oven to 375°F. Lightly spray a muffin tin with cooking spray to prevent sticking. Take a wonton wrapper and gently press it into the muffin tin to form a cone shape. Repeat this with the remaining wrappers. Bake for 8-10 minutes or until they turn golden and crispy. Let them cool before filling. The crispy texture is what makes these cones so delightful!
Step 4: Make the Shrimp Mixture
In a medium bowl, combine the chopped shrimp, mayonnaise, and sriracha if you’re feeling adventurous. Mix well until everything is evenly coated. This creamy shrimp mixture is the heart of your cones, adding flavor and richness. If you’re using pre-cooked shrimp, this step is a breeze!
Step 5: Assemble the Cones
Now comes the fun part! Take each cooled wonton cone and fill it with a spoonful of sushi rice. Next, add a layer of the shrimp mixture, followed by avocado slices and julienned cucumber. Don’t be shy—pack them in! Finally, garnish with sesame seeds and chopped green onions for that extra flair. Serve with soy sauce on the side for dipping, and watch your guests dive in!

Tips for Success
- Make sure to rinse the sushi rice thoroughly for the best texture.
- Don’t skip the resting time for the rice; it’s key for fluffiness.
- Keep an eye on the wonton cones while baking to avoid burning.
- Feel free to customize the fillings based on your preferences.
- Serve immediately for the best crunch; they can get soggy if left too long.
Equipment Needed
- Medium saucepan: For cooking the sushi rice. A pot with a lid works too.
- Muffin tin: Essential for shaping the wonton cones. A mini muffin tin can also be used.
- Mixing bowls: For combining ingredients. Any size will do.
- Cooking spray: To prevent sticking. Olive oil or butter can be a substitute.
Variations
- Vegetarian Option: Swap out the shrimp for diced tofu or a medley of colorful vegetables like bell peppers, carrots, and radishes.
- Spicy Tuna Cones: Use spicy tuna instead of shrimp for a classic sushi flavor with a kick. Just mix diced raw tuna with mayo and sriracha.
- California Roll Style: Fill the cones with imitation crab, avocado, and cucumber for a familiar taste that everyone loves.
- Quinoa Base: For a healthier twist, replace sushi rice with cooked quinoa, adding a nutty flavor and extra protein.
- Different Sauces: Experiment with teriyaki sauce, spicy mayo, or even a drizzle of sesame oil for added depth of flavor.
Serving Suggestions
- Pair your Sushi Wonton Cones with a refreshing cucumber salad for a light side.
- Serve with chilled sake or a crisp white wine to complement the flavors.
- For a vibrant presentation, arrange the cones on a wooden platter with colorful garnishes.
- Include a variety of dipping sauces like soy sauce, wasabi, or ponzu for added excitement.
FAQs about Sushi Wonton Cones
Curious about making these delightful Sushi Wonton Cones? Here are some common questions that might pop up as you prepare this fun appetizer.
Can I make Sushi Wonton Cones ahead of time?
Absolutely! You can prepare the sushi rice and shrimp mixture in advance. Just assemble the cones right before serving to keep the wonton wrappers crispy.
What can I substitute for shrimp in the recipe?
If shrimp isn’t your thing, try diced tofu or a mix of your favorite veggies. Bell peppers and carrots work wonderfully for a vegetarian option!
How do I store leftover Sushi Wonton Cones?
Store any leftovers in an airtight container in the fridge. However, the wonton wrappers may lose their crunch, so it’s best to enjoy them fresh!
Can I use different sauces for dipping?
Definitely! While soy sauce is a classic choice, feel free to experiment with teriyaki sauce, spicy mayo, or even a tangy ponzu sauce for a unique twist.
Advertisement
Are Sushi Wonton Cones gluten-free?
Yes, as long as you use gluten-free soy sauce, these cones are a great gluten-free appetizer option. Enjoy without worry!
Final Thoughts
Creating Sushi Wonton Cones is more than just cooking; it’s about bringing people together. The joy of assembling these delightful cones with friends or family makes for a memorable experience. Each bite is a burst of flavor, combining the crunch of the wonton with the freshness of the fillings. Whether you’re serving them at a party or enjoying them on a quiet night in, these cones are sure to impress. Plus, the versatility of the ingredients means you can tailor them to suit any palate. Dive into this culinary adventure and savor the smiles they bring!
Sushi Wonton Cones: Easy Recipe You Can’t Resist!
Ingredients
Method
- Rinse the sushi rice under cold water until the water runs clear. Combine the rice and water in a medium saucepan and bring to a boil. Reduce heat to low, cover, and simmer for 18-20 minutes, or until the rice is tender and the water is absorbed. Remove from heat and let it sit, covered, for 10 minutes.
- In a small bowl, mix the rice vinegar, sugar, and salt until dissolved. Gently fold this mixture into the cooked rice, then let it cool to room temperature.
- Preheat the oven to 375°F. Lightly spray a muffin tin with cooking spray.
- Take a wonton wrapper and gently press it into the muffin tin to form a cone shape. Repeat with the remaining wrappers. Bake for 8-10 minutes or until golden and crispy. Allow to cool.
- In a medium bowl, combine the chopped shrimp, mayonnaise, and sriracha (if using). Mix well.
- To assemble the cones, fill each wonton cone with a spoonful of sushi rice, followed by a layer of the shrimp mixture, avocado slices, and cucumber.
- Garnish with sesame seeds and chopped green onions. Serve with soy sauce on the side for dipping.
Nutrition
Notes
- For a vegetarian option, substitute the shrimp with diced tofu or additional vegetables like bell peppers and carrots.
- Experiment with different sauces, such as teriyaki or spicy mayo, to customize the flavor of your cones.


