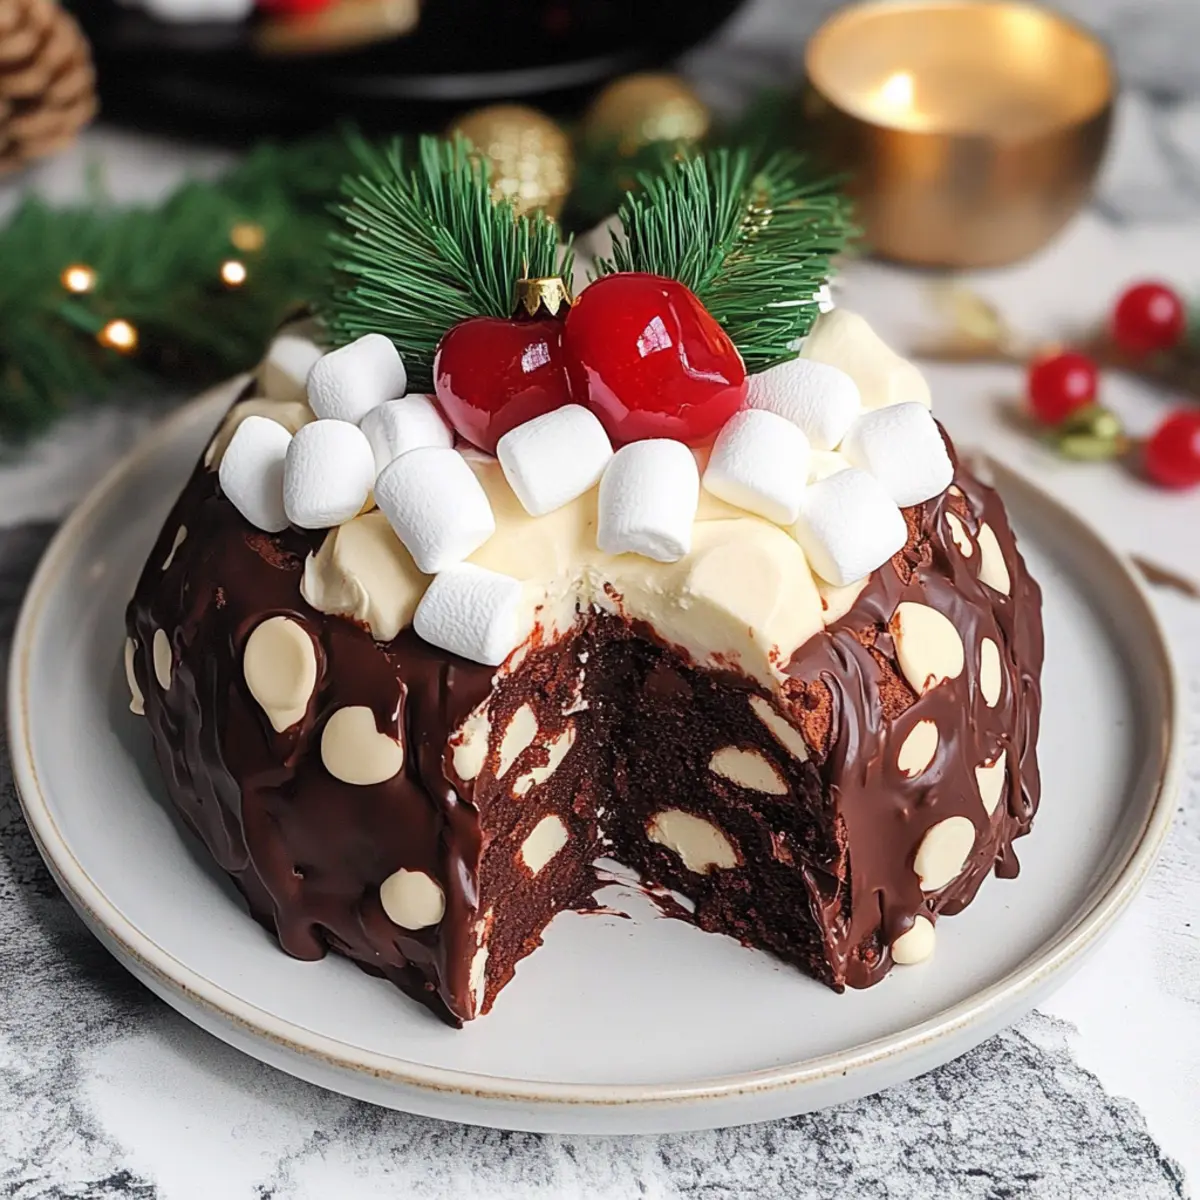
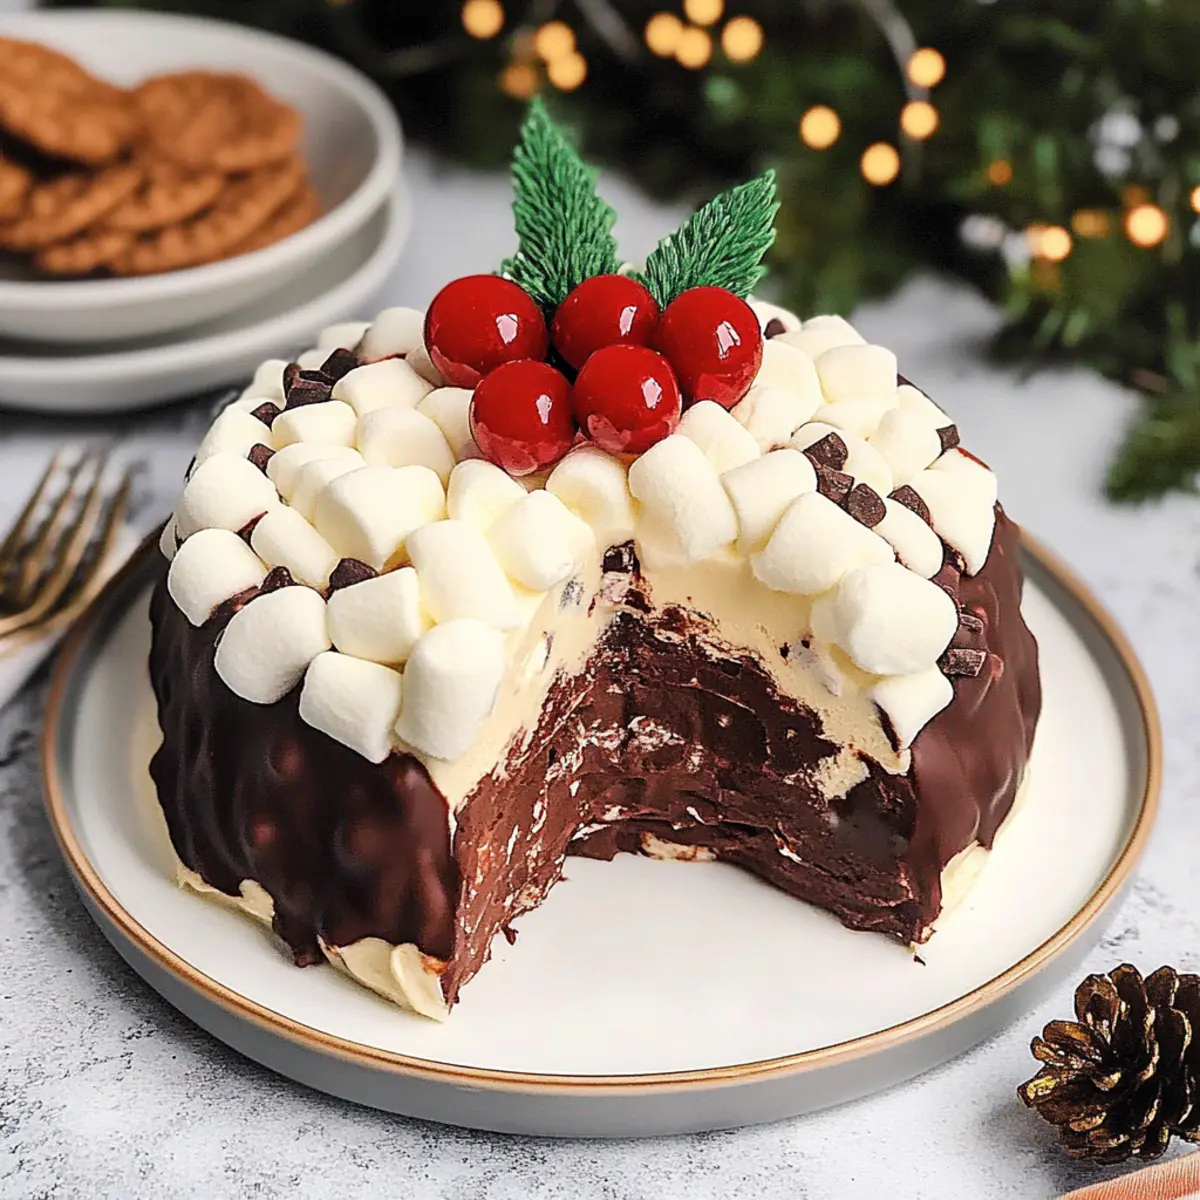
The holiday season is a whirlwind of joy, laughter, and, of course, the delightful treats that come with it! This year, I’m putting a playful spin on tradition with my No-Bake Chocolate Rocky Road Christmas Pudding. In just a few simple steps, you can whip up this festive dessert that’s as easy as it is indulgent. Its rich chocolate layers invite you into a world of chewy marshmallows and crunchy biscuits, making it the perfect choice for anyone in need of a quick and customizable holiday treat. Whether you’re hosting a gathering or simply looking to brighten your evening at home, this pudding will surely bring smiles all around. Curious about how to make it your own? Let’s dive in!
Why Choose This Rocky Road Dessert?
No-Bake Convenience: Skip the oven and still impress your guests! This No-Bake Chocolate Rocky Road Christmas Pudding is effortlessly simple to prepare.
Customizable Treat: Feel free to swap ingredients based on your preferences, whether you prefer dark chocolate over milk or want to skip the cherries.
Festive Appeal: The vibrant colors and textures make this pudding a showstopper at any holiday gathering—it’s as beautiful as it is delicious!
Time-Saving Delight: Ready in just a few hours of chilling time, you can make this dessert ahead of your festivities without any hassle.
Crowd Favorite: Its rich chocolate layers and chewy marshmallows are sure to be a hit with both kids and adults alike—perfect for holiday get-togethers!
If you’re looking to make even more festive treats, consider these ideas: Christmas Cookie Exchange or try whipping up some Gingerbread Cupcakes Christmas for an extra special celebration!
Rocky Road Christmas Pudding Ingredients
For the Base
- Golden Syrup – Adds sweetness and helps bind the mixture; you can use corn syrup as an alternative.
- Unsalted Butter – Provides richness and moisture; coconut oil is a great dairy-free substitute.
- Milk Chocolate – Contributes creaminess and sweetness; choose dark chocolate for a richer taste.
- Dark Chocolate – Adds depth and balances sweetness; you can use all milk chocolate for a sweeter version.
- Digestives – Offer a base and crunch; Graham crackers can be used as a similar substitute.
- Amaretti Biscuits – Enhance flavor with almond notes; use any biscuit if there are nut allergies.
For the Mix-ins
- Mini Marshmallows – Provide a delightful chewy texture; replace with chopped nuts for a less sweet option.
- Glacé Cherries – Add color and sweetness; can be substituted with chopped dried fruits or omitted completely.
- Raisins – Bring chewiness and sweetness; dried cranberries make a good alternative.
For Decoration
- White Chocolate – Used for a decorative topping; feel free to replace with royal icing or skip it entirely.
- Icing Sugar – For buttercream decoration; omit for a simpler look.
- Green Food Colouring – Gives the buttercream a festive touch; this step is optional for a more natural appearance.
- Red M&Ms – Added for festive flair; any red candy can work as a fun alternative.
No matter how you put your twist on this Rocky Road Christmas Pudding, each bite is bound to be a holiday delight!
Step‑by‑Step Instructions for Rocky Road Christmas Pudding!
Step 1: Prepare the Bowl
Begin by lining a medium-sized bowl with cling film, ensuring it drapes over the edges for easy removal later. This step is crucial for a smooth serving experience. Set the bowl aside while you gather and prepare the rest of your ingredients for the Rocky Road Christmas Pudding.
Step 2: Chop the Chocolate
Finely chop the milk and dark chocolate into small pieces, ensuring they melt evenly. Place the chopped chocolate in a bowl and set it aside. Make sure to use a sharp knife for ease and precision, and enjoy the rich aroma of chocolate as you prepare your delightful base for the pudding.
Step 3: Melt the Butter and Syrup
In a saucepan over medium heat, combine unsalted butter and golden syrup. Stir continuously until the mixture starts bubbling gently, which should take about 3-5 minutes. Once bubbling, promptly remove it from the heat, creating a rich, sweet syrup that will act as the glue for your Rocky Road Christmas Pudding.
Step 4: Combine Chocolate and Syrup
Pour the chopped chocolate into the saucepan with the melted butter and syrup mixture. Stir until the chocolate is completely melted and the mixture is smooth, taking about 2-3 minutes. This velvety chocolate blend is the key to the indulgent flavor of your pudding, ready to envelop the other ingredients.
Step 5: Mix the Dry Ingredients
In a large mixing bowl, combine broken digestives, mini marshmallows, chopped glacé cherries, and raisins. Mixing these ingredients well will ensure you get a delectable combination of textures and flavors throughout your Rocky Road Christmas Pudding. Once combined, pour the warm chocolate mixture over the dry ingredients and stir thoroughly.
Step 6: Assemble the Pudding
Transfer the chocolatey mixture into the lined bowl, pressing it down firmly to eliminate any air pockets. Ensure an even surface and compact the mixture well, as this will help the pudding set nicely. Cover the bowl with cling film and refrigerate for at least 2 hours, or until solid.
Step 7: Decorate with White Chocolate
Once your Rocky Road Christmas Pudding has set, melt white chocolate in a microwave-safe bowl for about 30 seconds, stirring until completely smooth. Pour the melted white chocolate over the top of the pudding, allowing it to drizzle down the sides for a lovely decorative touch. Let it set briefly at room temperature.
Step 8: Prepare the Buttercream
In a mixing bowl, whip together unsalted butter and icing sugar until light and fluffy, about 3-4 minutes. Mix in a few drops of green food coloring for that festive touch, making it vibrant and cheerful. This will add a charming decorative element to your Rocky Road Christmas Pudding.
Step 9: Pipe Decorative Elements
Using a piping bag, create festive holly decorations on top of the set pudding with the green buttercream. Add red M&Ms in the center for berries, enhancing the holiday aesthetic. This finishing touch not only adds to the presentation but also tempts everyone to dive into this delicious treat!
Step 10: Serve with Heart
Let your completed Rocky Road Christmas Pudding set for a while before slicing. Serve chilled at your holiday gathering, and watch the smiles as everyone enjoys this delightful no-bake dessert. Share warmth and joy as you indulge in this unforgettable festive treat that’s sure to be a family favorite!
Rocky Road Christmas Pudding Variations
Feel free to unleash your creativity and make this recipe truly your own with these fun and mouthwatering twists!
-
Ginger Biscuit Base: Swap digestives for ginger biscuits to infuse a warm spice flavor that complements the chocolate beautifully. A little zing goes a long way!
-
Nutty Addition: Add chopped nuts, such as walnuts or hazelnuts, for an extra crunch. The combination of chocolate and nuts brings out a delightful richness and texture.
-
Mini Puddings: Create individual desserts by using muffin tins instead of a bowl. These bite-sized treats are perfect for sharing and make a lovely presentation.
-
Dairy-Free Delight: Substitute unsalted butter with coconut oil and use dark chocolate for a dairy-free version. The tropical hint will elevate the pudding to new heights!
-
Fruit Twist: Replace glacé cherries with dried cranberries or apricots for a fruity alternative. The tartness balances the chocolate and adds a refreshing touch.
-
Chocolate Explosion: For an even richer experience, use half milk chocolate and half white chocolate in the mix. It’s a decadent dream for chocolate lovers!
-
Reduced Sugar Option: Use sugar substitutes in place of icing sugar for a lighter version. Enjoy the same beautiful presentation without the extra sweetness.
-
Festive Fudge: Drizzle melted fudge over the top instead of white chocolate for a different decorative touch. It not only looks great but also tastes simply divine!
These variations will not only ensure that your Rocky Road Christmas Pudding stands out but also accommodate different tastes and dietary preferences. For even more festive goodness, check out these delightful ideas: DIY Christmas Tree to impress your guests, or add some joy with a Christmas Cookie Exchange!
Make Ahead Options
These No-Bake Chocolate Rocky Road Christmas Puddings are perfect for those busy holiday schedules! You can prepare the pudding mixture up to 24 hours in advance; simply follow the assembly steps and refrigerate it until solid. For the best results, avoid adding the white chocolate decoration until you’re ready to serve, as this keeps it looking fresh and beautiful. Also, make sure to wrap the pudding tightly in cling film after it has set to prevent any moisture loss and maintain its scrumptious texture. When it’s time to enjoy, just drizzle the white chocolate on top, pipe on your festive buttercream, and add those delightful red M&Ms for an instant holiday cheer!
How to Store and Freeze Rocky Road Christmas Pudding
Fridge: Keep in an airtight container for up to 1 week. This ensures your Rocky Road Christmas Pudding stays fresh and maintains its delightful texture.
Freezer: If you’d like to make it ahead, freeze for up to 3 months without the decoration. Once ready to serve, thaw it in the fridge overnight for a perfect treat.
Serving Temperature: Serve chilled for the best flavor experience. Let it sit at room temperature for about 10-15 minutes before enjoying if it’s been in the refrigerator.
Reheating: There’s no need to reheat this dessert! It’s best enjoyed cold, allowing the rich chocolatey flavor to shine through.
Expert Tips for Rocky Road Christmas Pudding
-
Mind the Temperature: Ensure your chocolate mixture is warm, not hot, to prevent lumps when mixing in the dry ingredients for your Rocky Road Christmas Pudding.
-
Proper Refrigeration: For best results, let the pudding chill overnight. This helps it set firmly and improves the texture, making each slice perfect.
-
Layering Ingredients: Gently fold the mix-ins into the chocolate without over-mixing; this ensures the delightful textures and flavors remain present in every bite.
-
Use Quality Chocolate: Opt for high-quality chocolate; it elevates the flavor of your pudding, making your dessert truly irresistible during the festive season.
-
Flexible Decorating: Feel free to get creative with decorations! Use different candies or nuts to customize your Rocky Road Christmas Pudding based on your family’s preferences.
What to Serve with No-Bake Chocolate Rocky Road Christmas Pudding?
Elevate your festive gathering with delightful pairings that complement this indulgent dessert perfectly.
-
Creamy Vanilla Ice Cream: A scoop of vanilla ice cream adds a refreshing contrast to the rich chocolate layers, making each bite a harmony of flavors.
Pair it with some hot fudge sauce for an extra delicious twist. -
Fresh Berries: Juicy raspberries or strawberries provide a tart and refreshing balance to the sweetness of the pudding, brightening your plate with vibrant colors.
Their natural acidity cuts through the richness, enhancing your dessert experience. -
Peppermint Hot Chocolate: Serve this warm, cozy drink alongside your pudding for a double chocolate delight; the minty flavor also brings a festive spirit.
Top it with whipped cream and crushed peppermint for a beautiful presentation! -
Spiced Gingerbread Cookies: The warm spices from gingerbread add a seasonal touch that pairs beautifully with the chocolatey richness of your pudding.
Dipping them into the pudding makes for a fun and interactive treat! -
Coconut Whipped Cream: Light and airy, this dairy-free topping adds a tropical flair and richness without overpowering the flavor of the pudding.
It’s a delightful way to keep things festive and fun! -
Cranberry-Orange Sauce: A tart and zesty sauce adds a sophisticated touch and a pop of color, enhancing your holiday table’s visual appeal.
This bright complement highlights the pudding’s sweetness beautifully. -
Sparkling Water with Lime: Refreshing and light, sparkling water garnished with lime offers a cleansing palate between bites of the decadent pudding.
It’s a fizzy option that keeps your festivities lively and enjoyable! -
Chocolate-Covered Pretzels: These salty-sweet treats are a playful crunchy contrast to the soft texture of the pudding, adding another layer of fun to your dessert experience.
They’re also fantastic for dipping! -
Christmas Sugar Cookies: Festively decorated sugar cookies bring a touch of nostalgia and joy, making your dessert selection even more cheerful.
They are perfect for sharing and enjoying with loved ones! -
Hot Apple Cider: Serve this warm, spiced drink alongside your pudding for a comforting seasonal option that pairs wonderfully with the chocolatey richness.
It’s a cozy combination sure to warm hearts and smiles!

Advertisement
Rocky Road Christmas Pudding Recipe FAQs
What type of chocolate should I use for the best flavor?
I recommend using a combination of milk and dark chocolate to achieve a rich, balanced flavor. If you’re a dark chocolate lover, feel free to swap in all dark chocolate for a deeper taste. Quality matters, so choose good quality chocolate for the best results!
How do I know when my ingredients are ripe or ready to use?
Apply a gentle squeeze to marshmallows; they should be soft and spongy, not stale. For glacé cherries, look for vibrant colors without any dark spots, signaling freshness. Always check expiration dates for your dried fruits and chocolates before using them!
How should I store my Rocky Road Christmas Pudding?
Keep your pudding in an airtight container in the fridge for up to 1 week. If you plan on making it ahead of time, you can freeze it for up to 3 months without decoration. Just be sure to wrap it well to prevent freezer burn and thaw overnight in the fridge before serving.
What if my pudding doesn’t set properly?
If your pudding is a bit too soft, it may need more refrigeration time. Try letting it chill overnight for a firmer texture. If you’re looking for a quick fix, you can mix in a bit more crushed biscuits to absorb the moisture—just fold them in gently!
Is this recipe suitable for people with allergies?
This recipe contains ingredients that may pose allergy risks, such as chocolate and biscuits. Always double-check labels for allergens, especially if making for someone with nut allergies—consider using nut-free substitutes for biscuits and avoid any nuts in the mix.
Can I freeze the Rocky Road Christmas Pudding?
Absolutely! To freeze, prepare your pudding without any decoration. Wrap it tightly in plastic wrap and foil, or place it in an airtight container. It can last in the freezer for up to 3 months. When ready to serve, just thaw it in the refrigerator overnight for the best texture.

Rocky Road Christmas Pudding That You Can't Resist!
Ingredients
Equipment
Method
- Line a medium-sized bowl with cling film, ensuring it drapes over the edges for easy removal later.
- Finely chop the milk and dark chocolate into small pieces and set aside.
- In a saucepan, combine unsalted butter and golden syrup, stirring continuously until bubbling gently, about 3-5 minutes.
- Pour the chopped chocolate into the saucepan, stirring until completely melted and smooth, about 2-3 minutes.
- In a large mixing bowl, combine broken digestives, mini marshmallows, glacé cherries, and raisins thoroughly.
- Transfer the chocolate mixture into the lined bowl, pressing down firmly to remove air pockets. Cover and refrigerate for at least 2 hours.
- Melt white chocolate in a microwave-safe bowl for about 30 seconds, stir until smooth, and pour over the pudding.
- In a mixing bowl, whip unsalted butter and icing sugar until light and fluffy; add green food coloring.
- Using a piping bag, create decorations on top of the pudding with green buttercream and add red M&Ms for berries.
- Slice and serve chilled at your holiday gathering!