gutenberg
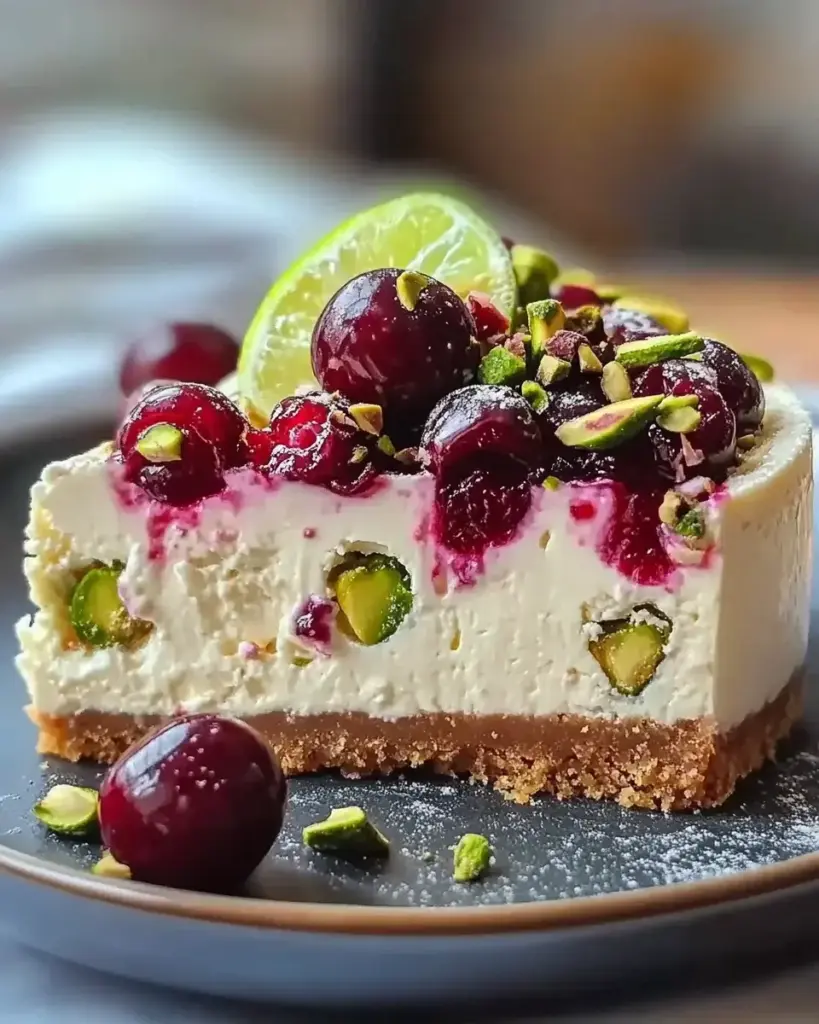
Introduction to Lemon Lime Cherry Pistachio Cheesecake
Welcome to the world of delightful desserts! If you’re like me, juggling a busy life while trying to whip up something special can feel overwhelming. That’s where this Lemon Lime Cherry Pistachio Cheesecake comes in. It’s a vibrant, refreshing treat that’s perfect for impressing your loved ones or simply indulging yourself after a long day. With its zesty citrus notes and creamy texture, this cheesecake is not just a dessert; it’s a celebration on a plate. Let’s dive into this easy recipe that will surely become a family favorite!
Why You’ll Love This Lemon Lime Cherry Pistachio Cheesecake
This Lemon Lime Cherry Pistachio Cheesecake is a dream come true for busy moms and professionals alike. It’s not only easy to make, but it also comes together quickly, allowing you to spend more time with your loved ones. The combination of tangy citrus and sweet cherries creates a flavor explosion that will leave everyone asking for seconds. Plus, the crunchy pistachios add a delightful texture that makes each bite unforgettable!
Ingredients for Lemon Lime Cherry Pistachio Cheesecake
Gathering the right ingredients is the first step to creating your Lemon Lime Cherry Pistachio Cheesecake. Here’s what you’ll need:
- Graham cracker crumbs: These form the base of your cheesecake crust, providing a sweet and crunchy texture.
- Unsalted butter: Melted butter binds the crumbs together, ensuring a firm crust that holds its shape.
- Granulated sugar: A touch of sweetness enhances the crust and balances the tangy filling.
- Cream cheese: The star of the show! Softened cream cheese gives the cheesecake its rich and creamy texture.
- Vanilla extract: This adds a warm, aromatic flavor that complements the other ingredients beautifully.
- Eggs: They help set the filling, giving it that perfect cheesecake consistency.
- Sour cream: Adds a tangy richness that elevates the flavor profile of the cheesecake.
- Lemon juice: Fresh lemon juice brings a bright, zesty flavor that cuts through the creaminess.
- Lime juice: Similar to lemon, lime juice adds a refreshing twist that enhances the overall taste.
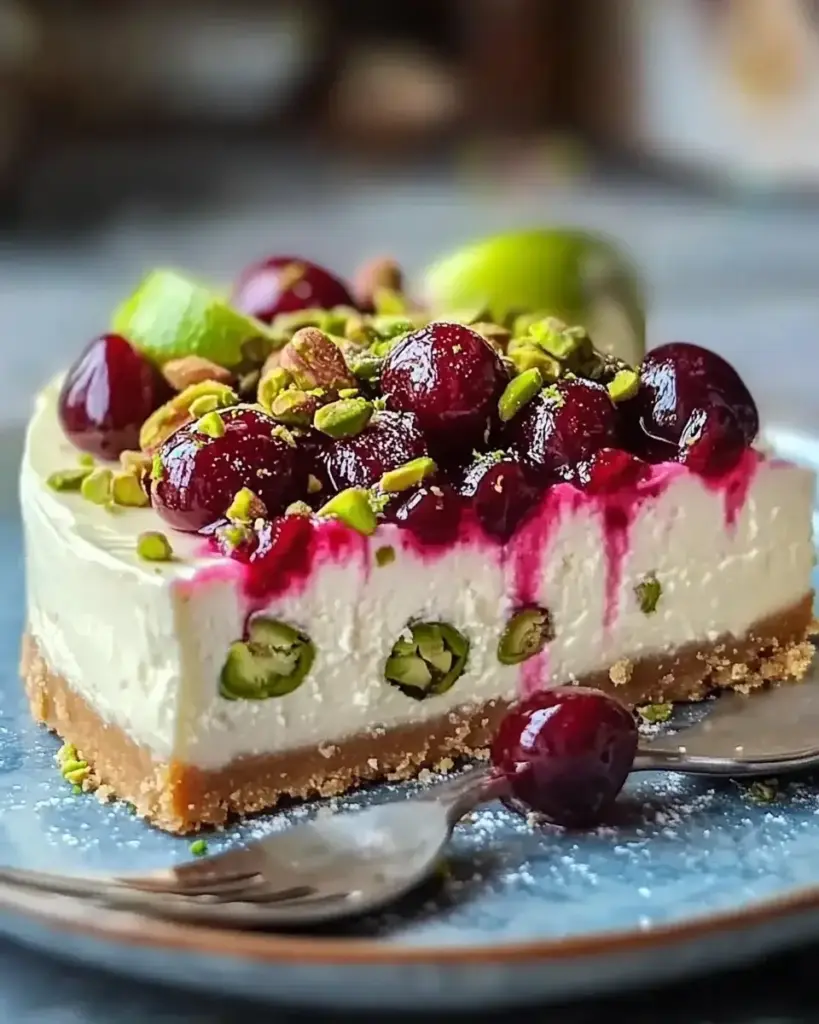
- Cherry pie filling: This sweet topping adds a burst of fruity flavor and a pop of color to your cheesecake.
- Chopped pistachios: These not only add a delightful crunch but also a nutty flavor that pairs perfectly with the cheesecake.
For those looking to lighten things up, consider using low-fat cream cheese and sour cream. If you want to add a unique twist, a teaspoon of almond extract can elevate the flavor even more!
Exact measurements for each ingredient can be found at the bottom of the article, ready for you to print and take to the kitchen!
How to Make Lemon Lime Cherry Pistachio Cheesecake
Now that you have all your ingredients ready, let’s dive into the fun part: making your Lemon Lime Cherry Pistachio Cheesecake! Follow these simple steps, and you’ll be on your way to creating a dessert that will wow your family and friends.
Step 1: Preheat the Oven
First things first, preheat your oven to 325°F. Preheating is crucial because it ensures that your cheesecake bakes evenly. A hot oven helps set the filling properly, giving you that creamy texture we all love.
Step 2: Prepare the Crust
In a medium bowl, mix together the graham cracker crumbs, melted butter, and sugar until well combined. This mixture should resemble wet sand. Now, press it firmly into the bottom of your 9-inch springform pan. Pressing it down well is key; it helps the crust hold together when you slice into the cheesecake later.
Step 3: Bake the Crust
Pop the crust into the preheated oven and bake for about 10 minutes. This step helps to set the crust, giving it a nice golden color. Once done, remove it from the oven and let it cool completely. This cooling time is essential before adding the filling.
Step 4: Make the Cream Cheese Filling
In a large mixing bowl, beat the softened cream cheese with the granulated sugar and vanilla extract until smooth and creamy. This should take about 2-3 minutes. Next, add the eggs one at a time, mixing well after each addition. Finally, stir in the sour cream, lemon juice, and lime juice until everything is fully incorporated. The mixture should be velvety and luscious!
Step 5: Combine and Pour
Now it’s time to pour that delicious cream cheese filling over your cooled crust. Make sure to spread it evenly, so every slice has the same delightful flavor. This step is where the magic happens, transforming your crust into a creamy cheesecake.
Step 6: Bake the Cheesecake
Carefully place the springform pan back into the oven and bake for 50-60 minutes. You’ll know it’s done when the center is set but still slightly jiggly. This slight jiggle is a good sign; it means your cheesecake will be creamy and not dry!
Step 7: Cool Gradually
Once baked, turn off the oven and leave the cheesecake inside for an hour. This gradual cooling helps prevent cracks on the surface. After an hour, remove it from the oven and let it cool to room temperature. Patience is key here!
Step 8: Refrigerate
After it’s cooled, refrigerate your cheesecake for at least 4 hours, or overnight if you can wait. Chilling allows the flavors to meld beautifully, making each bite even more delicious. Trust me, the wait is worth it!
Step 9: Add Toppings
Before serving, spread the cherry pie filling evenly over the top of the cheesecake. Then, sprinkle the chopped pistachios for that extra crunch and a pop of color. This final touch not only enhances the flavor but also makes your cheesecake look stunning!
Tips for Success
- Make sure your cream cheese is at room temperature for easy mixing.
- Don’t skip the cooling steps; they help prevent cracks in your cheesecake.
- Use a water bath for even baking if you want a creamier texture.
- For a fun twist, try adding a layer of lemon or lime zest to the filling.
- Always refrigerate overnight for the best flavor and texture.
Equipment Needed
- 9-inch springform pan: Essential for easy removal of your cheesecake. A regular cake pan works too, but slicing will be trickier.
- Mixing bowls: Use a large bowl for the filling and a medium one for the crust. Any sturdy bowl will do!
- Electric mixer: A hand mixer or stand mixer makes beating the cream cheese a breeze. You can use a whisk, but it’ll take longer.
- Spatula: Perfect for scraping down the sides of the bowl and spreading the filling evenly.
- Measuring cups and spoons: Accurate measurements are key for baking success. If you don’t have them, use a regular cup, but be cautious!
Variations
- Chocolate Swirl: Add a swirl of melted chocolate to the cream cheese filling for a decadent twist.
- Fruit Medley: Instead of cherry pie filling, top with mixed berries or fresh fruit for a lighter option.
- Nut-Free: Omit the pistachios and replace them with crushed graham crackers or coconut for a different texture.
- Gluten-Free: Use gluten-free graham crackers or almond flour for the crust to make it suitable for gluten-sensitive diets.
- Vegan Option: Substitute cream cheese with a vegan alternative and use flax eggs for a plant-based version.
Serving Suggestions
- Pair your Lemon Lime Cherry Pistachio Cheesecake with a dollop of whipped cream for added creaminess.
- Serve alongside fresh berries for a burst of color and flavor.
- Complement with a refreshing glass of iced tea or lemonade.
- For a beautiful presentation, garnish with mint leaves or extra pistachios.
FAQs about Lemon Lime Cherry Pistachio Cheesecake
Can I make this cheesecake ahead of time?
Absolutely! In fact, making your Lemon Lime Cherry Pistachio Cheesecake a day in advance allows the flavors to develop beautifully. Just be sure to keep it refrigerated until you’re ready to serve.
What can I use instead of cream cheese?
If you’re looking for a lighter option, you can substitute low-fat cream cheese. For a dairy-free version, try using a vegan cream cheese alternative. It will still yield a delicious cheesecake!
How do I know when the cheesecake is done baking?
The key is to look for a slightly jiggly center. It should be set around the edges but still have a gentle wobble in the middle. This ensures a creamy texture in your Lemon Lime Cherry Pistachio Cheesecake.
Can I freeze the cheesecake?
Yes, you can freeze your cheesecake! Just wrap it tightly in plastic wrap and then in aluminum foil. When you’re ready to enjoy it, let it thaw in the refrigerator overnight.
Advertisement
What’s the best way to slice the cheesecake?
To get clean slices, dip your knife in hot water and wipe it dry before cutting. This technique helps prevent the cheesecake from sticking to the knife, giving you those perfect, beautiful slices!
Final Thoughts
Creating this Lemon Lime Cherry Pistachio Cheesecake is more than just baking; it’s about crafting memories. Each slice is a burst of flavor that brings smiles to faces, making it perfect for family gatherings or a cozy night in. The combination of zesty citrus, sweet cherries, and crunchy pistachios creates a delightful experience that lingers long after the last bite. I hope this recipe becomes a cherished part of your dessert repertoire, bringing joy and sweetness to your table. So, roll up your sleeves and let the baking adventure begin!
“`
Lemon Lime Cherry Pistachio Cheesecake: A Delightful Recipe!
Ingredients
Method
- Preheat the oven to 325°F.
- In a medium bowl, combine graham cracker crumbs, melted butter, and 2 tablespoons of sugar. Mix until well combined.
- Press the mixture firmly into the bottom of a 9-inch springform pan to form the crust. Bake for 10 minutes, then remove from the oven and let cool.
- In a large mixing bowl, beat the softened cream cheese with 1 cup of sugar and vanilla extract until smooth and creamy.
- Add the eggs one at a time, mixing well after each addition.
- Stir in the sour cream, lemon juice, and lime juice until fully incorporated.
- Pour the cream cheese mixture over the cooled crust in the springform pan.
- Bake for 50-60 minutes, or until the center is set but slightly jiggly.
- Turn off the oven and leave the cheesecake inside for 1 hour to cool gradually.
- Remove the cheesecake from the oven and let it cool to room temperature.
- Once cooled, refrigerate for at least 4 hours or overnight for best results.
- Before serving, spread the cherry pie filling evenly over the top of the cheesecake and sprinkle with chopped pistachios.
Nutrition
Notes
- For a lighter version, substitute low-fat cream cheese and sour cream.
- For added flavor, mix in a teaspoon of almond extract with the cream cheese filling.