A Sweet Tradition Born from Childhood Memories
There’s something about Easter that stirs up childhood nostalgia—the excitement of hunting for eggs, the crisp scent of spring in the air, and the joy of gathering with family for a feast filled with seasonal treats. For me, no Easter celebration was complete without a dessert that combined both fun and indulgence.
I still remember the first time my grandmother introduced me to “dirt cake.” She called me into the kitchen and handed me a wooden spoon, instructing me to crush chocolate cookies into crumbs. “Make it look like fresh soil,” she said with a wink. I giggled at the thought of serving dirt for dessert, but when she layered it with a sweet, creamy filling, I was hooked.
Years later, I found myself recreating this recipe with my own twist—turning it into an Easter Dirt Cake Casserole. This version takes the classic dirt cake and transforms it into a shareable, festive centerpiece. With its rich layers of chocolate and cream, topped with playful decorations, this casserole is not just a dessert—it’s an experience, bringing smiles to both kids and adults alike.
Whether you’re making this for a family gathering, a holiday potluck, or simply to relive the joy of childhood treats, this Easter Dirt Cake Casserole will be a hit.
What Makes Easter Dirt Cake Casserole Special?
At first glance, this dessert might look like an ordinary chocolate pudding treat, but its charm lies in its layers. Each bite offers a perfect balance of crunchy, creamy, and smooth textures, making it incredibly satisfying. The crushed cookies provide a delightful contrast to the silky pudding and cream cheese layers, while the decorations bring a festive touch that captures the spirit of Easter.
But what truly sets this recipe apart is its versatility. You can customize the decorations, adjust the flavors, or even create individual servings to match the theme of your gathering. Whether you’re serving it as a playful dessert for kids or a nostalgic treat for adults, it’s a crowd-pleaser through and through.
Creative Variations to Try
One of the best things about this casserole is how adaptable it is. Here are some ways you can switch things up:
1. White Chocolate Bunny Edition
Swap the classic chocolate pudding with white chocolate or vanilla pudding for a lighter, creamier version. Top with pastel-colored candies or white chocolate shavings to give it a more “springtime” feel.
2. Peanut Butter Lover’s Twist
For those who can’t resist the combination of chocolate and peanut butter, mix a few spoonfuls of peanut butter into the cream cheese layer. You can also use peanut butter sandwich cookies instead of chocolate cookies for a nutty crunch.
3. Spring Garden Style
Give your casserole a “garden” effect by topping it with crushed green-colored coconut flakes to resemble grass. Add flower-shaped candy decorations, edible sugar flowers, or even chocolate carrots for a whimsical touch.
4. Mini Jar Servings for Individual Treats
Instead of making a large casserole, divide the layers into individual jars or cups. This is perfect for Easter brunches or outdoor gatherings, allowing each guest to have their own portable serving.
5. Dairy-Free & Gluten-Free Adaptations
If you have dietary restrictions, don’t worry! Use gluten-free cookies for the crust and opt for dairy-free pudding and cream cheese alternatives. The result is just as creamy and indulgent but suitable for those with allergies or sensitivities.
Storage & Make-Ahead Tips
Refrigeration:
This dessert needs time to set, so it’s best to prepare it at least 2 hours in advance. However, for even better results, making it the night before allows the layers to firm up beautifully. Keep it covered in the refrigerator until ready to serve.
How Long Does It Last?
If you have leftovers (which is rare!), they will stay fresh for 3-4 days in the fridge. Just make sure the casserole is tightly covered to prevent it from absorbing any odors.
Can You Freeze It?
Yes! While freezing may slightly alter the texture, it’s a great way to prepare this dessert in advance. If freezing, do so before adding decorations. Wrap the casserole tightly with plastic wrap and aluminum foil, then freeze for up to 2 months. Thaw in the fridge overnight and add fresh toppings before serving.
Serving Suggestions: Elevate the Experience
To make this dessert even more enjoyable, here are some serving ideas:
- Pair it with Ice Cream: A scoop of vanilla or chocolate ice cream complements the creamy layers beautifully.
- Drizzle with Caramel or Chocolate Sauce: For extra indulgence, add a drizzle of sauce before serving.
- Top with Whipped Cream: A dollop of whipped cream on each slice makes it even more decadent.
- Serve Chilled: This dessert tastes best when served cold, so keep it refrigerated until just before serving.
Ingredients: The Building Blocks of Sweetness
- 1 package (14.3 oz) of Oreos, crushed
- 1/2 cup unsalted butter, softened
- 1 package (8 oz) cream cheese, softened
- 1 cup powdered sugar
- 2 packages (3.9 oz each) instant chocolate pudding mix
Directions: Layering the Goodness
1. Create the Crunchy Oreo Base
- Crush the Oreos into fine crumbs using a rolling pin or food processor.
- In a bowl, mix crushed Oreos with softened butter until well combined.
- Press this mixture into the bottom of a 9×13-inch casserole dish to form a firm crust.
2. Prepare the Creamy Middle Layer
- Beat softened cream cheese until smooth and creamy.
- Gradually mix in powdered sugar until fully combined.
- Spread this mixture evenly over the Oreo crust.
3. Make the Chocolate Pudding Layer
- Prepare the chocolate pudding mix according to the package instructions.
- Once thickened, spread it evenly over the cream cheese layer.
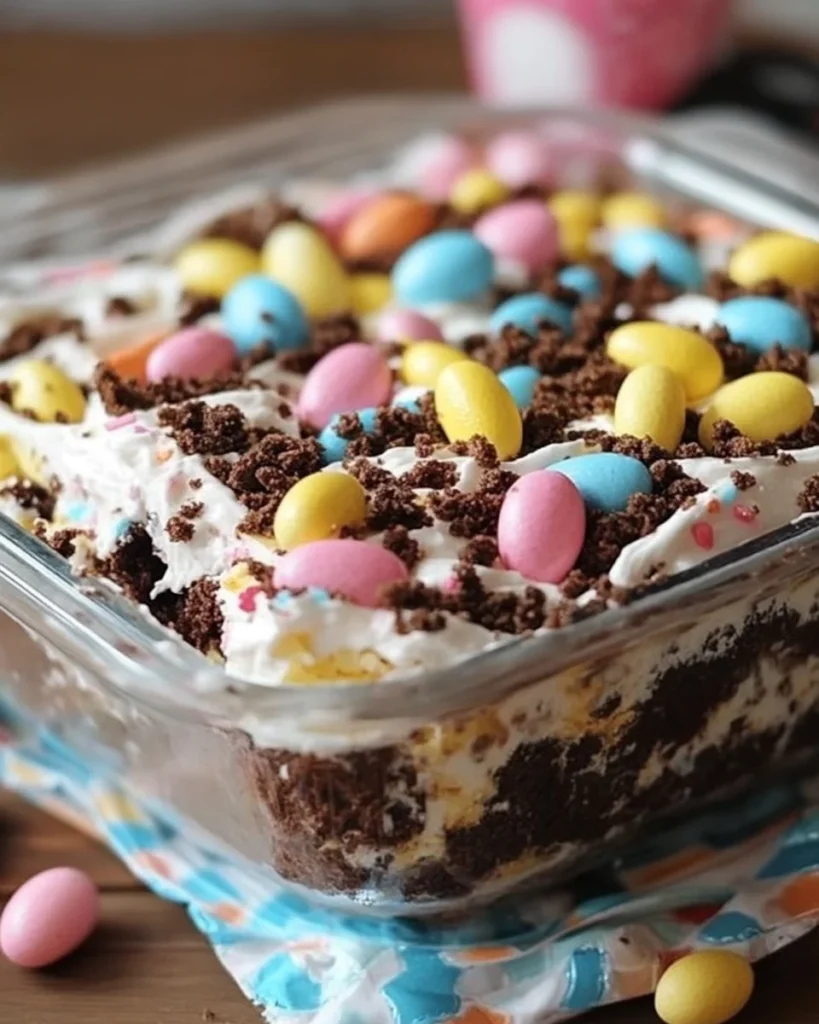
4. Add the Dirt Effect & Decorations
- Sprinkle additional crushed Oreos over the pudding layer for a realistic “dirt” look.
- Decorate with Easter-themed candy such as mini eggs or gummy worms for a festive touch.
5. Chill & Serve
- Refrigerate for at least 2 hours or until set.
- Slice, serve, and enjoy the chocolatey goodness!
Nutritional Insights: A Sweet Indulgence
(Per serving, approximate values)
- Calories: ~320
- Carbohydrates: ~45g
- Fat: ~15g
- Sugar: ~30g
- Protein: ~3g
This Easter Dirt Cake Casserole is a crowd-pleaser with its perfect blend of crunchy, creamy, and chocolatey textures. Whether you’re making it for a family gathering or a fun Easter treat, it’s sure to be a hit!
Frequently Asked Questions (FAQs)
1. Can I use a different type of cookie for the crust?
Absolutely! While chocolate sandwich cookies are traditional, you can experiment with chocolate graham crackers, chocolate wafer cookies, or even vanilla sandwich cookies for a different flavor twist.
2. Can I make this ahead of time?
Yes! This is actually one of the best make-ahead desserts because it gets better as it chills. Prepare it the night before your event, store it in the fridge, and simply add decorations before serving.
3. Can I use regular pudding instead of instant pudding?
While instant pudding is recommended for quick and easy preparation, you can use regular cook-and-serve pudding if preferred. Just make sure to let it cool completely before layering it into the casserole.
Advertisement
4. Can I make this dessert without cream cheese?
Yes, if you’re not a fan of cream cheese, you can substitute it with whipped topping or Greek yogurt for a lighter alternative. However, the cream cheese adds a rich, cheesecake-like texture that many people love.
5. How do I keep the cookie layer from getting too soggy?
If you’re worried about the cookie layer softening too much, you can reserve some crushed cookies and sprinkle them on top right before serving for an extra crunchy bite.
Conclusion: A Dessert That Brings People Together
Easter is a time of joy, togetherness, and delicious traditions—and this Easter Dirt Cake Casserole embodies all of those elements. Whether you’re introducing this dessert to a new generation or bringing back fond childhood memories, it’s a dish that sparks conversation and happiness.
More than just a sweet treat, this casserole represents the simple joys of baking: the fun of layering ingredients, the creativity of decorating, and the smiles that follow every bite. So, this Easter, gather your loved ones, share stories, and indulge in a dessert that’s as delightful to make as it is to eat.
No matter how you choose to serve it, one thing is certain—this Easter Dirt Cake Casserole will become a holiday tradition for years to come.

Easter Dirt Cake Casserole: A Chocolatey Celebration of Spring
Ingredients
Method
- Create the Crunchy Oreo Base
- Crush the Oreos into fine crumbs using a rolling pin or food processor.
- Mix crushed Oreos with softened butter in a bowl until well combined.
- Press this mixture into the bottom of a 9×13-inch casserole dish to form a firm crust.
- Prepare the Creamy Middle Layer
- Beat softened cream cheese until smooth and creamy.
- Gradually mix in powdered sugar until fully combined.
- Spread this mixture evenly over the Oreo crust.
- Make the Chocolate Pudding Layer
- Prepare the chocolate pudding mix according to the package instructions.
- Once thickened, spread it evenly over the cream cheese layer.
- Add the Dirt Effect & Decorations
- Sprinkle additional crushed Oreos over the pudding layer for a realistic “dirt” look.
- Decorate with Easter-themed candy such as mini eggs or gummy worms for a festive touch.
- Chill & Serve
- Refrigerate for at least 2 hours or until set.
- Slice, serve, and enjoy the chocolatey goodness!
Notes
- For an extra creamy texture, mix whipped topping into the cream cheese layer.
- Try using golden Oreos for a unique flavor variation.
- Add coconut flakes dyed green with food coloring for a fun “grass” effect.