A Sweet Tradition Worth Sharing
Every year, as spring rolls in and Easter approaches, I find myself searching for fun, festive, and easy-to-make treats that bring joy to the entire family. Growing up, Easter was always a special time filled with egg hunts, colorful baskets, and of course, homemade sweets that my mom and I would prepare together. Now, as a parent, I cherish the opportunity to create those same warm memories with my own children.
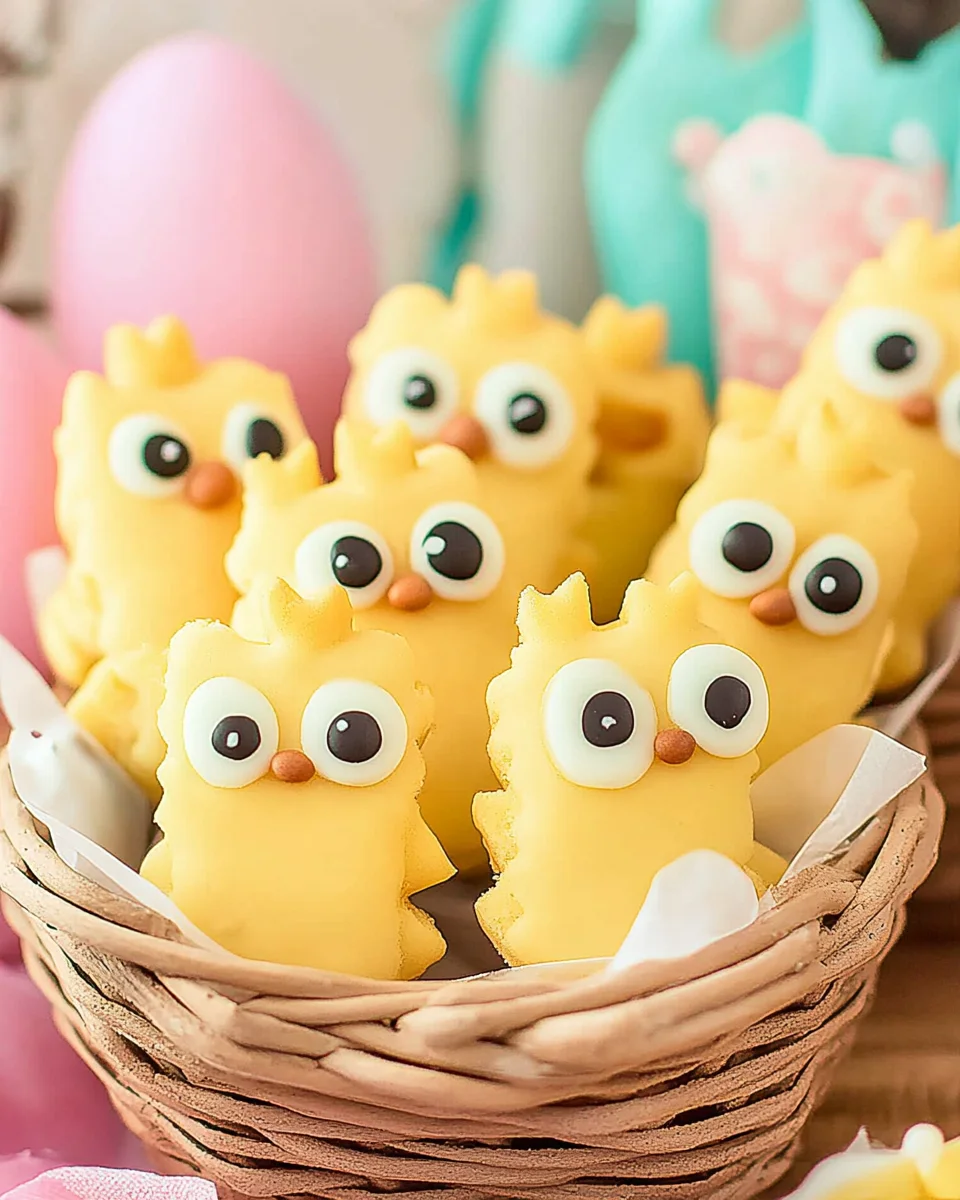
One of the simplest yet most delightful Easter treats we’ve made over the years is Easter Chick Dipped Wafer Cookies. These adorable little chick-themed cookies are not just a sweet indulgence; they’re an experience—one that brings families together for laughter, creativity, and a little bit of delicious mess-making in the kitchen.
What I love most about this recipe is that it’s a no-bake treat, making it perfect for little hands eager to help. With just a few ingredients and minimal effort, you can create something that looks like it came straight out of a bakery. Whether you’re making these for an Easter gathering, a classroom party, or just a fun weekend activity with the kids, these cheerful chick cookies are sure to bring smiles all around.
Let’s dive into everything you need to know about this charming and delicious Easter treat.
Why These Easter Chick Wafer Cookies Are a Must-Try
1. No-Bake, No-Stress
If you’re looking for a festive Easter treat that doesn’t require hours of baking or a long list of ingredients, these wafer cookies are the perfect solution. Since the base of this treat is store-bought sugar wafer cookies, all you need to do is dip, decorate, and enjoy.
2. Kid-Friendly and Engaging
These cookies are a fantastic way to get children involved in the kitchen. They can help with dipping the wafers, placing the candy eyes, and adding sprinkles for the beak, feet, and feathers. It’s a hands-on activity that lets them feel like little chefs while fostering creativity and fine motor skills.
3. Perfect for Easter Celebrations
Whether you’re hosting an Easter brunch, filling baskets with homemade goodies, or need a unique treat for a classroom party, these chick-themed cookies fit the bill. Their bright yellow color and adorable expressions make them stand out on any dessert table.
4. Customizable for Other Occasions
While these cookies are designed to look like Easter chicks, the concept can easily be adapted for other holidays and themes. Swap the yellow candy melts for different colors and use various sprinkle shapes to create animals, seasonal characters, or even fun abstract designs.
Expert Tips for the Best Chick Cookies
Use Quality Candy Melts
Not all candy melts are created equal. Some brands melt more smoothly than others. If you find your melted candy is too thick, adding a small amount of coconut oil helps thin it out for easier dipping and decorating.
Have Your Decorations Ready
Once you dip the wafer cookies, the candy coating starts setting fairly quickly. Make sure your candy eyes, sprinkles, and any other decorations are within arm’s reach so you can place them immediately.
Work in Batches
Instead of dipping all the cookies at once, work in small batches. This way, the candy melts won’t harden before you have time to decorate each cookie properly.
Store Properly
These cookies are best enjoyed within a few days of making them. Store them in an airtight container at room temperature. If stacking them, place parchment paper between layers to prevent sticking. Avoid refrigerating, as moisture can cause the cookies to become soft and the decorations to run.
Gather Your Goodies
- 1 package sugar wafer cookies (any flavor)
- 1 cup yellow candy melts
- 1 tablespoon coconut oil
- 60 candy eyeballs
- 60 round orange sprinkles (for the beak)
- 60 orange flower-shaped sprinkles (for the feet)
- 60 yellow leaf-shaped sprinkles (for the hair)
Crafting Your Chick Creations
- Melt the Magic – In a microwave-safe bowl, combine the yellow candy melts and coconut oil. Heat in 30-second intervals, stirring each time, until smooth (about 3-5 minutes).
- Prep Your Nest – Pour the melted candy into a piping bag. Arrange wafer cookies on a wire rack over a parchment-lined baking sheet.
- Coat with Sunshine – Starting at the top, pipe or pour the melted candy onto each cookie in a back-and-forth motion, covering about two-thirds of the wafer. Let the excess drip off.
- Add the Cute Details – Quickly place two candy eyeballs near the top, two flower sprinkles at the bottom for feet, and two yellow leaf sprinkles above the eyes for hair.
- Beak It Up – Place two orange round sprinkles below the eyes for the beak.
- Let It Set – Allow the cookies to set for at least 10 minutes before enjoying.
Nutritional Nest Egg (Per Cookie)
- Calories: 21 kcal
- Carbohydrates: 2g
- Fat: 1g
- Saturated Fat: 1g
- Sodium: 4mg
- Sugar: 2g
Enjoy these adorable, no-bake Easter treats with your little chicks!
Frequently Asked Questions
Can I Use White Chocolate Instead of Candy Melts?
Yes! If you don’t have candy melts on hand, you can use white chocolate chips or a chopped-up white chocolate bar. To get the bright yellow color, simply add a few drops of yellow gel food coloring. However, be cautious when adding food coloring to melted chocolate—use an oil-based or powdered food coloring to prevent the chocolate from seizing.
What If I Don’t Have a Piping Bag?
No worries! While a piping bag gives more precision, you can also use a spoon to drizzle the melted candy over the wafers. Another alternative is pouring the melted candy into a small zip-top bag and snipping off a tiny corner to create a makeshift piping bag.
Can I Make These in Advance?
Yes, these cookies can be made a day or two ahead of time. Just be sure to store them in an airtight container at room temperature to keep them fresh. Avoid humidity or heat, as it can cause the candy coating to soften or become sticky.
Are There Any Substitutes for Coconut Oil?
If you’re not a fan of coconut oil or don’t have any on hand, you can use vegetable shortening or even a bit of neutral-flavored vegetable oil to help thin out the candy melts.
Do I Need Special Tools?
The beauty of this recipe is its simplicity—you don’t need any fancy equipment. A microwave-safe bowl, a spoon or piping bag, and a pair of food-safe tweezers (for precise sprinkle placement) are all you really need.
Can I Freeze These Cookies?
Freezing is not recommended, as the candy coating may develop condensation when thawed, causing the decorations to smear or fall off. It’s best to enjoy these cookies fresh.
Are There Any Alternative Decorations?
Absolutely! While candy eyes, sprinkles for the beak, feet, and feathers are the go-to decorations for these chicks, you can get creative. Try using mini chocolate chips for the eyes, an orange candy-coated chocolate for the beak, or even small pieces of fruit leather for a unique twist.
Advertisement
Bringing Joy Through Simple Baking
At the heart of every great holiday tradition is the joy of sharing something special with the people you love. These Easter Chick Dipped Wafer Cookies may be simple, but they represent something much bigger—the happiness that comes from creating, laughing, and making memories in the kitchen.
I still remember the first time I made these with my kids. Their little fingers struggled to place the candy eyes just right, and their giggles filled the kitchen as some of our chick cookies turned out more comical than cute. But in the end, the perfectly imperfect cookies became our favorite part of Easter that year. They reminded me that it’s not about perfection—it’s about the experience.
So this Easter, whether you’re making these cookies with children, friends, or even on your own as a fun seasonal project, embrace the joy that comes with it. Because sometimes, the simplest treats hold the most cherished memories.
Happy baking, and happy Easter!
Easter Chick Dipped Wafer Cookies: A Fun and Festive Treat for All Ages
Ingredients
Method
- Melt the Candy Coating – In a microwave-safe bowl, melt the yellow candy melts with coconut oil in 30-second intervals, stirring between each, until smooth. This should take about 3-5 minutes.
- Prepare the Wafers – Lay out the sugar wafer cookies on a wire rack over a parchment-lined baking sheet for easy cleanup.
- Coat the Cookies – Transfer the melted candy to a piping bag or use a spoon to drizzle it over the top two-thirds of each wafer. Let the excess drip off.
- Decorate the Chicks – Quickly place two candy eyeballs near the top, two orange flower-shaped sprinkles at the bottom for feet, and two yellow leaf sprinkles above the eyes for hair.
- Add the Beak – Place two round orange sprinkles below the eyes to form the chick’s beak.
- Let Them Set – Allow the decorated cookies to set for at least 10 minutes before serving.
Notes
- If the candy melts start to harden while decorating, reheat them in 10-second bursts.
- You can swap coconut oil for vegetable shortening if needed.
- Store in an airtight container at room temperature for up to a week.