Introduction to Crispy Chicken Tenders Recipe
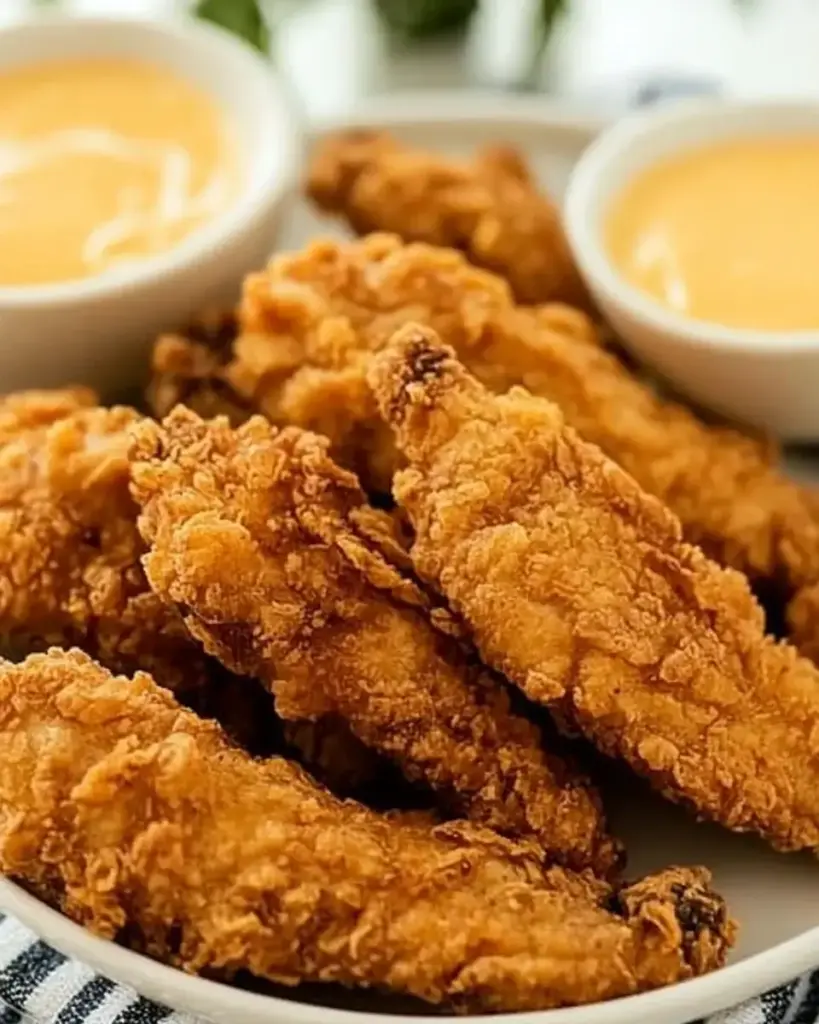
Welcome to the world of crispy chicken tenders! This delightful dish is a favorite for many, and it’s easy to see why. Crispy chicken tenders are not just a meal; they are an experience. Whether you’re serving them at a family dinner, a party, or just for a cozy night in, they are sure to please everyone at the table. The combination of juicy chicken and a crunchy coating makes each bite irresistible.
What Makes a Great Crispy Chicken Tender?
So, what exactly makes a chicken tender great? First, it’s all about the marinade. Soaking the chicken in buttermilk adds flavor and moisture, ensuring that the tenders remain juicy. Next, the breading is crucial. A perfect blend of flour and breadcrumbs creates that satisfying crunch. Using panko breadcrumbs can elevate the texture, giving you an extra crispy finish.
Moreover, frying at the right temperature is essential. If the oil is too hot, the outside will burn before the inside cooks. If it’s too cool, the chicken will absorb too much oil, making it greasy. The ideal frying temperature is around 350°F, which allows for a golden-brown crust while keeping the chicken tender and juicy inside.
Finally, serving your crispy chicken tenders with delicious dipping sauces can take them to the next level. Whether you prefer classic ranch, zesty barbecue, or spicy honey mustard, the right sauce can enhance the flavors and make your meal even more enjoyable.
In this article, we will guide you through a simple yet delicious crispy chicken tenders recipe. You’ll learn about the ingredients, preparation steps, and even some variations to try. Let’s dive in and discover how to make the perfect crispy chicken tenders!
Ingredients for Crispy Chicken Tenders Recipe
To create the perfect crispy chicken tenders, you’ll need a few simple ingredients. Each component plays a vital role in achieving that delicious flavor and texture. Here’s what you’ll need:
- 1 pound boneless, skinless chicken breasts: Cut into strips for easy frying.
- 1 cup buttermilk: This is essential for marinating the chicken, adding moisture and flavor.
- 1 teaspoon garlic powder: Adds a savory depth to the chicken.
- 1 teaspoon onion powder: Enhances the overall taste with a hint of sweetness.
- 1 teaspoon paprika: Provides a subtle smokiness and a beautiful color.
- 1 teaspoon salt: Essential for seasoning the chicken.
- 1/2 teaspoon black pepper: Adds a touch of heat and flavor.
- 1 cup all-purpose flour: This will help create a crispy coating.
- 1 cup breadcrumbs: Preferably panko for that extra crunch.
- Vegetable oil: For frying the chicken tenders to golden perfection.
These ingredients are easy to find and can be adjusted based on your preferences. For instance, you can add more spices or even try different types of breadcrumbs. The key is to ensure that the chicken is well-marinated and coated properly for that ultimate crispy texture. Now that you have your ingredients ready, let’s move on to the preparation steps!
Step-by-Step Preparation of Crispy Chicken Tenders Recipe
Now that you have gathered all your ingredients, it’s time to dive into the preparation of your crispy chicken tenders. This step-by-step guide will help you create delicious tenders that are sure to impress. Let’s get started!
Step 1: Preparing the Chicken
First, take your boneless, skinless chicken breasts and cut them into strips. Aim for uniform sizes, about 1 to 1.5 inches wide. This ensures even cooking. Next, in a large bowl, combine the buttermilk, garlic powder, onion powder, paprika, salt, and black pepper. Stir well to mix all the ingredients.
Once your marinade is ready, add the chicken strips to the bowl. Make sure each piece is fully submerged in the buttermilk mixture. Cover the bowl with plastic wrap and refrigerate. For the best flavor, let the chicken marinate for at least 1 hour, or even overnight if you have the time. This step is crucial for juicy, flavorful tenders!
Step 2: Creating the Breading Mixture
While the chicken is marinating, it’s time to prepare the breading mixture. In a shallow dish, combine the all-purpose flour and breadcrumbs. Mixing these two ingredients creates a perfect coating that will give your chicken tenders that desired crunch. You can also add a pinch of salt or other spices to this mixture for extra flavor.
Make sure to mix well so that the flour and breadcrumbs are evenly distributed. This will help ensure that every chicken strip gets a nice, even coating when you’re ready to fry.
Step 3: Coating the Chicken
After the chicken has marinated, it’s time to coat it. Remove the chicken strips from the buttermilk marinade, allowing any excess liquid to drip off. Then, take each strip and dredge it in the flour and breadcrumb mixture. Press gently to ensure the coating adheres well to the chicken.
Repeat this process for all the chicken strips. Make sure they are well-coated, as this will contribute to the crispy texture once fried. Place the coated chicken tenders on a plate or a baking sheet while you prepare to fry them.
Step 4: Frying the Chicken Tenders
Now comes the exciting part—frying! In a large skillet, heat about 1 inch of vegetable oil over medium-high heat. Use a thermometer to check the oil temperature; it should reach around 350°F. This is the perfect temperature for frying, ensuring a golden-brown crust without burning.
Carefully add the chicken strips to the hot oil in batches. Avoid overcrowding the pan, as this can lower the oil temperature and result in soggy tenders. Fry each strip for about 4-5 minutes on each side, or until they are golden brown and cooked through. Use a meat thermometer to check that the internal temperature reaches 165°F.
Once cooked, remove the chicken tenders from the oil and place them on a paper towel-lined plate to drain any excess oil. This will help keep them crispy. Now, your crispy chicken tenders are ready to be served!
Variation of Crispy Chicken Tenders Recipe
While the classic crispy chicken tenders are delicious on their own, there are many fun variations to explore. Whether you like a little heat or prefer a healthier option, these variations will keep your taste buds excited. Let’s take a look at two popular alternatives: spicy crispy chicken tenders and baked crispy chicken tenders.
Spicy Crispy Chicken Tenders
If you enjoy a kick of heat, spicy crispy chicken tenders are the way to go! To make this variation, simply add some heat to your marinade. Here’s how:
- 1-2 teaspoons cayenne pepper: Adjust based on your spice preference.
- 1 teaspoon hot sauce: Mix this into the buttermilk marinade for an extra zing.
Follow the same marinating and frying steps as the original recipe. The result will be tender chicken strips with a crispy coating and a delightful spicy flavor. Serve these spicy tenders with a cooling ranch or blue cheese dressing to balance the heat!
Baked Crispy Chicken Tenders
For a healthier twist, try baked crispy chicken tenders. This method reduces the amount of oil used while still delivering a satisfying crunch. Here’s how to bake them:
- Preheat your oven to 400°F.
- After coating the chicken strips, place them on a baking sheet lined with parchment paper.
- For extra crispiness, spray the coated chicken with a light layer of cooking spray.
- Bake for 20-25 minutes, flipping halfway through, until they are golden brown and cooked through.
Baked crispy chicken tenders are a fantastic option for those looking to enjoy a lighter meal without sacrificing flavor. Pair them with your favorite dipping sauce for a delicious treat!
Cooking Note for Crispy Chicken Tenders Recipe
When it comes to cooking crispy chicken tenders, a few important notes can help you achieve the best results. These tips will ensure that your chicken tenders turn out perfectly crispy and delicious every time.
First, always use fresh chicken. Fresh chicken breasts will yield the best flavor and texture. If you must use frozen chicken, make sure to thaw it completely before marinating. This helps the marinade penetrate the meat better, enhancing the overall taste.
Next, pay attention to the marinating time. While marinating for at least one hour is essential, letting the chicken soak overnight can significantly improve the flavor. The longer the chicken sits in the buttermilk mixture, the more tender and flavorful it becomes.
When frying, ensure that the oil is at the right temperature. If you don’t have a thermometer, you can test the oil by dropping a small piece of bread into it. If it sizzles and turns golden brown in about 60 seconds, the oil is ready. If it browns too quickly, the oil is too hot; if it takes longer, it’s too cool.
Also, avoid overcrowding the pan while frying. Frying in batches allows the oil temperature to remain consistent, resulting in evenly cooked and crispy tenders. If you add too many pieces at once, the temperature drops, leading to soggy chicken.
Lastly, let the fried chicken tenders rest on a paper towel-lined plate. This step is crucial for draining excess oil, keeping your tenders crispy. Enjoy your crispy chicken tenders hot for the best flavor and texture!
Serving Suggestions for Crispy Chicken Tenders Recipe
Now that you’ve mastered the art of making crispy chicken tenders, it’s time to think about how to serve them. The right accompaniments can elevate your meal and make it even more enjoyable. Let’s explore some delicious dipping sauces and side dishes that pair perfectly with your crispy chicken tenders.
Dipping Sauces to Pair with Crispy Chicken Tenders
Dipping sauces are a must when serving crispy chicken tenders. They add flavor and excitement to each bite. Here are some popular options:
- Ranch Dressing: A classic choice, ranch dressing is creamy and flavorful, making it a favorite for many.
- Barbecue Sauce: Sweet and tangy, barbecue sauce complements the crispy texture of the tenders beautifully.
- Honey Mustard: This sauce combines sweetness and tang, creating a delightful contrast to the savory chicken.
- Buffalo Sauce: For those who love heat, buffalo sauce adds a spicy kick that pairs well with the crispy coating.
- Sweet and Sour Sauce: This sauce offers a unique blend of flavors, making it a fun option for dipping.
Feel free to mix and match these sauces to find your favorite combination. You can even create a dipping sauce bar for parties, allowing guests to choose their preferred flavors!
Side Dishes that Complement Crispy Chicken Tenders
To round out your meal, consider serving crispy chicken tenders with some tasty side dishes. Here are a few ideas:
- French Fries: A classic pairing, crispy fries are always a hit. You can also try sweet potato fries for a healthier twist.
- Coleslaw: This crunchy salad adds a refreshing contrast to the warm, crispy chicken.
- Macaroni and Cheese: Creamy and cheesy, this comfort food is a delightful side that kids and adults alike will love.
- Vegetable Sticks: Carrot and celery sticks with dip provide a healthy crunch that balances the meal.
- Green Salad: A simple green salad with a light vinaigrette can add freshness to your plate.
These side dishes not only complement the flavors of the crispy chicken tenders but also create a well-rounded meal. Enjoy experimenting with different combinations to find what you love best!
Tips for Perfecting Your Crispy Chicken Tenders Recipe
Making crispy chicken tenders is an art, and with a few helpful tips, you can elevate your dish to perfection. Here are some essential tips to ensure your chicken tenders turn out crispy, flavorful, and absolutely delicious every time.
First, always start with high-quality chicken. Fresh, boneless, skinless chicken breasts are ideal. If you use frozen chicken, make sure to thaw it completely. This helps the marinade soak in better, enhancing the flavor and tenderness.
Next, marinating is key. Allow the chicken to soak in the buttermilk mixture for at least one hour. For the best results, marinate overnight. This not only adds flavor but also keeps the chicken juicy during cooking.
When it comes to the breading, don’t rush the coating process. Make sure each chicken strip is thoroughly coated in the flour and breadcrumb mixture. Press down gently to ensure the coating sticks well. This will create that satisfying crunch you’re looking for.
Temperature control is crucial while frying. Use a thermometer to check the oil temperature, aiming for around 350°F. If you don’t have a thermometer, drop a small piece of bread into the oil. If it sizzles and turns golden in about 60 seconds, the oil is ready.
Fry the chicken in small batches. Overcrowding the pan can lower the oil temperature, leading to soggy tenders. Frying in batches allows for even cooking and a crispy exterior.
After frying, let the chicken tenders rest on a paper towel-lined plate. This step helps drain excess oil, keeping your tenders crispy. Serve them hot for the best flavor and texture.
Lastly, don’t be afraid to experiment! Try adding different spices to the marinade or breading for unique flavors. You can also play with various dipping sauces to find your perfect pairing. Enjoy the process and have fun creating your crispy chicken tenders!
Breakdown of Time for Crispy Chicken Tenders Recipe
Understanding the time needed for each step in the crispy chicken tenders recipe is essential for planning your meal. Here’s a detailed breakdown of the time required for preparation and cooking. This will help you manage your kitchen time effectively and ensure that your tenders are ready to serve when you want them!
Prep Time
The prep time for crispy chicken tenders mainly involves marinating the chicken and preparing the breading mixture. Here’s how it breaks down:
- Marinating the Chicken: 1 hour (or up to overnight for best flavor)
- Preparing the Breading Mixture: 10 minutes
- Coating the Chicken: 15 minutes
In total, the prep time can range from 1 hour and 25 minutes to 1 hour and 45 minutes, depending on how long you choose to marinate the chicken.
Cooking Time
Once your chicken is marinated and coated, it’s time to fry! Here’s the cooking time breakdown:
- Heating the Oil: 5 minutes
- Frying the Chicken: 8-10 minutes (4-5 minutes per side)
The total cooking time is approximately 13-15 minutes, depending on how many batches you fry at once.
Total Time
When you combine both prep and cooking times, the total time for making crispy chicken tenders is:
- Total Time: 1 hour and 38 minutes to 2 hours (including marinating time)
Keep in mind that if you marinate the chicken overnight, you can save time on the day you plan to cook. This makes it easier to whip up a delicious meal quickly. Now that you know the time breakdown, you can plan your cooking session with confidence!
Nutritional Information for Crispy Chicken Tenders Recipe
Understanding the nutritional content of your food is essential, especially when preparing delicious dishes like crispy chicken tenders. This section will provide you with key nutritional information to help you make informed choices. Here’s a breakdown of the calories, protein, and sodium content per serving of crispy chicken tenders.
Calories
350 calories. This calorie count includes the chicken, breading, and oil used for frying. While this dish is indulgent, it can fit into a balanced diet when enjoyed in moderation. Pairing it with healthy sides can also help create a more nutritious meal.
Protein
30 grams of protein. Protein is essential for building and repairing tissues, making it a vital part of your diet. Enjoying these tenders can help you meet your daily protein needs, especially if you’re active or looking to build muscle.
Advertisement
Sodium
800 milligrams. This amount can vary based on the seasoning and sauces you choose to use. While sodium is necessary for bodily functions, it’s important to monitor your intake. If you’re watching your sodium levels, consider using less salt in the marinade or opting for low-sodium sauces when serving.
In summary, crispy chicken tenders can be a tasty and satisfying meal option. With a good balance of calories, protein, and sodium, they can fit into a variety of dietary plans. Just remember to enjoy them alongside nutritious sides and dipping sauces for a well-rounded meal!
FAQs about Crispy Chicken Tenders Recipe
Can I make Crispy Chicken Tenders in the oven?
Absolutely! You can make crispy chicken tenders in the oven for a healthier option. To do this, preheat your oven to 400°F. After coating the chicken strips, place them on a baking sheet lined with parchment paper. For extra crispiness, lightly spray the coated chicken with cooking spray. Bake for 20-25 minutes, flipping halfway through, until they are golden brown and cooked through. This method gives you that satisfying crunch without the need for frying!
How do I store leftover Crispy Chicken Tenders?
Storing leftover crispy chicken tenders is easy! Allow them to cool completely before placing them in an airtight container. You can keep them in the refrigerator for up to 3 days. If you want to keep them longer, consider freezing them. To freeze, place the cooled tenders in a single layer on a baking sheet and freeze until solid. Then, transfer them to a freezer-safe bag or container. They can be stored in the freezer for up to 3 months. When ready to eat, reheat them in the oven for the best texture!
What can I use instead of breadcrumbs for Crispy Chicken Tenders?
If you’re looking for alternatives to breadcrumbs, there are several options you can try! Crushed cornflakes or panko-style gluten-free breadcrumbs work well for a crunchy coating. You can also use crushed crackers, such as saltines or Ritz, for a different flavor. For a low-carb option, consider using almond flour or crushed pork rinds. Each of these alternatives can provide a unique texture and taste, so feel free to experiment and find your favorite!
Conclusion on Crispy Chicken Tenders Recipe
In conclusion, making crispy chicken tenders is a rewarding experience that brings joy to both the cook and those who enjoy the meal. With a few simple ingredients and straightforward steps, you can create a dish that is not only delicious but also versatile. Whether you choose to fry or bake, the result is always a satisfying crunch paired with juicy chicken.
Remember, the key to perfect crispy chicken tenders lies in the marinating process, the right breading, and maintaining the correct oil temperature. By following the tips and variations provided, you can customize your tenders to suit your taste preferences. From spicy to baked options, there’s a crispy chicken tender recipe for everyone!
As you serve your crispy chicken tenders, don’t forget to include a variety of dipping sauces and side dishes. This not only enhances the meal but also makes it a fun experience for family and friends. Enjoy experimenting with different flavors and combinations to find what you love best.
So, gather your ingredients, roll up your sleeves, and get ready to impress your loved ones with your homemade crispy chicken tenders. Happy cooking!

Crispy Chicken Tenders Recipe for a Perfect Meal!
Ingredients
Method
- Marinate for Flavor: In a bowl, combine the chicken tenders and pickle juice. Cover and refrigerate for at least 30 minutes, or up to overnight for maximum flavor.
- Egg Wash Prep: Drain the pickle juice from the chicken. In a separate bowl, whisk together the egg and milk. Add the chicken to this mixture and let it sit while preparing the breading.
- Make the Breading: In a large ziplock bag, combine the flour, powdered sugar, paprika, cayenne, black pepper, and salt. Seal the bag and shake to mix thoroughly.
- Coat the Chicken: Remove each tender from the egg mixture and place it into the flour bag. Seal and shake until all tenders are evenly coated.
- Heat the Oil: Pour oil into a skillet over medium heat. Once the oil is hot, add chicken tenders in batches. Fry each batch for 3 to 5 minutes or until golden brown and fully cooked through.
- Drain and Serve: Transfer the tenders to a paper towel-lined plate to drain excess oil. Serve hot with dipping sauces like honey mustard, BBQ, or Chick-Fil-A sauce.
Notes
- Brining Time: The longer the chicken marinates in the pickle juice, the more flavorful and tender it becomes.
- Oil Tip: Peanut oil is preferred for a more authentic flavor, but canola oil works well too.
- Spice Adjustment: Reduce or increase the cayenne to control the heat level.
- Serving Ideas: Serve with waffle fries, a side salad, or in a sandwich with a buttered bun and pickles.