The moment those leaves start to turn and the air gets that crisp bite, I know it’s time to start conjuring up some fun fall treats! Enter the whimsical Cheese Broomsticks, your new go-to Halloween snack. With just three simple ingredients, these enchanting bites are the perfect way to get kids excited about kitchen time while ensuring that deliciousness reigns supreme at your Halloween festivities. Not only are they incredibly easy to whip up, but they also add a delightful twist to your snack table, turning mundane munchies into magical moments. These cheese-y, fun broomsticks promise to be a hit with both young and old alike. Ready to cast your culinary spell? Let’s create some enchanting bites together!

Why are Cheese Broomsticks a Halloween favorite?
Kid-Friendly Fun: These adorable Cheese Broomsticks bring a playful vibe to any Halloween gathering, making them the ideal treat for kids and adults alike.
Quick to Make: With just three ingredients, you’ll have these whimsical snacks ready in no time—perfect for spontaneous gatherings or school lunches.
Creative Presentation: Shaped like tiny broomsticks, they add a festive flair that’s sure to impress guests at your Halloween parties.
Versatile Ingredients: Feel free to swap out the cheese for your favorite flavors or try different pretzel sticks for added crunch—everyone can customize their broom!
Family Activity: Involve the whole family in the fun of assembling these treats; it’ll create lasting memories in the kitchen! For more easy ideas, check out my creamy honey pepper chicken or moist carrot cake with cream cheese frosting for tasty options!
Cheese Broomsticks Ingredients
• Get ready to create some spooky magic!
For the Broomsticks
- Pretzel Sticks – These provide the perfect ‘broom’ handle; choose straight ones for stability.
- Marbled Cheddar String Cheese – The magical component that forms the broom bristles; opt for firmer varieties to keep them intact.
- Substitution Note: You can experiment with other cheeses, but firmer options are best to avoid breakage.
- Chive Strings – These add a delightful touch, wrapping around the cheese to mimic broom ties; feel free to cut them to size for a perfect fit.
Step‑by‑Step Instructions for Cheese Broomsticks
Step 1: Prepare the Cheese
Begin by using a thin serrated knife to cut each marbled cheddar string cheese stick into thirds. This step is crucial, as each piece will become the broom bristles. Make your cuts gently to avoid breaking the cheese. You should have a total of nine pieces, each ready to be transformed into adorable broomsticks.
Step 2: Create Broom Bristles
Take each cheese piece and make lengthwise cuts about 3/4 of the way up, creating little slits to form the broom bristles. Rotate the cheese and cut again to enhance the texture without slicing all the way through. This will give your Cheese Broomsticks that whimsical broom appearance, combining both fun and flavor in every bite.
Step 3: Assemble the Broomsticks
Now it’s time to bring your Cheese Broomsticks to life! Gently insert a pretzel stick into the top of each cheese piece, ensuring it’s snug but not breaking through the bottom. The pretzel will serve as the sturdy handle of your broomstick, creating a delightful crunch to complement the creamy cheese.
Step 4: Add the Final Touch
Cut your chive strings into appropriate lengths, then wrap them around the top of each cheese stick, securing the pretzel in place, resembling the tie on a broom. This vibrant green detail adds a pop of color and enhances the overall presentation of your lovely Cheese Broomsticks, making them festive for Halloween gatherings.
Step 5: Serve and Enjoy
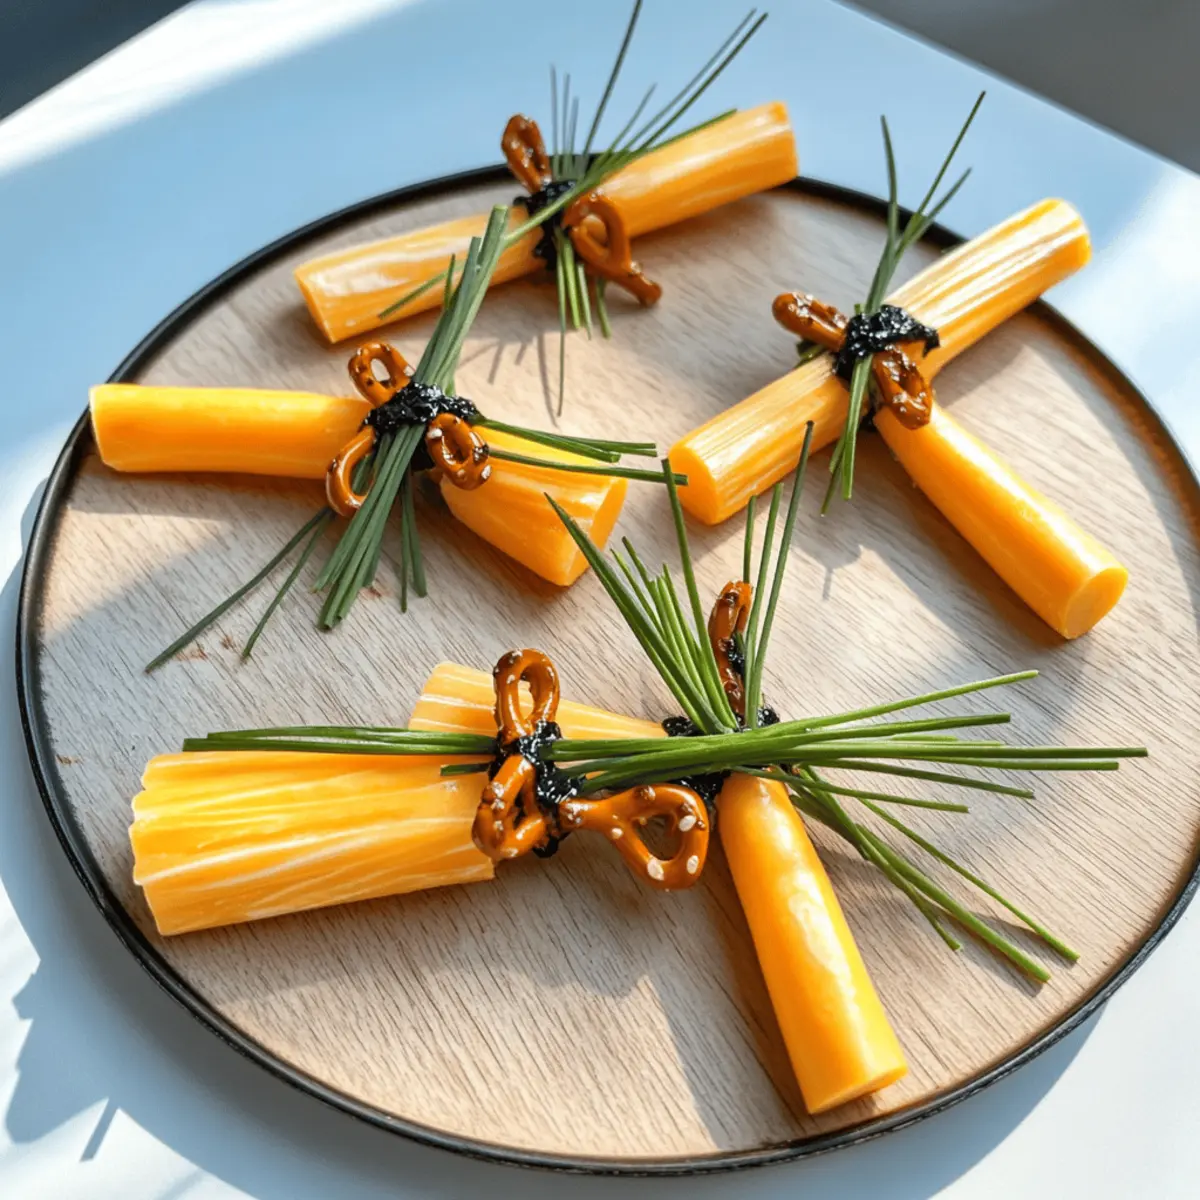
Your Cheese Broomsticks are now ready to be served! Place them on a festive platter, showcasing their charming broomstick appearance. These snacks are best enjoyed fresh, so gather your family and friends, and watch as they delight in this whimsical Halloween treat that combines fun and flavor in every bite.

What to Serve with Cheese Broomsticks?
Elevate your Halloween festivities with delightful pairings that compliment the whimsical charm of these cheesy treats.
-
Sweet Apple Slices: The crispness and sweetness of fresh apple slices provide a refreshing contrast to the savory cheese, making each bite a delightful experience.
-
Roasted Pumpkin Seeds: Crunchy and nutty, these seeds add an autumnal flair and a fun texture that balances the creamy cheese broomsticks beautifully.
-
Spooky Hummus Dip: A spooky-themed, vibrant hummus dip ignites creativity and adds a creamy zest that your guests will love to dip their broomsticks into!
-
Mini Cornbread Muffins: Soft and slightly sweet, cornbread muffins create a comforting complement, enhancing the fun of your Halloween-themed spread.
-
Vegetable Crudités: Fresh vegetables like carrots, cucumbers, and bell peppers not only add color but also present a satisfying crunch that harmonizes with the cheese’s smoothness.
-
Apple Cider: With its sweet, fruity essence, a glass of chilled apple cider makes for a festive and refreshing beverage to wash down those broomstick treats.
-
Chocolate-Covered Pretzels: For those with a sweet tooth, the juxtaposition of chocolate’s richness with the salty crunch of pretzels creates an indulgent treat that rounds out your Halloween menu perfectly.
-
Pumpkin Spice Muffins: Seasonal warmth fills the air with these moist muffins, creating the perfect sweet balance to the savory Broomsticks that everyone will adore!
Make Ahead Options
These Cheese Broomsticks are perfect for meal prep enthusiasts looking to save time during the busy Halloween season! You can prepare the cheese sticks by cutting them into thirds and creating the broom bristles up to 24 hours in advance. Simply store the cut cheese in an airtight container in the refrigerator to maintain their yumminess. However, I recommend assembling the broomsticks just before serving to keep the pretzels crunchy and fresh. If you need to, you can also pre-cut the chive strings, keeping them wrapped in a damp paper towel to prevent them from wilting. When it’s time to impress your guests, just insert the pretzel sticks and wrap with chives for a breathtaking spooky snack that looks and tastes just as delicious!
How to Store and Freeze Cheese Broomsticks
Room Temperature: Serve Cheese Broomsticks immediately for the best flavor and texture; they are best enjoyed fresh.
Fridge: If needed, store in an airtight container for up to 2 days, but be mindful that pretzels may lose their crunch.
Freezer: It’s not recommended to freeze Cheese Broomsticks; the texture of the cheese and pretzels may alter significantly when thawed.
Reheating: For any leftover components, gently reheat cheese in the microwave briefly, but avoid the pretzels to maintain their crispness.
Expert Tips for Cheese Broomsticks
- Serve Fresh: Ensure optimal taste by serving these Cheese Broomsticks right after assembly; refrigeration may lead to a soggy pretzel texture.
- Gentle Cutting: Use a thin serrated knife for cutting cheese to prevent breakage, ensuring that your broomsticks stay sturdy and look adorable.
- Involve Kids: Make the assembly process a fun family activity! Kids love getting hands-on, making these snacks even more special.
- Customize Cheese: Feel free to get creative with the cheese! Experiment with flavors like pepper jack or mozzarella for a unique twist on your Cheese Broomsticks.
- Choose Right Pretzels: Select straight, sturdy pretzel sticks to serve as broom handles; bendy ones might not hold up well during assembly.
Cheese Broomsticks Variations & Substitutions
Feel free to unleash your creativity and tailor these Cheese Broomsticks to fit your tastes and dietary needs!
-
Different Cheeses:
Experiment with pepper jack or mozzarella for a unique flavor twist. Each cheese brings its own personality to the broomsticks! -
Flavored Pretzels:
Try using pretzel sticks with flavors like garlic or cheese for an exciting taste surprise. The added seasoning enhances the overall experience! -
Herb Toss:
Incorporate fresh herbs like parsley or basil instead of chives for an aromatic touch. This not only elevates the flavor but also adds vibrant color. -
Spicy Kick:
Crushed red pepper flakes can add a bit of heat if you dare! Just sprinkle a touch inside the cheese before assembly for a surprising zest. -
Crunchy Additions:
Consider adding slivered almonds or sunflower seeds at the base of the cheese for extra crunch. This twist will have everyone reaching for more! -
Sweet Treats:
For a sweet angle, substitute string cheese with chocolate-covered caramel or marshmallow sticks, creating a whimsical dessert version. S’mores-inspired broomsticks, anyone? -
Colorful Presentation:
Use food-safe markers to draw spooky designs on the cheese, turning these treats into a canvas of Halloween art! -
Easy Dips:
Pair with a dipping sauce like ranch or spicy mustard to add a unique flavor contrast. Your Cheese Broomsticks will become a crowd-pleaser at any gathering.
These simple variations will make your Cheese Broomsticks an even more exciting Halloween treat! Speaking of fun snacks, consider trying out my no-bake Biscoff cheesecake for another delightful dessert option.

Cheese Broomsticks Recipe FAQs
What type of pretzel sticks should I use for Cheese Broomsticks?
Using straight, sturdy pretzel sticks is ideal for creating the broom handles. Ensure they’re not too bendy, as this can compromise the structural integrity of your adorable creations. Straight pretzels maintain their shape, lending to a better presentation and delightful crunch!
How should I store leftover Cheese Broomsticks?
If you find yourself with any leftover Cheese Broomsticks, it’s best to store them in an airtight container at room temperature for up to 2 days. This method helps preserve the delicious flavor, but keep in mind that the pretzels may lose their crunch. Don’t refrigerate them, as this could lead to a soggy texture.
Advertisement
Can you freeze Cheese Broomsticks?
I wouldn’t recommend freezing Cheese Broomsticks. Freezing alters the texture of both the cheese and pretzel sticks, leading to disappointment when you thaw and serve them. They are best enjoyed fresh right after assembly for the ultimate taste experience.
How do I choose the right cheese for my Cheese Broomsticks?
For the best results, opt for firmer cheese varieties like marbled cheddar, as they hold their shape better during cutting and assembly. If you’d like to experiment, you can try cheeses like pepper jack or mozzarella, but make sure they’re sufficiently firm to avoid breakage.
What if my Cheese Broomsticks start to break while preparing them?
Absolutely, the key is to handle the cheese gently while cutting. Using a thin serrated knife helps minimize breaks. If your cheese does start to break, don’t worry! Simply use the pieces as more of a cheese dipper for the pretzels or serve alongside extra cheese. Making it a creative presentation can still turn mishaps into a fun experience!
Are there any dietary considerations for Cheese Broomsticks?
If you’re considering dietary restrictions, note that cheese can be a common allergen. Be sure to check with guests regarding dairy allergies. For a dairy-free alternative, consider using vegan cheese options, ensuring they’re firm enough to withstand the cutting and assembly process. Engage everyone by asking about their favorite flavors as you create your enchanting treats!
Cheese Broomsticks: Easy 3-Ingredient Halloween Fun
Ingredients
Equipment
Method
- Begin by using a thin serrated knife to cut each marbled cheddar string cheese stick into thirds. You should have a total of nine pieces, each ready to be transformed into adorable broomsticks.
- Take each cheese piece and make lengthwise cuts about 3/4 of the way up, creating little slits to form the broom bristles.
- Gently insert a pretzel stick into the top of each cheese piece, ensuring it’s snug but not breaking through the bottom.
- Cut your chive strings into appropriate lengths, then wrap them around the top of each cheese stick.
- Your Cheese Broomsticks are now ready to be served! Place them on a festive platter.