gutenberg
Introduction to Mini Fruit Tarts
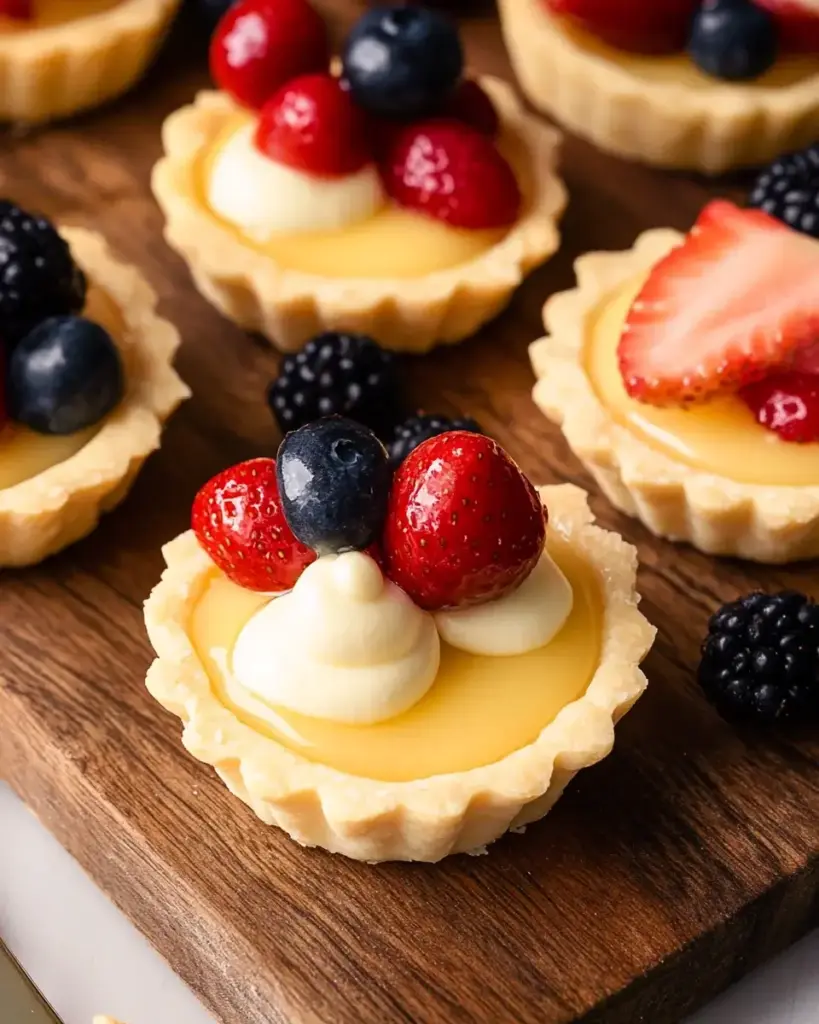
As a busy mom, I know how precious time can be, especially when it comes to whipping up something special for my family. That’s why I absolutely adore these Mini Fruit Tarts! They’re not just delightful bite-sized desserts; they’re a quick solution for a busy day or a charming treat to impress your loved ones. With a creamy filling and a colorful array of fresh fruits, these tarts are as pleasing to the eye as they are to the palate. Trust me, once you try this easy recipe, you’ll find yourself making them for every occasion!
Why You’ll Love This Mini Fruit Tarts
These Mini Fruit Tarts are a game-changer for anyone looking to impress without the stress. They come together quickly, making them perfect for last-minute gatherings or a sweet surprise for your family. The combination of a creamy filling and fresh fruit creates a burst of flavor in every bite. Plus, they’re versatile enough to suit any occasion, from birthday parties to casual weeknight desserts. You’ll love how easy they are to make!
Ingredients for Mini Fruit Tarts
Gathering the right ingredients is the first step to creating these delightful Mini Fruit Tarts. Here’s what you’ll need:
- All-purpose flour: This forms the base of your tart shells, giving them structure and a light texture.
- Powdered sugar: A touch of sweetness for both the tart shells and the creamy filling, making everything melt in your mouth.
- Unsalted butter: Adds richness and helps create a tender crust. Make sure it’s softened for easy mixing!
- Salt: Just a pinch enhances the flavors and balances the sweetness.
- Cream cheese: This is the star of the filling, providing a creamy, tangy base that pairs perfectly with fresh fruit.
- Vanilla extract: A splash of this adds warmth and depth to the filling, making it irresistible.
- Whipped cream: Lightens the filling and adds a fluffy texture. You can use store-bought or whip your own!
- Mixed fresh fruit: Choose your favorites! Strawberries, blueberries, kiwi, and raspberries not only taste great but also add vibrant color.
For those with dietary restrictions, you can easily substitute the all-purpose flour with a gluten-free blend. Feel free to experiment with seasonal fruits, like peaches or mangoes, for a tropical twist!
Exact measurements for these ingredients can be found at the bottom of the article, ready for you to print and take to the kitchen.
How to Make Mini Fruit Tarts
Now that you have your ingredients ready, let’s dive into the fun part: making these delightful Mini Fruit Tarts! Follow these simple steps, and you’ll have a beautiful dessert that’s sure to impress.
Step 1: Preheat the Oven
First things first, preheat your oven to 350°F (175°C). Preheating is crucial because it ensures that your tart shells bake evenly. A hot oven helps create that perfect golden crust, so don’t skip this step!
Step 2: Prepare the Tart Shells
In a mixing bowl, combine the all-purpose flour, powdered sugar, and salt. Then, add the softened butter. Mix until the mixture resembles coarse crumbs. It should feel a bit like sand between your fingers. Now, press this mixture into the bottom and up the sides of a mini muffin tin. Make sure to pack it tightly to form sturdy tart shells.
Step 3: Bake the Tart Shells
Pop the muffin tin into your preheated oven and bake for 12-15 minutes. Keep an eye on them! You want them to be lightly golden, not brown. A good tip is to check them a minute or two before the timer goes off. Once done, let them cool completely in the tin.
Step 4: Make the Cream Cheese Filling
While the tart shells cool, let’s whip up the filling! In a separate bowl, beat the cream cheese until it’s smooth and creamy. Gradually add the powdered sugar and vanilla extract, mixing until everything is well combined. The goal is a silky texture that’s easy to spread.
Step 5: Fill the Tart Shells
Once your tart shells are cool, it’s time to fill them! Spoon the cream cheese mixture into each shell, filling them generously but not overflowing. A small offset spatula or the back of a spoon works wonders for this step, giving you a nice, even layer.
Step 6: Top with Fresh Fruit
Now comes the fun part—topping your tarts with fresh fruit! Arrange your mixed fruits on top of the cream cheese filling. Get creative! You can create a rainbow effect with strawberries, blueberries, kiwi, and raspberries. The more colorful, the better!
Step 7: Chill Before Serving
Finally, chill your Mini Fruit Tarts in the refrigerator for at least 30 minutes. This step is essential as it allows the flavors to meld together beautifully. Plus, the tarts will be refreshingly cool when served, making them even more delightful!

Tips for Success
- Use room temperature ingredients for a smoother filling.
- Don’t overmix the cream cheese filling; it should be light and fluffy.
- Experiment with different fruit combinations for variety.
- Make the tart shells ahead of time and fill them just before serving.
- For a touch of elegance, drizzle a bit of honey over the fruit before serving.
Equipment Needed
- Mini muffin tin: If you don’t have one, a regular muffin tin works too; just adjust the baking time.
- Mixing bowls: A set of different sizes is handy for mixing ingredients.
- Electric mixer: A hand mixer is perfect for whipping the cream cheese filling.
- Offset spatula: Great for filling the tart shells evenly; a regular spoon works too!
Variations
- For a chocolate twist, add cocoa powder to the cream cheese filling for a rich flavor.
- Try using Greek yogurt instead of cream cheese for a lighter, tangy filling.
- Incorporate a splash of citrus juice, like lemon or orange, into the filling for a zesty kick.
- Swap out the mixed fruits for a single type, like peaches or mangoes, for a more focused flavor.
- For a nutty flavor, sprinkle crushed nuts on top of the fruit before serving.
Serving Suggestions
- Pair your Mini Fruit Tarts with a refreshing glass of iced tea or lemonade for a delightful summer treat.
- Serve them on a colorful platter to showcase the vibrant fruits and make a stunning presentation.
- For a cozy touch, enjoy them alongside a warm cup of coffee or hot chocolate.
FAQs about Mini Fruit Tarts
Can I make Mini Fruit Tarts ahead of time?
Absolutely! You can prepare the tart shells a day in advance. Just fill them with the cream cheese mixture and top with fresh fruit right before serving. This keeps everything fresh and delicious!
What fruits work best for Mini Fruit Tarts?
While strawberries, blueberries, kiwi, and raspberries are classic choices, feel free to get creative! Seasonal fruits like peaches or mangoes can add a delightful twist. Just make sure they’re ripe and sweet!
How do I store leftover Mini Fruit Tarts?
Store any leftovers in an airtight container in the refrigerator. They’re best enjoyed within a day or two, as the fruit can start to lose its freshness over time.
Can I use a different filling for the tarts?
Definitely! You can experiment with different fillings like pastry cream, yogurt, or even a chocolate mousse. Just ensure the filling complements the fresh fruit for a balanced flavor.
Advertisement
Are Mini Fruit Tarts suitable for special diets?
Yes! You can easily make these tarts gluten-free by using a gluten-free flour blend. Additionally, substituting cream cheese with Greek yogurt can make them lighter and healthier!
Final Thoughts
Making Mini Fruit Tarts is more than just baking; it’s about creating joyful moments with family and friends. Each bite is a celebration of fresh flavors and creamy goodness, bringing smiles all around the table. I love how these tarts can transform an ordinary day into something special, whether it’s a casual weeknight dessert or a festive gathering. Plus, they’re so easy to whip up, even on the busiest days! So, roll up your sleeves, gather your loved ones, and dive into this delightful recipe. Trust me, you’ll be savoring every delicious moment!
“`
Mini Fruit Tarts: Delight in This Easy, Fresh Recipe!
Ingredients
Method
- Preheat your oven to 350°F (175°C).
- In a mixing bowl, combine the flour, powdered sugar, and salt. Add the softened butter and mix until the mixture resembles coarse crumbs.
- Press the mixture into the bottom and up the sides of a mini muffin tin to form tart shells. Bake for 12-15 minutes or until lightly golden. Allow to cool completely.
- In another bowl, beat the cream cheese until smooth. Gradually add the powdered sugar and vanilla extract, mixing until well combined.
- Gently fold in the whipped cream until the mixture is light and fluffy.
- Once the tart shells are cool, fill each shell with the cream cheese mixture.
- Top each tart with a variety of fresh fruit. Arrange the fruit in a decorative pattern for an appealing presentation.
- Chill the tarts in the refrigerator for at least 30 minutes before serving to allow the flavors to meld.
Nutrition
Notes
- For a gluten-free option, substitute the all-purpose flour with a gluten-free flour blend.
- Experiment with different fruits based on the season or your personal preference, such as peaches or mangoes for a tropical twist.