Introduction
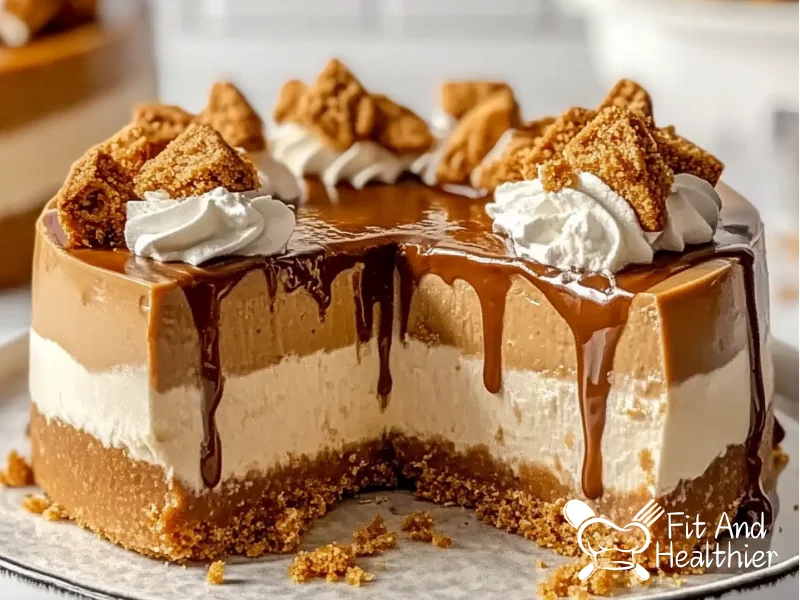
Imagine the first bite of a smooth, creamy cheesecake paired with the spiced sweetness of Biscoff. It’s not just a dessert; it’s a sensory experience that feels indulgent, comforting, and unforgettable. This Biscoff Cheesecake Recipe is here to make those dessert dreams a reality—no baking required. Whether you’re planning a dinner party, celebrating a special occasion, or simply craving a sweet treat, this easy recipe will quickly become your go-to dessert.
What Makes Biscoff Cheesecake So Special?
A Unique Twist on Classic Cheesecake
Traditional cheesecake is beloved for its creamy texture and rich flavor, but adding Biscoff takes it to the next level. The cookies’ warm, spiced notes perfectly complement the cream cheese, creating a dessert that’s both familiar and unique.
Perfect for Any Occasion
This no-bake cheesecake is versatile enough for any setting. Its elegant presentation makes it ideal for celebrations, while its ease of preparation makes it perfect for casual gatherings or weekday indulgences.
Ingredients for No-Bake Biscoff Cheesecake
Gathering your ingredients ahead of time ensures a smooth baking experience. Here’s what you’ll need:
For the Base
| Ingredient | Quantity |
| Biscoff biscuits | 250 grams |
| Unsalted butter | 75 grams |
For the Cheesecake Filling
| Ingredient | Quantity |
| Cream cheese | 1000 grams |
| Granulated sugar | 150 grams |
| Brown sugar | 150 grams |
| Sour cream | 150 grams |
| Vanilla paste | 2 tablespoons |
| Biscoff spread | 200 grams |
| Eggs | 3 large + 2 yolks |
For the Topping
| Ingredient | Quantity |
| Biscoff spread | 150 grams |
| Biscoff biscuits | 8 pieces |
Step-by-Step Guide to Making Biscoff Cheesecake
Step 1: Preparing the Base
- Crush the Cookies
Start by crushing the Biscoff biscuits into fine crumbs. You can use a food processor or place the cookies in a sealed bag and crush them with a rolling pin. - Mix with Butter
Melt the unsalted butter and combine it with the cookie crumbs. The mixture should have the consistency of wet sand. - Press into the Pan
Line an 8- or 9-inch springform pan with parchment paper. Press the crumb mixture firmly into the bottom of the pan to form an even base. - Bake for Stability
Preheat your oven to 175°C (350°F). Bake the base for 8–10 minutes, then let it cool completely before adding the filling.
Step 2: Making the Cheesecake Filling
- Beat the Cream Cheese
In a large mixing bowl, beat the cream cheese with an electric mixer until it’s smooth and lump-free. This step is crucial for a creamy texture. - Add the Sugars
Gradually mix in the granulated sugar and brown sugar. The mixture should be thick, smooth, and slightly fluffy. - Incorporate the Flavorings
Add sour cream, vanilla paste, and Biscoff spread. Stir by hand to ensure everything is well combined. - Mix in the Eggs
Add the eggs and yolks one at a time, mixing gently after each addition. Be careful not to overmix, as this can incorporate too much air into the batter.
Step 3: Assembling and Baking
- Pour the Filling
Pour the cheesecake batter over the cooled crust in the springform pan. - Create a Water Bath
Wrap the springform pan tightly with foil to prevent water from seeping in. Place it in a larger baking dish, then add hot water to the dish to create a water bath. - Bake Slowly
Reduce the oven temperature to 165°C (325°F) and bake for 60 minutes. - Cool Gradually
Turn off the oven and crack the door open slightly. Let the cheesecake cool in the oven for an hour before transferring it to the counter to cool completely.
Step 4: Chilling and Topping
- Refrigerate Overnight
Once the cheesecake is completely cool, cover it and place it in the refrigerator for at least 8 hours or overnight. - Add the Toppings
Warm the Biscoff spread slightly and drizzle it over the cheesecake. Arrange whole Biscoff biscuits on top for decoration. - Slice and Serve
Use a sharp knife to slice the cheesecake into even pieces. Serve with whipped cream for an extra indulgent touch.
Pro Tips for a Perfect Cheesecake
- Room Temperature Ingredients
Ensure your cream cheese, eggs, and sour cream are at room temperature for a smoother batter. - Prevent Cracks
The water bath helps maintain an even baking temperature, reducing the risk of cracks. - Invest in a Good Springform Pan
A quality pan ensures easy removal and a professional-looking cheesecake. - Customize the Topping
Add crushed Biscoff cookies, white chocolate shavings, or even fresh fruit for a unique twist.
Creative Variations
- Chocolate Biscoff Cheesecake: Add a layer of chocolate ganache over the cheesecake before drizzling with Biscoff spread.
- Mini Cheesecakes: Use a muffin tin to create individual servings.
- Nutty Twist: Sprinkle chopped hazelnuts or almonds over the topping for added crunch.
- No-Bake Version: Skip the baking process entirely and let the cheesecake set in the fridge.
FAQs About Biscoff Cheesecake
Can I freeze Biscoff Cheesecake?
Yes! Wrap the cheesecake tightly in plastic wrap and foil, then freeze for up to 3 months. Thaw in the refrigerator overnight before serving.
What’s the best way to store leftovers?
Keep the cheesecake covered in the fridge for up to 5 days.
Can I use a different type of cookie for the crust?
Absolutely! Digestive biscuits, graham crackers, or chocolate cookies all work well.
How do I avoid a soggy crust?
Baking the crust before adding the filling helps prevent it from becoming soggy.
Conclusion
This Biscoff Cheesecake Recipe offers the perfect balance of creamy texture and spiced flavor. Its elegant appearance and decadent taste make it a standout dessert for any occasion, while its simple preparation ensures that anyone can succeed in creating it.
So why wait? Gather your ingredients, follow the steps, and let your kitchen transform into a haven of sweet, spiced aromas. Your loved ones (and your taste buds) will thank you for it.
Advertisement
If you try this recipe, don’t forget to share your results and let us know how it turned out. Happy baking!

