A Nostalgic Easter Delight
Easter has always been a time of joy, renewal, and—most importantly—sweet indulgence. As a child, I vividly remember the excitement of hunting for chocolate eggs in the backyard, my basket filling up with little treasures wrapped in shiny foil. But there was always one tradition that stood above the rest—baking the Easter Nest Cake with my grandmother.
Her kitchen smelled of warm cocoa and vanilla, the air thick with anticipation as we mixed, baked, and assembled our masterpiece. The cake wasn’t just about its rich chocolate flavor or the satisfying crunch of its nest; it was about the laughter, the flour-dusted aprons, and the stories shared over spoonfuls of icing.
Now, as I pass this recipe down to my own family, I realize that Easter Nest Cake is more than just a dessert. It’s a symbol of togetherness, a piece of childhood magic that never fades. Whether you’re baking it for the first time or continuing a cherished family tradition, this cake is sure to bring smiles, warmth, and a touch of Easter wonder to your home.
What Makes the Easter Nest Cake Special?
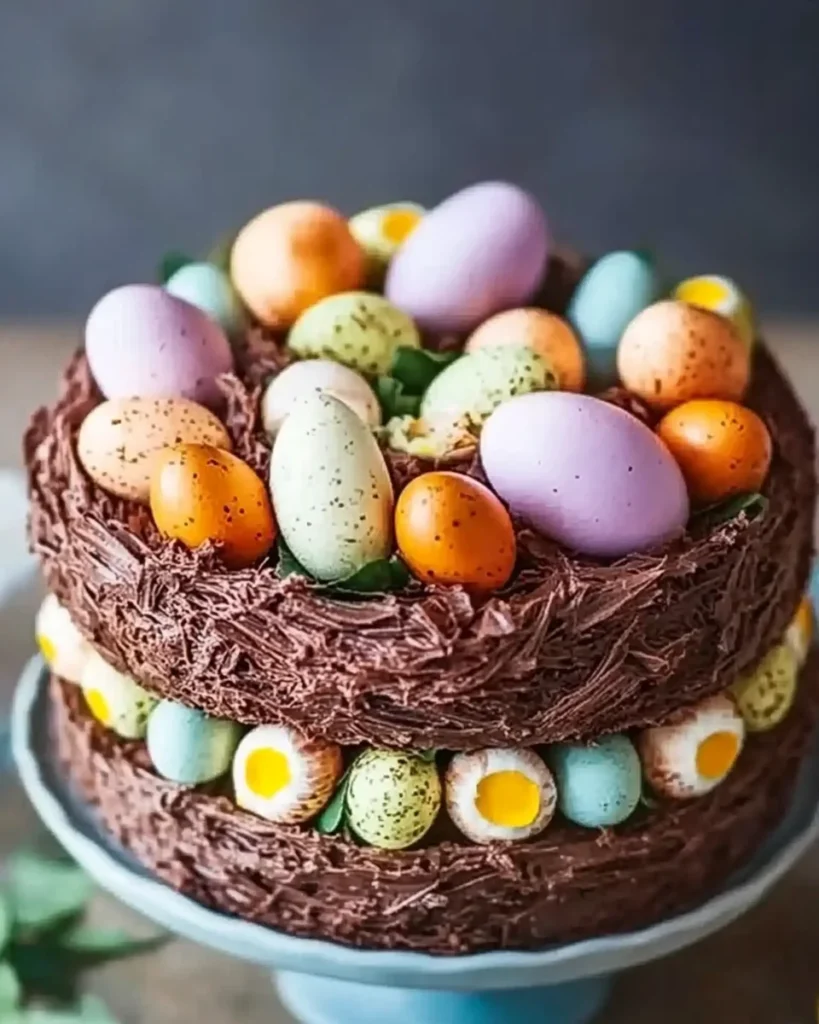
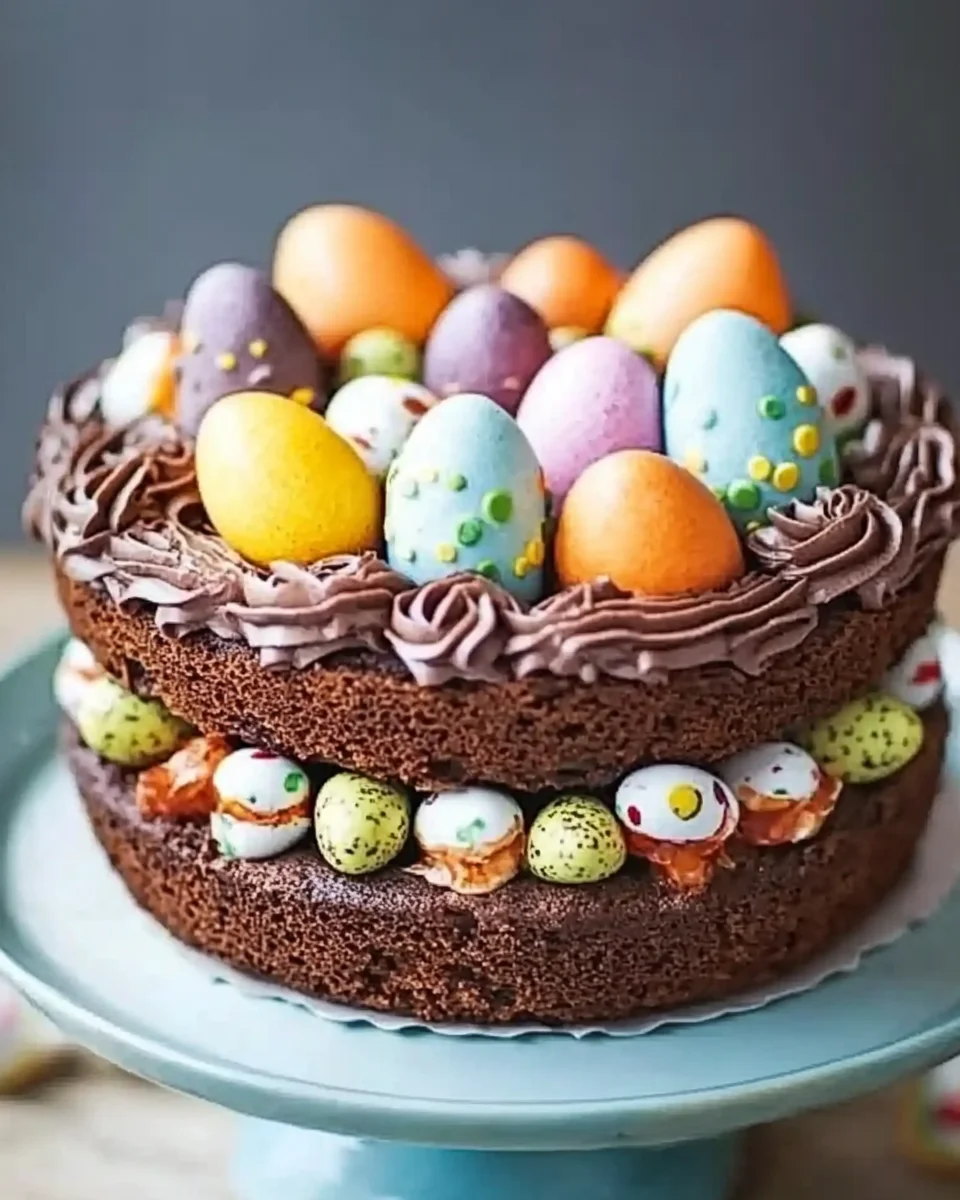
Easter Nest Cake is not just another chocolate cake—it’s a show-stopping centerpiece that captures the essence of Easter celebrations. With its moist, cocoa-rich sponge and a unique nest made from marshmallows, pretzels, and shredded wheat, it offers a delightful combination of textures and flavors. The finishing touch? A bounty of chocolate eggs nestled in the crispy, chocolatey nest, making it an irresistible treat for both kids and adults.
But beyond its stunning appearance, what truly sets this cake apart is its ability to bring people together. Whether you’re baking it with children, friends, or family, it’s a fun and interactive experience that turns the kitchen into a place of joy and creativity.
A Cake That Appeals to All Ages
One of the best things about the Easter Nest Cake is its universal appeal.
- For Kids: The excitement of shaping the edible nest and filling it with colorful chocolate eggs makes this cake a dream come true for little bakers.
- For Adults: The deep chocolate flavor, combined with the nostalgic joy of Easter traditions, makes this cake just as enjoyable for grown-ups.
- For Family Gatherings: This cake serves as a stunning centerpiece, sparking conversations and sweet moments shared around the table.
Unlike traditional Easter cakes, which often lean towards fruit or spiced flavors, this chocolate delight caters to a wider audience, making it a guaranteed crowd-pleaser.
FAQs: Everything You Need to Know About Easter Nest Cake
1. Can I Make the Cake in Advance?
Yes! The sponge layers can be baked a day or two ahead of time. Simply wrap them tightly in plastic wrap and store them at room temperature. The nest can also be prepared in advance and kept in an airtight container. Assemble everything on the day you plan to serve for the freshest taste.
2. Can I Use a Different Base Instead of Chocolate Cake?
Absolutely! While the classic version uses a chocolate sponge, you can experiment with vanilla, carrot, or even a lemon-flavored cake. However, the rich chocolate base pairs best with the nest and decorations.
3. What Can I Use Instead of Shredded Wheat for the Nest?
If you’re not a fan of shredded wheat, you can use crushed cornflakes, Rice Krispies, or even crumbled biscuits. The key is to mix them well with the melted marshmallow and butter mixture to create a firm, nest-like structure.
4. How Do I Prevent My Cake from Being Too Dry?
Chocolate cakes can sometimes turn out dry if overbaked. To keep yours moist, be sure to check for doneness with a skewer and remove the cake as soon as it comes out clean. Adding buttermilk or yogurt to the batter also helps maintain a soft, tender crumb.
5. Can I Make a No-Bake Version of This Cake?
Yes! If you’re short on time, you can make a no-bake version by layering chocolate mousse or cheesecake filling in a springform pan and topping it with the marshmallow nest. This alternative is just as delicious and requires minimal effort.
6. What Are Some Fun Variations for the Nest Decoration?
While chocolate eggs are the traditional choice, you can also use:
- Jelly beans for a colorful touch
- Fresh berries for a slightly healthier twist
- White chocolate shavings for a “snowy” nest effect
- Mini marshmallows for a soft contrast to the crunchy nest
The Magic of Baking Together
One of the most beautiful aspects of the Easter Nest Cake is that it’s not just a recipe—it’s an experience. Whether you’re baking it with kids who love getting their hands messy or with a group of friends reminiscing about childhood Easter celebrations, the process is just as rewarding as the final product.
Baking together fosters creativity, patience, and a sense of accomplishment. Watching the cake rise in the oven, shaping the nest, and finally decorating it with vibrant chocolate eggs brings a sense of joy that goes beyond taste.
Advertisement
Tips for a Flawless Easter Nest Cake
- Use Room Temperature Ingredients – This ensures a smooth, even batter and helps the cake bake more evenly.
- Grease Your Cake Tins Well – Lining them with parchment paper prevents sticking and makes for easy removal.
- Chill the Nest Before Placing It on the Cake – This helps it hold its shape and makes decorating much easier.
- Be Generous with the Icing – A thick layer of buttercream enhances both the texture and flavor of the cake.
- Let Kids Take the Lead – If you’re baking with little ones, give them creative control over the decoration—it makes the process even more special.
The Perfect Ending to Your Easter Feast
As you slice into the Easter Nest Cake, the rich chocolate layers, creamy icing, and crunchy nest come together in a perfect harmony of flavors. Each bite is a reminder of the simple joys of the season—family, laughter, and, of course, plenty of chocolate.
Easter may come once a year, but the memories made in the kitchen last a lifetime. Whether this cake becomes a new tradition in your home or simply a delightful treat for the holiday, it’s sure to bring happiness to everyone who shares it.
So gather your loved ones, tie on those aprons, and start baking. After all, the best part of Easter isn’t just the sweets—it’s the moments we create while making them.
Easter Nest Cake: A Celebration of Sweet Memories
Ingredients
Method
- Prepare & Mix – Preheat the oven to 180°C (160°C fan) or gas mark 4. Grease and line two 20cm round cake tins. In a bowl, whisk together flour, cocoa powder, baking powder, bicarbonate of soda, sugar, and salt, breaking up any lumps.
- Combine Wet & Dry Ingredients – In a jug, whisk together the oil and buttermilk, then add vanilla extract and eggs. Pour the wet mixture into the dry ingredients, stirring until fully combined.
- Bake to Perfection – Divide the batter between the prepared tins and bake for 25 minutes. Check for doneness with a skewer—if it comes out clean, the cakes are ready. Let them cool in the tins for 15 minutes before transferring to wire racks.
- Build the Nest – Line one of the cake tins with oiled baking parchment. Melt the marshmallows and butter in a microwave or on the stove, stirring frequently until smooth. Mix in cocoa powder, crushed pretzels, and shredded wheat. Shape into a nest inside the lined tin and allow it to cool completely.
- Create the Icing – Beat the butter, cocoa powder, icing sugar, and milk together until smooth. Add a little extra milk if needed for a creamy consistency.
- Assemble the Masterpiece – Layer the cooled sponges with icing in between. Spread icing on top, then carefully place the chocolate nest on the cake. Fill the nest with chocolate eggs and serve. For easier slicing, remove the nest first, cut the cake, and serve the nest pieces separately.
Notes
- Use high-quality cocoa powder for a richer chocolate flavor.
- The chocolate nest can be made a day in advance for convenience.
- Swap buttermilk with a mix of milk and lemon juice if needed (1 tbsp lemon juice + milk to make 150ml).
- Store the cake in an airtight container at room temperature for up to 3 days.