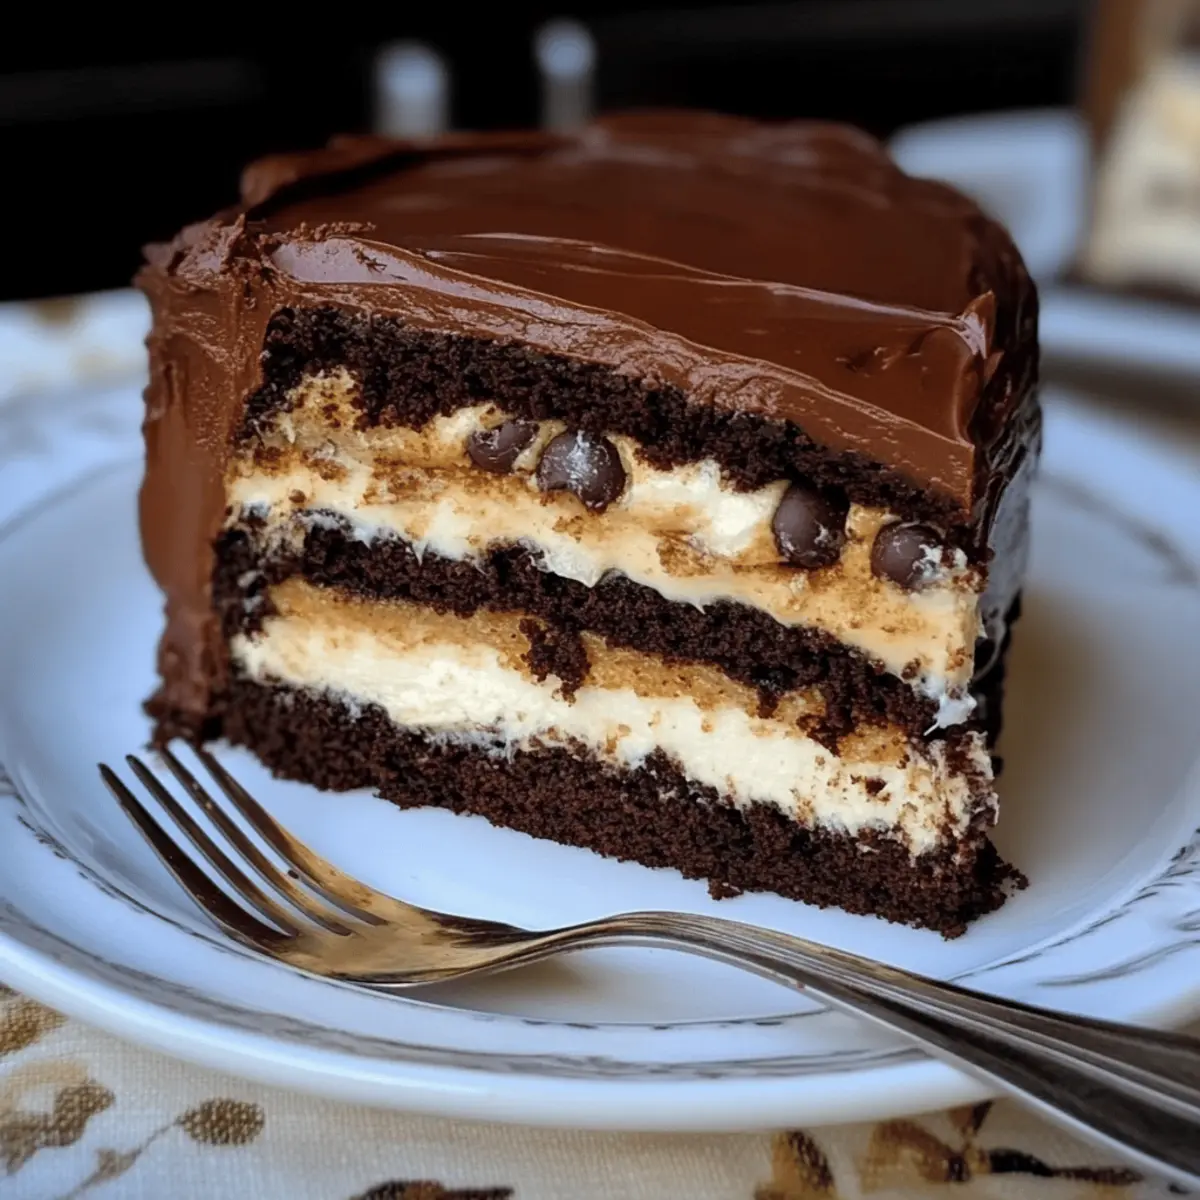
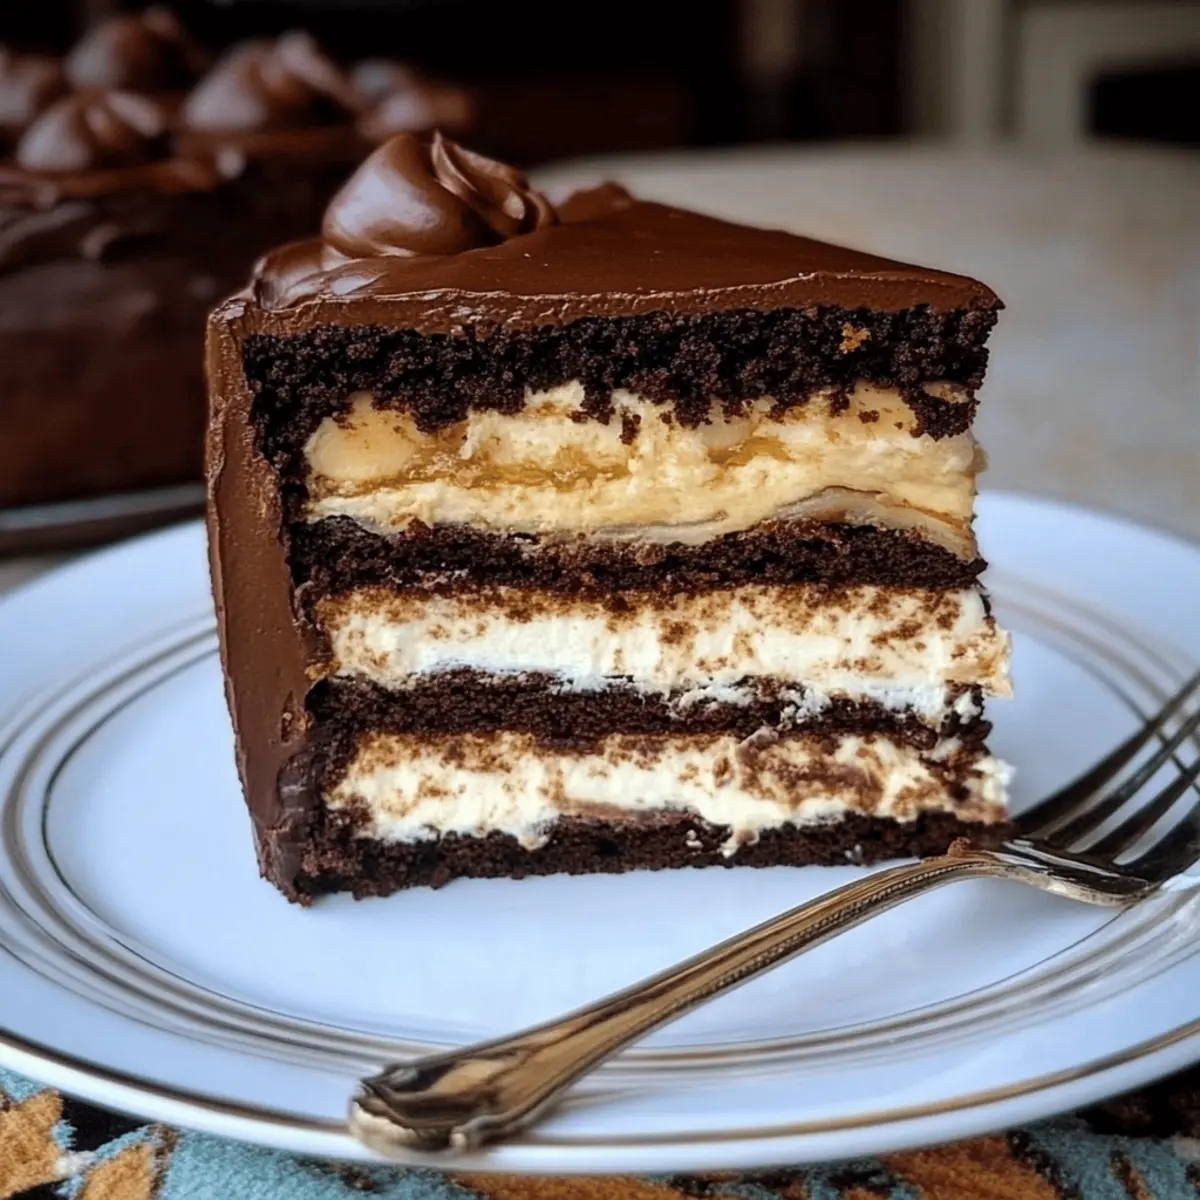
As I pulled the warm brownies from the oven, a cozy wave of nostalgia washed over me, reminding me of afternoons spent baking with my family. This is the magical moment that leads to creating the showstopping 7-Layer Sin Cake, a confection that brings together the best of brownies, cheesecake, and chocolate chip cookies. What makes this cake a true crowd-pleaser? Its impressive layers not only wow visually but also deliver a delightful array of textures with each bite. Plus, it’s perfect for celebratory gatherings, whether it’s Christmas or a special anniversary! With a delightful combination of creamy frosting and crunchy graham crackers, it’s an indulgent treat that’s as fun to make as it is to eat. Are you ready to elevate your dessert game and impress everyone at the table? Let’s dive into this layered wonder!
Why is 7 Layer Sin Cake irresistible?
Indulgent Layers: Each layer of this cake is packed with flavor, from rich brownie bases to creamy cheesecake that melts in your mouth.
Unforgettable Texture: The contrast of chewy chocolate chip cookies and crunchy graham crackers adds a delightful surprise in every slice.
Visual Showstopper: This cake is a stunning centerpiece that’s sure to impress your guests, making it ideal for celebrations like birthdays and anniversaries.
Easy to Customize: Feel free to swap ingredients or add flavors, like using peanut butter cookies or flavored cream cheese, for a unique twist.
Fun to Make Together: Gather friends or family in the kitchen to help assemble this beautiful cake, creating sweet memories along the way.
Why not pair it with a cup of coffee or a holiday drink for an even better experience? Your loved ones will be raving about this indulgent creation!
7 Layer Sin Cake Ingredients
For the Brownie Layers
• Unsalted Butter – Melted butter adds richness and helps achieve the perfect fudgy texture.
• Granulated Sugar – Sweetens the batter and contributes to the brownie’s shiny crust.
• Brown Sugar – Enhances moisture and provides a caramel-like flavor.
• Eggs – Bind the ingredients together and create a dense structure.
• All-Purpose Flour – Necessary for stability; be careful not to overmix.
• Cocoa Powder – Brings out the chocolatey depth in the brownies.
• Vanilla Extract – Adds a layer of warmth to the overall flavor.
For the Cheesecake Layers
• Full-Fat Cream Cheese – Ensures the cheesecake is creamy and rich; use block, not spreadable.
• Granulated Sugar – Balances the tanginess of the cream cheese for a sweet bite.
• Eggs – Help set the cheesecake as it bakes; use at room temperature for best incorporation.
• Sour Cream – Adds an extra layer of creaminess and a slight tang.
• Vanilla Extract – Essential for flavor enhancement throughout the cheesecake.
For the Cookie Layers
• Chocolate Chip Cookie Dough – Provides a soft and chewy element; avoid overbaking for the best texture.
• Semi-Sweet Chocolate Chips – Intensify the chocolate flavor within the cookie layers.
For the Graham Cracker Layers
• Graham Crackers – Crushed pieces contribute a delightful crunch; perfect for layering.
• Butter – When mixed with graham crackers, it creates a robust, crumbly layer.
For the Frostings
• Marshmallow Fluff – Lightens up the texture of the filling while adding sweetness.
• Unsalted Butter – Use softened butter for seamless mixing in frostings.
• Powdered Sugar – Sweetens the frostings, giving them a soft and spreadable consistency.
• Cocoa Powder – Essential for the chocolate frosting, delivering rich chocolate flavor.
• Milk – Helps achieve the desired smooth consistency for the frosting.
This 7 Layer Sin Cake will undoubtedly be the star of your next celebration, enticing friends and family with its layers of indulgence.
Step‑by‑Step Instructions for 7 Layer Sin Cake
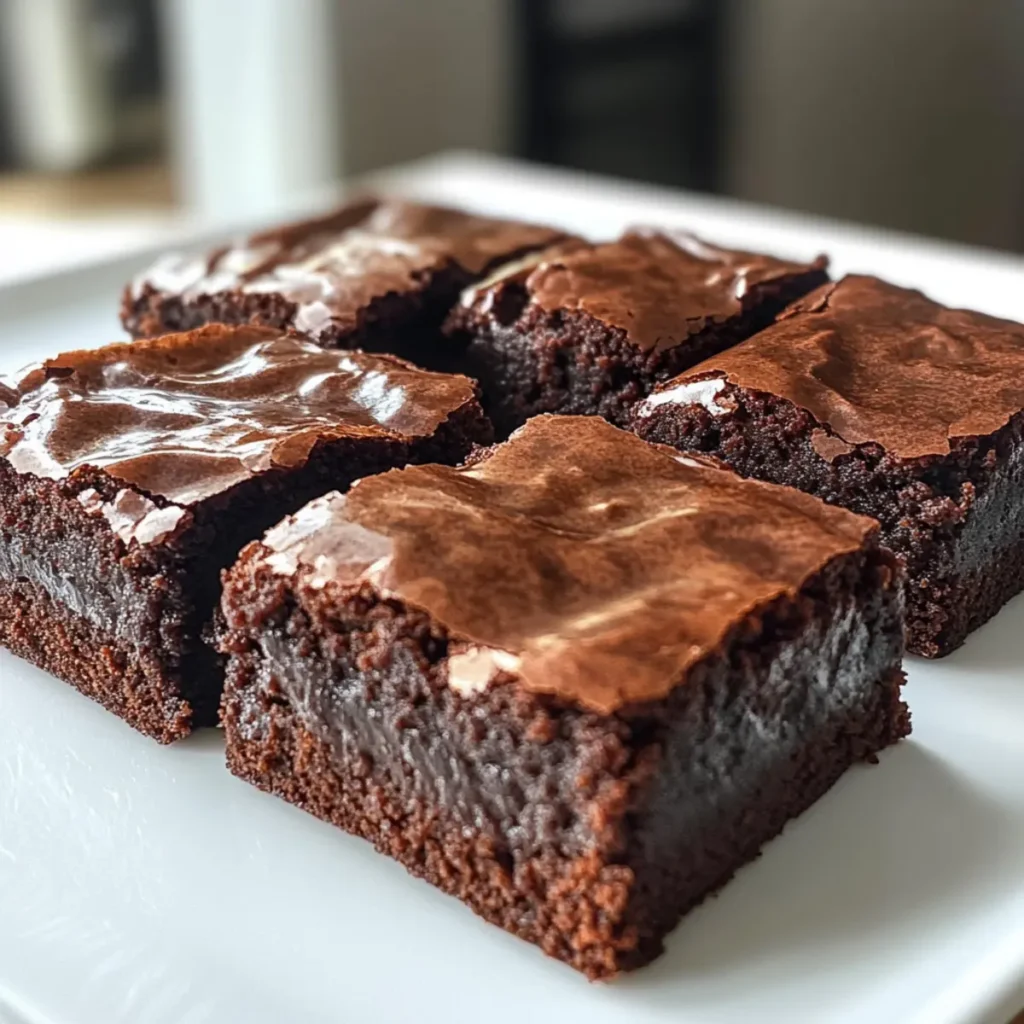
Step 1: Brownie Preparation
Preheat your oven to 350°F (175°C) and prepare two round cake pans by greasing them and lining the bottoms with parchment paper. In a microwave-safe bowl, melt 1 cup of unsalted butter. Stir in granulated sugar and brown sugar until glossy, then mix in eggs, vanilla extract, cocoa powder, flour, and salt. Divide the batter between the pans and bake for 30 minutes. Let them cool completely in the pans on a wire rack.
Step 2: Cheesecake Preparation
Now, increase the oven temperature to 425°F (220°C) for the cheesecake layers. In a large mixing bowl, beat 16 ounces of full-fat cream cheese until light and fluffy, then gradually add granulated sugar. Add in eggs one at a time, mixing well after each addition, followed by sour cream and vanilla extract. Pour the cheesecake batter into the greased pans and bake for 25 minutes or until the edges are set but the center is slightly jiggly. Allow layers to cool before placing them in the freezer to chill.
Step 3: Cookie Preparation
While the cheesecake layers chill, prepare the chocolate chip cookie layers by preheating your oven to 350°F (175°C). Line two more cake pans with parchment and gently spread the chocolate chip cookie dough evenly across the bottom. Bake for about 12 minutes, or until the edges are golden. Remove them from the oven and let them cool in the pans on a wire rack.
Step 4: Frosting Preparation
In a separate bowl, prepare the chocolate frosting by mixing cocoa powder, softened unsalted butter, powdered sugar, and milk until creamy and smooth. For the marshmallow frosting, combine marshmallow fluff and softened butter in a bowl, then gradually add powdered sugar and vanilla extract while beating until light and fluffy. Set both frostings aside for assembly.
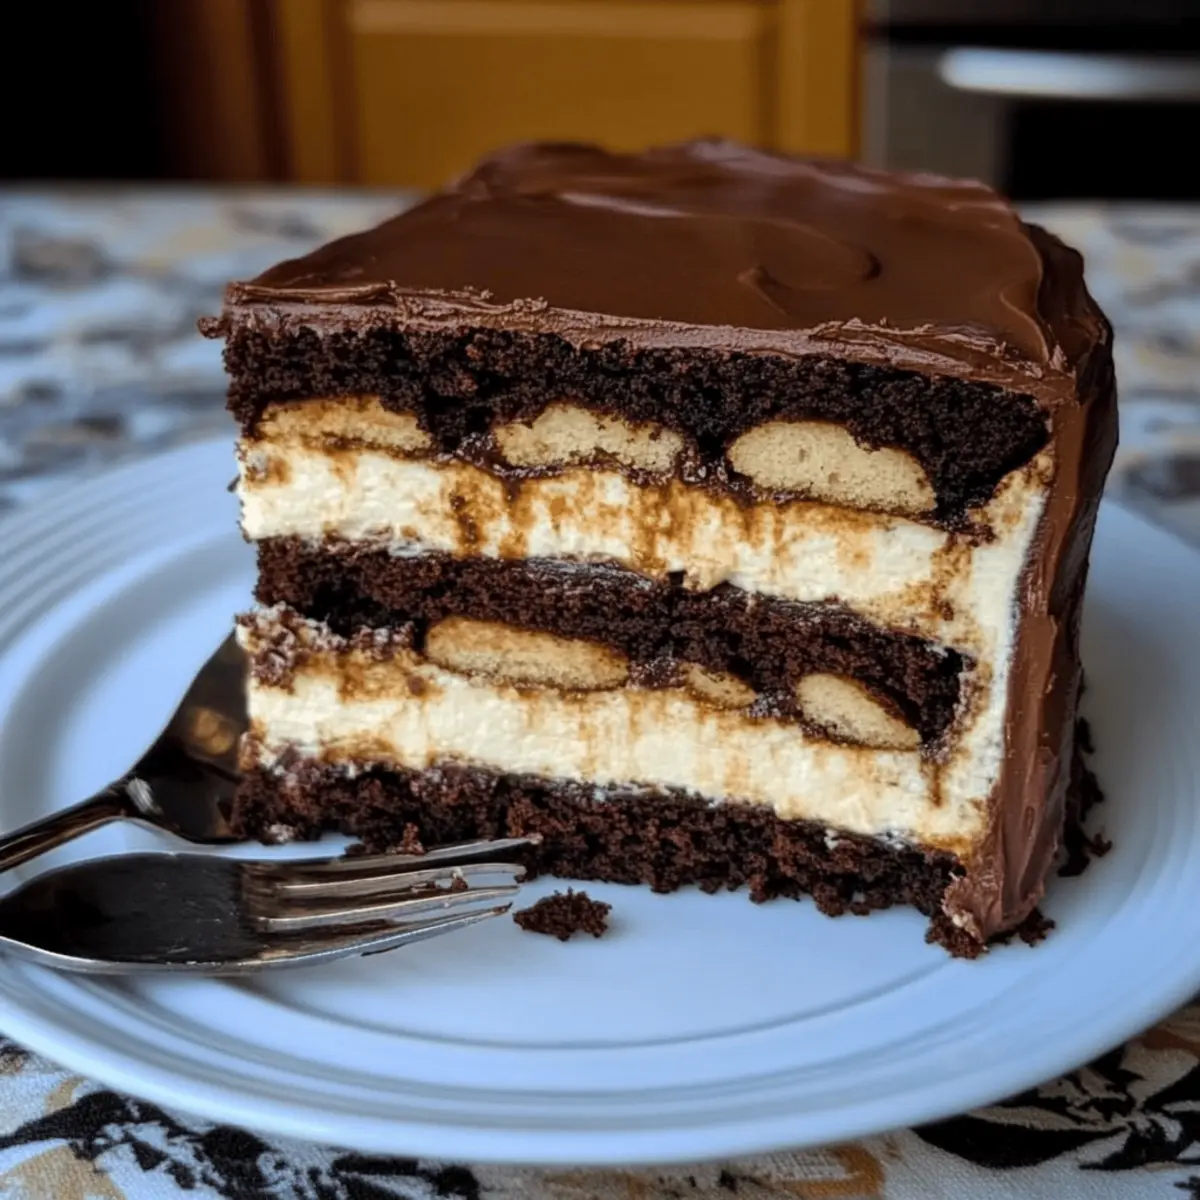
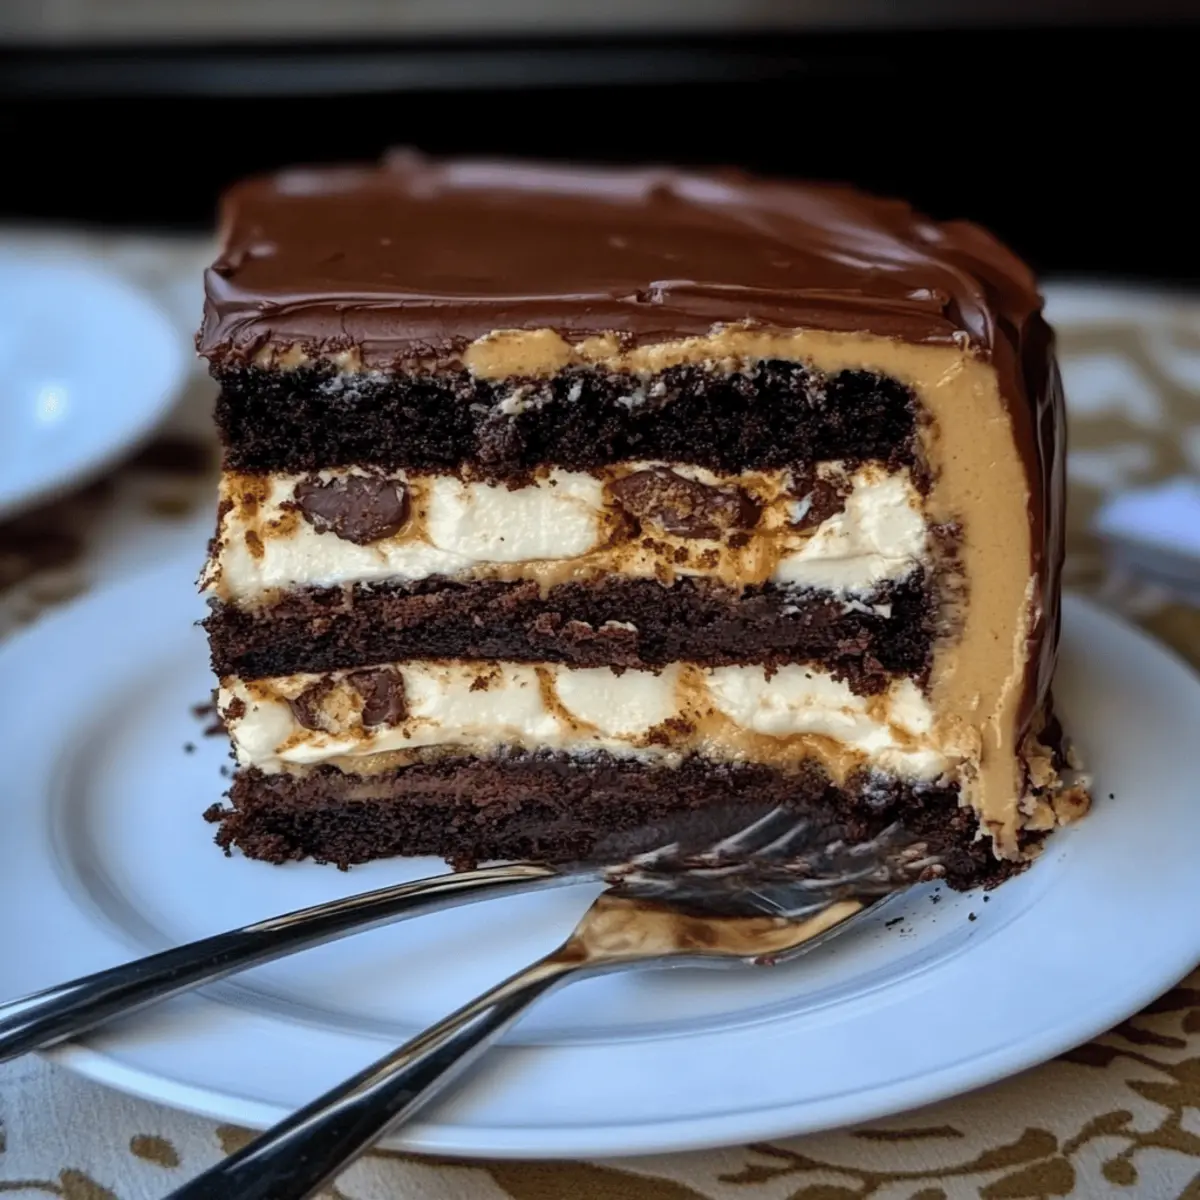
Step 5: Assembly
To create your 7 Layer Sin Cake, start with a brownie layer as the base. Spread a generous layer of marshmallow frosting on top, followed by a chocolate chip cookie layer. Repeat the process with another marshmallow frosting layer, then add a cheesecake layer. Next, spread chocolate frosting on top and place crushed graham crackers evenly. Continue layering in the same order until all elements are used, topping the final layer with chocolate frosting.
Step 6: Final Touch
Once your cake is fully assembled, smooth the remaining chocolate frosting around the sides and on top of the cake. Decorate with extra graham cracker crumbs or chocolate chip cookies as desired. Allow the 7 Layer Sin Cake to set in the refrigerator for at least an hour before slicing. This will ensure the layers hold together beautifully and make for neat servings.
7 Layer Sin Cake Variations
Feel free to let your creativity shine as you customize this delightful cake with these fun twists!
-
Peanut Butter Swirl: Replace chocolate chip cookies with peanut butter cookies for a nutty bliss that enhances each layer’s richness. The creamy peanut butter flavor harmonizes perfectly with the brownie and cheesecake layers.
-
Seasonal Flavors: Use flavored cream cheese such as pumpkin or gingerbread to add a festive touch. This variation seamlessly incorporates seasonal spice into your cake, making it the perfect centerpiece for holiday gatherings.
-
Fruit Infusion: Add fresh berries between layers or top the cake with a fruit compote for a refreshing burst. Strawberries or raspberries work beautifully, offering a tart contrast to the sweet richness.
-
Decadent Drizzle: Enhance the top layer with a drizzle of caramel or chocolate sauce. This extra layer of sweetness not only amps up the visual appeal but provides a luscious finish to every slice.
-
Gluten-Free Option: Swap out all-purpose flour for a gluten-free baking blend in the brownie and cheesecake layers. The result is just as indulgent, ensuring everyone can enjoy a slice of this delightful cake.
-
Extra Crunch: Layer crispy rice cereal mixed with chocolate between some of the layers for added texture. This unexpected crunch adds another delightful layer of surprise that will keep everyone coming back for more.
-
Choco-Mint Bliss: Combine mint extract into the frosting for a refreshing mint-chocolate flavor. It’s a delightful twist, reminiscent of a classic after-dinner mint that your guests will love.
-
Layer Cake Fun: Instead of standard layers, get creative by cutting each layer into shapes or using cookie cutters to present a fun design. Each slice will become a playful surprise, making the cake even more enjoyable for kids and adults alike.
Looking for more enticing desserts to try? Check out this amazing Eggnog Bundt Cake or this fresh and vibrant Limoncello Ricotta Cake to add to your celebration!
Expert Tips for 7 Layer Sin Cake
• Cool Completely: Allow each baked layer to cool completely before frosting to avoid melting or sliding of layers.
• Use Full-Fat Dairy: For both cheesecake and frosting, opt for full-fat cream cheese and unsalted butter; they enhance flavor and texture wonderfully.
• Avoid Overbaking: Keep a close eye while baking the chocolate chip cookie layers; they’re best when soft and chewy rather than dry.
• Layer Fun: Don’t hesitate to mix and match layers. Adding flavored cream cheese or different cookie types can personalize your 7 Layer Sin Cake!
• Refrigerate First: Once assembled, chill the cake for at least an hour before slicing to ensure clean, intact layers for serving.
How to Store and Freeze 7 Layer Sin Cake
Fridge: Keep the cake in the refrigerator, wrapped in plastic wrap or stored in an airtight container, for up to 1 week. This will help maintain its moisture and flavor.
Freezer: You can freeze the assembled cake for up to 3 months. Wrap it tightly in plastic wrap, followed by aluminum foil, to prevent freezer burn before placing it in an airtight container.
Thawing: To enjoy a previously frozen 7 Layer Sin Cake, transfer it to the refrigerator and allow it to thaw overnight. This gentle process retains its creamy and luscious textures.
Reheating: If you prefer serving it warm, slice individual pieces and microwave for about 15-20 seconds to enhance the rich flavors without compromising the layering.
Make Ahead Options
The 7-Layer Sin Cake is an absolute delight for busy home cooks looking to save time without sacrificing flavor. You can prepare the brownie and cheesecake layers up to 3 days in advance; simply cool them completely before refrigerating. You can also bake the chocolate chip cookie layers and let them cool, storing them in an airtight container. For the best results, frost the cake right before serving to keep the layers fresh and prevent sogginess. Assemble the cake a day ahead, storing it in the refrigerator, and it will be just as delicious on serving day! Your friends and family will be amazed by your effortless preparation!
What to Serve with 7-Layer Sin Cake?
Elevate your dessert experience with perfect pairings that complement this showstopping indulgence beautifully.
-
Fresh Berries: Bright and juicy, berries add a refreshing contrast to the rich sweetness of the cake.
-
Vanilla Ice Cream: A scoop of creamy vanilla ice cream balances the dense layers, creating a delightful temperature contrast.
-
Chocolate Coffee: A cup of rich chocolate-infused coffee enhances the cake’s chocolatey attributes, making each bite even more decadent.
-
Minty Whipped Cream: Light and fluffy, whipped cream infused with mint provides a refreshing and airy element, cutting through the cake’s richness.
-
Pecan Pie Bars: For a double dessert treat, serve with nutty pecan pie bars, offering contrasting flavors and textures.
-
Sparkling Beverage: A sparkling wine or fruity soda adds a celebratory flair and helps cleanse the palate between bites of cake.
-
Chocolate-Covered Strawberries: These sweet treats are a romantic addition that echoes the cake’s chocolate theme while offering a fun pop of flavor.
-
Espresso: A shot of bold espresso will wake up your taste buds and brings an energizing quality, balancing the cake’s heavy richness.
Indulging in these delightful pairings will create a memorable dessert experience that your guests will rave about long after the last slice is gone!
Advertisement
7-Layer Sin Cake Recipe FAQs
How do I choose ripe ingredients for the 7-Layer Sin Cake?
Absolutely! For the brownie layers, opt for unsalted butter that’s fresh, preferably within its sell-by date. For the cheesecake, using full-fat cream cheese at room temperature ensures a smooth and creamy texture. When it comes to chocolate chip cookies, choose high-quality semi-sweet chocolate chips for an extra depth of flavor.
What’s the best way to store the 7-Layer Sin Cake?
Very! To keep your cake fresh, wrap it tightly in plastic wrap or store it in an airtight container placed in the refrigerator for up to 1 week. This keeps the layers moist and delicious. Just make sure to keep the frosting intact to maintain its fluffiness!
Can I freeze the 7-Layer Sin Cake?
Absolutely! You can freeze the assembled cake for up to 3 months. First, wrap it tightly in plastic wrap to avoid freezer burn, then cover it with aluminum foil for an extra layer of protection. Place the wrapped cake in an airtight container. When you’re ready to enjoy it, simply remove it from the freezer and thaw it in the refrigerator overnight.
What if I encounter issues while making the cake?
For the best results, cooling all baked layers completely is crucial before frosting; this prevents melting. If your brownie doesn’t rise well, check that your baking powder or baking soda is fresh, as old leaveners can lead to dense layers. Also, be sure not to overbake the chocolate chip cookies; they should come out soft for that perfect chewy texture!
Are there any dietary considerations for the 7-Layer Sin Cake?
Very! While this indulgent treat is not suitable for low-calorie diets, it doesn’t include any specific allergens besides dairy and gluten. If you have guests with allergies, consider modifying the recipe by using gluten-free flour or dairy-free cream cheese to accommodate their dietary needs without losing the delicious flavors you love.
Can I use different flavors for the cheesecake?
Absolutely! A delightful twist would be to use flavored cream cheese, like strawberry or pumpkin, to give your cheesecake layers an exciting seasonal flair. You can also try swapping out the chocolate chip cookies for peanut butter cookies for a deliciously different flavor profile!
Decadent 7 Layer Sin Cake for Your Next Celebration
Ingredients
Equipment
Method
- Preheat your oven to 350°F (175°C) and prepare two round cake pans by greasing them and lining the bottoms with parchment paper. In a microwave-safe bowl, melt unsalted butter. Stir in granulated sugar and brown sugar until glossy, then mix in eggs, vanilla extract, cocoa powder, flour, and salt. Divide the batter between the pans and bake for 30 minutes. Let them cool completely in the pans on a wire rack.
- Increase the oven temperature to 425°F (220°C) for the cheesecake layers. In a large mixing bowl, beat full-fat cream cheese until light and fluffy, then gradually add granulated sugar. Add in eggs one at a time, mixing well after each addition, followed by sour cream and vanilla extract. Pour the cheesecake batter into the greased pans and bake for 25 minutes or until the edges are set but the center is slightly jiggly. Allow layers to cool before placing them in the freezer to chill.
- While the cheesecake layers chill, prepare the chocolate chip cookie layers by preheating your oven to 350°F (175°C). Line two more cake pans with parchment and gently spread the chocolate chip cookie dough evenly across the bottom. Bake for about 12 minutes, or until the edges are golden. Remove them from the oven and let them cool in the pans on a wire rack.
- In a separate bowl, prepare the chocolate frosting by mixing cocoa powder, softened unsalted butter, powdered sugar, and milk until creamy and smooth. For the marshmallow frosting, combine marshmallow fluff and softened butter in a bowl, then gradually add powdered sugar and vanilla extract while beating until light and fluffy. Set both frostings aside for assembly.
- To create your 7 Layer Sin Cake, start with a brownie layer as the base. Spread a generous layer of marshmallow frosting on top, followed by a chocolate chip cookie layer. Repeat the process with another marshmallow frosting layer, then add a cheesecake layer. Next, spread chocolate frosting on top and place crushed graham crackers evenly. Continue layering in the same order until all elements are used, topping the final layer with chocolate frosting.
- Once your cake is fully assembled, smooth the remaining chocolate frosting around the sides and on top of the cake. Decorate with extra graham cracker crumbs or chocolate chip cookies as desired. Allow the 7 Layer Sin Cake to set in the refrigerator for at least an hour before slicing.